Make an oil clay sculpture
Use oil clay to sculpt a small animal or character, practicing shaping, smoothing, and adding details with safe tools and simple step by step techniques.


Step-by-step guide to make an oil clay sculpture
How to Make a Hand Built Ceramic Sculpture: Step by Step Tutorial for Beginners
Step 1
Wash your hands with soap and water.
Step 2
Clear a flat workspace so you have room to sculpt.
Step 3
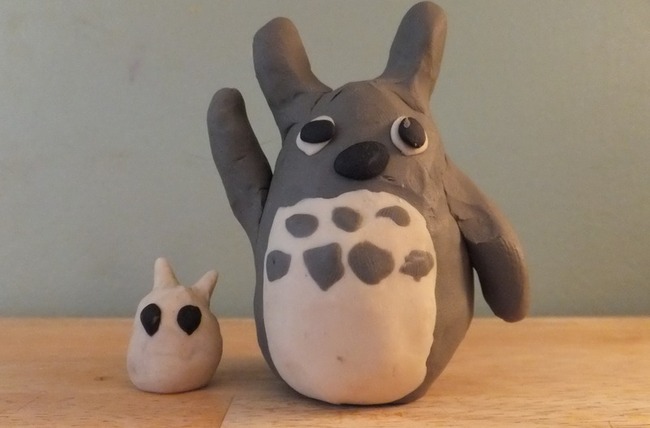
Choose an animal or character you want to make.
Step 4
Look at a simple picture of that animal for reference.
Step 5
Tear off a chunk of oil clay about the size of a ping-pong ball.
Step 6
Soften the clay by rolling it gently between your palms.
Step 7
Roll the softened clay into an oval or ball to form the body.
Step 8
Place the body on your base so it will sit steady.
Step 9
Make a smaller ball of clay to use as the head.
Step 10
Attach the head by pressing it gently onto the body.
Step 11
Roll thin sausage shapes to make legs arms or a tail.
Step 12
Attach each limb or tail by pressing it onto the body.
Step 13
Smooth the seams and blend joins using a plastic tool or your fingertip.
Step 14
Use a toothpick to add eyes mouth and other tiny details.
Step 15
Share your finished creation on DIY.org.
Help!?
What can we use if oil clay is hard to find?
If oil clay is unavailable, use soft modeling clay or playdough on a sturdy base like a plastic lid or piece of cardboard so you can still 'Place the body on your base so it will sit steady.'
Why do the head or legs keep falling off and how can we fix it?
If the head or limbs fall off, press them on firmly, make a shallow socket with the toothpick or tool where the limb joins, then 'Smooth the seams and blend joins using a plastic tool or your fingertip' to secure the bond.
How can I adapt this activity for different ages?
For toddlers, use larger pre-rolled 'oval or ball' bodies and skip toothpick details, for preschoolers have them roll 'sausage shapes' for limbs, and for older kids add finer details with a toothpick or an internal wire armature for stability.
How can we extend or personalize the sculpture once it's finished?
Personalize by pressing textures with leaves or a fork before smoothing seams, adding small found objects for eyes or accessories, and then 'Share your finished creation on DIY.org.'
Watch videos on how to make an oil clay sculpture
LEARN HOW TO MAKE A CLAY HAND - Step-by-Step Clay Art for Beginners | Clay | Clay Art
4 Videos
LEARN HOW TO MAKE A CLAY HAND - Step-by-Step Clay Art for Beginners | Clay | Clay Art
How to Make Modelling Clay at Home for Kids | Homemade Modelling Clay
Step by step ceramic sculpture: hand building a clay figure

DIY clay sculpture: a figure on a rock step by step
Facts about clay sculpting for kids
🧴 Oil-based clays like Plasticine don’t dry out — you can reshape and reuse them again and again.
🗿 Small figurine sculptures such as the Venus figurines are over 25,000 years old.
🧷 Sculptors often build a simple wire armature (a tiny skeleton) to support soft clay shapes.
🪥 Everyday household tools—toothpicks, old toothbrushes, butter knives—make great texture and detail tools.
🧠 Playing with clay helps kids develop fine motor skills, hand strength, and spatial thinking.
How do you make an oil clay sculpture of a small animal or character?
What materials do I need for an oil clay sculpture project?
What ages is oil clay sculpting suitable for?
What are the benefits and safety tips for kids using oil clay?
