Observe life under a microscope
Collect pond water, soil, and leaf samples, safely prepare microscope slides, observe microorganisms' shapes and movements, and draw findings with notes.


Step-by-step guide to observe life under a microscope
Amazing Life under a MICROSCOPE for Kids 🔬 How Does a Microscope Work 🧪 Science Experiments
Step 1
With an adult, scoop a small jar of pond water from a calm spot and close the lid.
Step 2
With an adult, put a small scoop of soil into a separate clean container.
Step 3
Use tweezers to take a tiny piece of a leaf and place it into its own container.
Step 4
Set the microscope on a steady table and make sure it is ready to use.
Step 5
Put a clean microscope slide flat on the table in front of you.
Step 6
Use the pipette to add one drop of pond water to the center of the slide.
Step 7
Put a drop of clean water on a second slide and add a tiny speck of soil or the tiny leaf piece to it.
Step 8
Gently lower a cover slip onto each drop at an angle to avoid trapping air bubbles.
Step 9
Place one prepared slide on the microscope stage and secure it with the clips.
Step 10
Start viewing with the lowest power objective and turn the focus knob slowly until shapes appear.
Step 11
Watch the sample for a few minutes and notice any tiny movements or shapes.
Step 12
Turn the microscope to a higher power objective to look for more detail.
Step 13
Refocus gently on the higher power until the image is clear.
Step 14
Draw what you saw in your notebook with a pencil and label the drawings.
Step 15
Share your finished creation on DIY.org
Help!?
What can we use if we don't have glass slides, cover slips, or a pipette from the materials list?
If you don't have glass slides or cover slips, use the flat side of a clean, clear plastic food-storage lid or a transparent disposable spoon and cover the drop with a tiny square of cling film, and if you lack a pipette use a clean eyedropper or gently suck up pond water with a straw and transfer one drop as directed in the step to add one drop of pond water to the slide.
What should we do if we can't see any shapes when we start viewing at the lowest power like the instructions say?
If nothing appears when viewing on lowest power, check that the prepared slide is centered and secured by the stage clips, confirm the lowest objective is clicked into place, increase the light, and then slowly turn the focus knob until shapes appear per the instructions.
How can we adapt this microscope activity for younger or older kids based on the steps given?
For younger children, have an adult do the scooping, slide preparation, and focusing while the child helps pick the leaf piece with tweezers and draws the visible shapes, and for older kids let them switch to higher power, refocus gently, and try noting finer details before labeling drawings in the notebook.
What are simple ways to extend or personalize the experiment after we've drawn and labeled our observations as the instructions suggest?
To extend the activity, prepare and compare multiple slides (pond water, soil speck, leaf), photograph or sketch each view through the eyepiece, add labeled notes in your notebook about movements or structures, and then share your photos and labeled drawings on DIY.org as the final step recommends.
Watch videos on how to observe life under a microscope
How Does a Microscope Work? 🔬🧬🦠 Fun Science Experiments for Kids! 🧪 #microscope #science
4 Videos
How Does a Microscope Work? 🔬🧬🦠 Fun Science Experiments for Kids! 🧪 #microscope #science
Microscope For Kids - Fun with Science
10 Cool Things to View Under a Microscope

Discover the Hidden World: Microscope Experiments for Curious Kids 🔬kidslearning #jimmydimetime
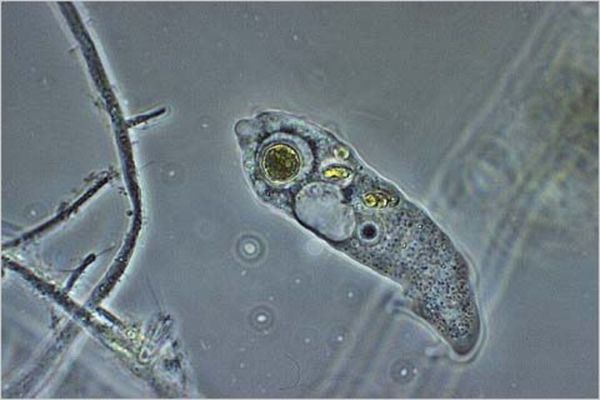
Facts about microscopy and pond microorganisms
🔬 A typical school light microscope can magnify specimens up to about 1,000×, enough to see many bacteria, protozoa, and tiny algae.
🧪 Just one drop of pond water can contain thousands of organisms — from single-celled protozoa to tiny crustaceans called water fleas.
🌱 Many pond plants and leaf surfaces host microscopic algae and bacteria that help recycle nutrients in freshwater ecosystems.
🪨 Diatoms are microscopic algae that build beautiful glass-like shells (frustules) that look like tiny patterned jewels under a microscope.
✏️ Before microphotography, scientists recorded discoveries by making careful drawings and notes — sketching is still a powerful way to observe details.
How do I observe life under a microscope from pond water, soil, and leaf samples?
What materials do I need to observe microorganisms from pond water, soil, and leaf samples?
What ages is observing pond water and soil under a microscope suitable for?
What safety tips should I follow when observing pond water and soil samples?
