Teach us how to draw something awesome
Learn to draw an awesome cartoon superhero step by step, using simple shapes, pencil guidelines, inking, and coloring to create your own unique character.

Drawing Apps
Step-by-step guide to draw an awesome cartoon superhero
Easy Drawing Ideas for Kids | Step by Step Tutorial
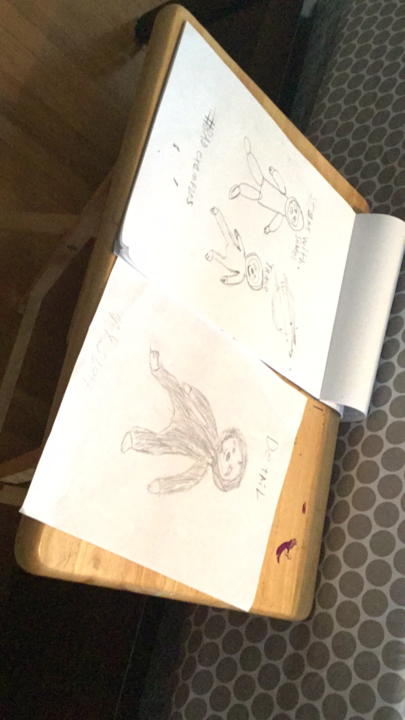
Step 1
Choose a pose for your superhero like flying standing or running.
Step 2
Draw a light stick-figure skeleton to mark the head spine hips and limb positions.
Step 3
Around the stick figure draw simple shapes to build the body (circle for head oval for chest rectangles or ovals for the torso and rounded cylinders for arms and legs).
Step 4
Lightly sketch costume pieces such as a cape mask boots and an emblem shape on the chest.
Step 5
Draw the facial expression and hairstyle so your hero looks brave funny or mysterious.
Step 6
Smooth and connect the simple shapes into a clean final pencil outline of your character.
Step 7
Ink over the final pencil outline with your black marker or pen using steady lines.
Step 8
Once the ink is dry gently erase all remaining pencil guidelines.
Step 9
Color your superhero with bold colors using your coloring materials.
Step 10
Add small details like highlights on the mask shadows on the cape and patterns on the emblem.
Step 11
Draw a simple background or action lines to show motion or a scene.
Step 12
Share your finished superhero on DIY.org
Help!?
What can we use if we don't have a black marker or special coloring materials called for in the instructions?
If you don't have a black marker or pen to ink over the final pencil outline, carefully trace the clean pencil lines with a dark colored pencil or fine-tipped crayon and then color your superhero with watercolors, regular crayons, or whatever coloring materials you have on hand.
Why does my hero look off after I ink and erase the guidelines, and how can I fix it?
If proportions or poses feel wrong, go back to the light stick-figure skeleton and adjust the head, spine, hips, and limb positions and simple build-up shapes before redrawing a smooth final pencil outline, then ink with steady lines and wait for the ink to dry fully before gently erasing pencil guidelines to avoid smudges.
How should I change the steps for different ages so the activity isn't too hard or too easy?
For ages 3–5 simplify to choosing a pose and filling in large simple shapes with crayons (skip inking), ages 6–9 follow the stick-figure, build with shapes and bold coloring, and ages 10+ refine the pencil outline, ink with a black marker, add highlights/shadows and a background or action lines.
What are fun ways to make the superhero more creative or to keep the project going after finishing the drawing?
Extend and personalize the project by designing a unique emblem pattern and cape texture, adding small details like highlights on the mask and shadows on the cape, attaching real fabric or foil for a 3D cape, drawing an action-packed background, and photographing your finished superhero to share on DIY.org.
Watch videos on how to draw an awesome cartoon superhero
How to Draw a Cute CREATIVE ART 🦢❤️ Step by Step Drawing for Kids
4 Videos

How to Draw a Cute CREATIVE ART 🦢❤️ Step by Step Drawing for Kids
Easy drawings step by step for beginners | Cool Things to Draw: Easy, Cool, Cute and Fun Ideas
Drawing a House 🏡 | Fun and Easy Tutorial for Kids with Creative House Drawing Ideas
16 CREATIVE DRAWING HACKS FOR KIDS
Facts about cartoon drawing and character design for kids
🦸♂️ Superheroes often start as simple shapes — artists block out poses with circles, rectangles, and triangles before adding details.
✏️ Pencil guidelines are drawn lightly (artists often use H or 2H pencils) so they can be erased easily after inking.
🖋️ Inking with pens or brushes gives drawings bold, clean lines that scan and print clearly — many artists prefer brush pens for dynamic strokes.
🎨 Traditional comic coloring used four process colors (CMYK) and Ben-Day dots to create shades and textures in print.
👩🎨 Jack Kirby co-created many iconic superhero looks and popularized bold poses and effects like the "Kirby Krackle" energy dots.
How do I teach my child to draw an awesome cartoon superhero step by step?
What materials do I need to draw a cartoon superhero with my child?
What ages is learning to draw a cartoon superhero suitable for?
What are the benefits of teaching kids to draw cartoon superheroes?
