Use Redstone in Minecraft build
Build a working Redstone circuit in Minecraft to power a door, piston, or lamp, learning basic switches, repeaters, and timing.


Step-by-step guide to build a working Redstone circuit in Minecraft
Minecraft Redstone FOR BEGINNERS! 15 Builds to Learn!
Step 1
Pick a flat spot in your Minecraft world where you want to build your redstone circuit.
Step 2
Gather all the listed redstone parts and building blocks in your inventory before you start.
Step 3
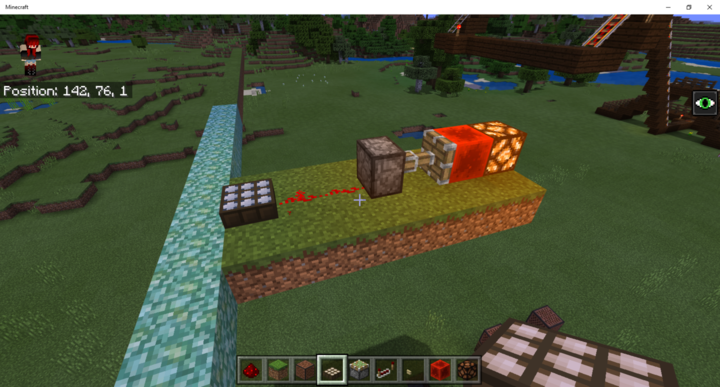
Place the door or piston or redstone lamp in the exact spot you want your circuit to control.
Step 4
Build a small flat platform or wall of building blocks behind or next to the device for the redstone wiring.
Step 5
Lay a line of redstone dust from the device toward where your switch will be so the dust touches the block behind or next to the device.
Step 6
Place your lever or button at the end of the redstone line to act as the switch.
Step 7
Insert a redstone repeater into the redstone line with the arrow on the repeater pointing toward the device.
Step 8
Right-click the repeater to change its delay ticks until the timing feels right for your device.
Step 9
If you used a button and want a longer ON time, add extra repeaters in a row between the button and the device to extend the signal.
Step 10
Test your circuit by flipping the lever or pressing the button and watch the door piston or lamp respond.
Step 11
If it doesn't work, check for gaps in the redstone dust and make sure repeaters are facing the correct direction and touching the line.
Step 12
Hide or decorate your wiring with building blocks so the build looks neat and finished.
Step 13
Take a screenshot or video of your working redstone build and share your finished creation on DIY.org
Help!?
What can I substitute if I don't have redstone repeaters or enough redstone dust?
If you can't find repeaters, extend the signal by laying more redstone dust and use a lever, button, or pressure plate as the switch instead, noting you won't get precise tick delays from repeaters.
My door/piston/lamp doesn't activate—what should I check in the circuit?
If it doesn't work, check for gaps in the redstone dust line, make sure each repeater's arrow is pointing toward the device, and verify the dust is touching the block directly behind or next to the door, piston, or lamp.
How can I modify the activity for younger kids or make it more challenging for older kids?
For younger children use a single lever and a nearby redstone lamp on a small flat platform to practice steps 1–6, while older kids can add multiple repeaters with varied tick delays and extra pistons or doors to create timed sequences or puzzles.
How can we extend or personalize the redstone build after it works?
Hide and decorate the wiring with building blocks, add color-coded redstone lines and extra repeaters for complex timing, or turn it into a secret door or puzzle and then take a screenshot or video to share on DIY.org.
Watch videos on how to build a working Redstone circuit in Minecraft
Redstone 101: The Basics & Getting Started | Minecraft Redstone Engineering Tutorial
4 Videos

Redstone 101: The Basics & Getting Started | Minecraft Redstone Engineering Tutorial
Minecraft: 5+ EASY & USEFUL Redstone Builds!

This is REDSTONE! - The Ultimate Beginner Guide

Minecraft: 5 USEFUL Redstone Build Hacks!
Facts about Minecraft Redstone and basic circuits
⚡ Redstone power in Minecraft travels up to 15 blocks from a source before fading, so planning distance matters!
🧰 Repeaters both boost weak Redstone signals and add adjustable delays, perfect for timing doors and pistons.
🧠 Players have used Redstone to build working calculators and simple CPUs inside Minecraft using logic gates.
🚪 Buttons, levers, pressure plates, and Redstone torches all act as switches you can use to control doors and lamps.
🛠️ Pistons can push many block types but can't move blocks like obsidian or bedrock, which makes puzzle design trickier.
How do I build a working Redstone circuit in Minecraft to power a door, piston, or lamp?
What materials do I need to build a Redstone circuit in Minecraft?
What ages is building Redstone circuits in Minecraft suitable for?
What are the benefits of building Redstone circuits and what variations or safety tips should I know?
