Build a compound machine
Build a compound machine from levers, pulleys, wheels and ramps using cardboard, string, and tape to lift objects and learn mechanics.


Step-by-step guide to build a compound machine
Compound Machine Projects
Step 1
Gather all Materials Needed and put them on a clear workspace
Step 2
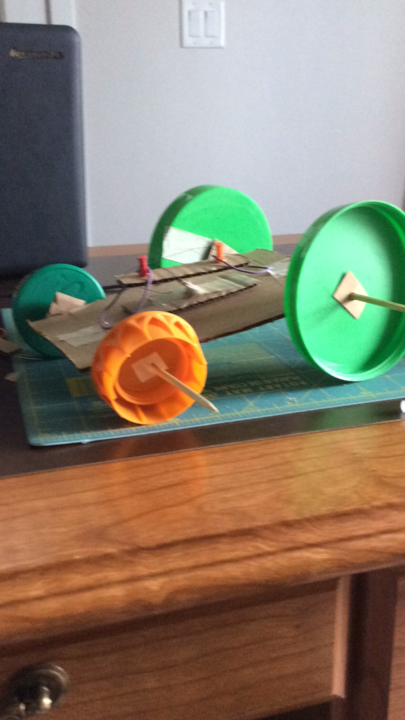
Cut a sturdy cardboard rectangle about 30 cm by 20 cm to make the base
Step 3
Cut two small cardboard support blocks about 4 cm tall
Step 4
Tape the two support blocks upright near one short edge of the base so they stand side by side
Step 5
Push a pencil through the supports so it rests as a spinning axle
Step 6
Cut two cardboard circles about 6 cm across to be wheels
Step 7
Slide a cardboard circle onto each pencil end and tape them so the wheels stay in place and can spin
Step 8
Cut a ramp from cardboard and tape one long edge to the base so it leans up against the wheels
Step 9
Cut a flat rectangular piece of cardboard to act as a lever plank
Step 10
Tape a small cardboard fulcrum block to the base a short distance from the ramp and lay the lever plank across the fulcrum
Step 11
Tie one end of the string to the small cup or light object you want to lift
Step 12
Run the string over the pencil axle like a pulley and tie the other end to the far end of the lever plank
Step 13
Press down the free end of the lever plank to lift the cup and watch your compound machine lift the object
Step 14
Share a photo or video of your finished compound machine on DIY.org
Help!?
What can we use instead of the pencil axle or the cardboard wheels if we don't have them?
If you don't have a pencil for the axle, use a wooden dowel, chopstick, or a long skewer, and replace the 6 cm cardboard circles with bottle caps, plastic lids, or cut circles from yogurt cups so they can slide onto the axle and be taped in place.
What should we do if the wheels stick and won't spin or the axle falls out of the support blocks?
If the wheels stick to the pencil or the axle slips out of the two support blocks, add short pieces of drinking straw on the pencil as bushings before sliding on the cardboard wheels and reinforce the two support blocks with extra tape to the base so the axle rests firmly yet can still rotate.
How can we change this activity to suit different ages or skill levels?
For younger kids have an adult pre-cut the 30×20 cm base, 4 cm support blocks, ramp, and wheels and let them assemble and operate the lever and cup, while older kids can measure and cut exact sizes, add straw bearings to the pencil axle, and experiment with pulley placements and lever distances for more challenge.
How can we extend or personalize the compound machine after it's working?
To extend the project, decorate the base and cardboard wheels, add a second pulley on the pencil axle or another lever plank to lift heavier cups, vary the ramp angle by re-taping the ramp edge, and record a video to share your finished machine on DIY.org.
Watch videos on how to build a compound machine using levers, pulleys, wheels, and ramps
Compound Machines
4 Videos
Compound Machines

Compound Machines - When Machines Team Up!
Learn How Simple Machines Work! Engineering for Kids!
Simple Machines | Compound Pulley | Compound Pulleys and its Types | Types of Pulley | Science
Facts about simple machines and basic mechanics
🛠️ Compound machines combine two or more simple machines—like levers, pulleys, wheels, and ramps—to make work easier.
⚖️ A lever can trade force for distance: move the fulcrum and you can lift heavier things with less push.
🔁 A single fixed pulley only changes direction, but a block-and-tackle pulley system can multiply how much you can lift.
🛞 The wheel and axle was invented thousands of years ago and dramatically reduced the effort needed to move heavy loads.
📐 An inclined plane (ramp) lowers the force needed to lift an object by increasing the distance you move it.
How do you build a compound machine from cardboard, string, and tape?
What materials do I need to build a cardboard compound machine?
What ages is building a compound machine suitable for?
What are the benefits of building a compound machine with children?
