Draw hair in any style
Draw hair in different styles using pencils, markers, and references. Practice textures, shapes, and shading to create unique hairstyles and improve observation.

Drawing Apps
Step-by-step guide to draw hair in different styles
Step 1
Gather your materials and set them on a clean flat surface so everything is ready to draw.
Step 2
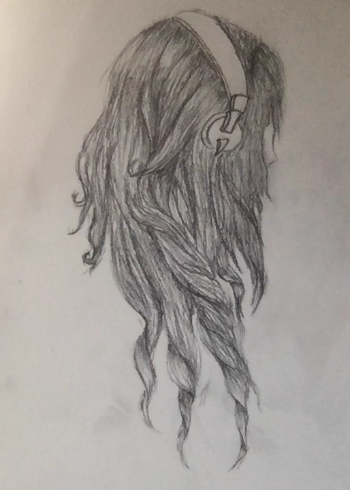
Pick three reference photos that show different hair types like straight curly wavy or short so you have variety to study.
Step 3
Look closely at the first reference and notice the big shapes the hair makes around the head; say them out loud.
Step 4
Lightly draw a simple head shape on your paper to act as the base for the hair.
Step 5
Mark the hairline and the main direction the hair flows with light strokes to plan where hair will fall.
Step 6
Block in the large outer shapes of the hairstyle using soft pencil strokes to capture the overall silhouette.
Step 7
Add long flowing strokes or short choppy strokes to show the hair texture matching the reference you are copying.
Step 8
Darken areas where hair overlaps or falls into shadow to create depth using gentle pencil pressure.
Step 9
Use your eraser to lift tiny lines for highlights where the light hits the hair to make it look shiny.
Step 10
Repeat Steps 6 to 9 for your second and third reference on the same page or new pages to practice different styles.
Step 11
Use markers or colored pencils to add color and bold edges to one drawing to make that style pop.
Step 12
Share your finished hair drawings on DIY.org so others can see your cool hairstyles.
Help!?
What can we use if we don't have 'soft pencils', markers, or printed reference photos?
Use an HB or 2B pencil for the 'soft pencil' strokes in Steps 5–7, substitute crayons or watercolor for the markers/colored pencils in Step 10, and use smartphone photos or magazine clippings for the three reference photos in Step 2.
My hair drawings look flat—what step should I redo to add depth?
Go back to Step 7 to darken overlapping areas and shadows and then use your eraser as in Step 8 to lift tiny highlight lines so the hair gains depth and shine.
How can this activity be adjusted for younger children or older kids?
For younger kids, provide a pre-drawn head from Step 4 and have them focus on blocking in shapes in Step 5 with chunky strokes, while older kids can refine texture in Step 6 and emphasize shadows/highlights in Steps 7–9 plus color in Step 10.
How can we extend or personalize the hairstyle drawings after finishing the basic steps?
Mix textures from your three references by repeating Steps 6–9 on different sections of one head, add bold color and edges per Step 10, and create a mini-portfolio to share on DIY.org as suggested in Step 11.
Watch videos on how to draw hair in different styles
☆ HOW TO DRAW 6 HAIRSTYLES || Easy Tutorial! ☆
3 Videos
☆ HOW TO DRAW 6 HAIRSTYLES || Easy Tutorial! ☆

Learn to Draw Hair from Beginner to Pro in Just One Video!

How to Draw All Types of Hair - EASY for BEGINNERS
Facts about drawing techniques for kids
🎨 Artists often draw hair as flowing shapes and clumps first — a few confident strokes can read as a full hairstyle.
✏️ Pencil grades (like HB, 2B, 6B) let you layer light to dark tones — softer pencils make richer, darker hair shading.
🧑🎨 The average human head has about 100,000 hairs, so illustrators suggest implying mass and texture rather than drawing every strand.
🖊️ Felt-tip markers give bold, even color fast — combining marker flats with pencil or ink details creates realistic texture.
👀 Squinting at a reference helps you spot big shapes and values in hair, so you draw structure before tiny strand details.
How do you draw hair in different styles with pencils and markers?
What materials do I need to draw hair styles with my child?
What ages is this hair-drawing activity suitable for?
What are the benefits and safe variations of practicing hair textures and shading?
