Share a Picture of Your Mini Studio
Create a mini studio corner with art or music supplies, arrange and decorate it, then photograph your setup and share the picture with others.


Step-by-step guide to share a picture of your mini studio
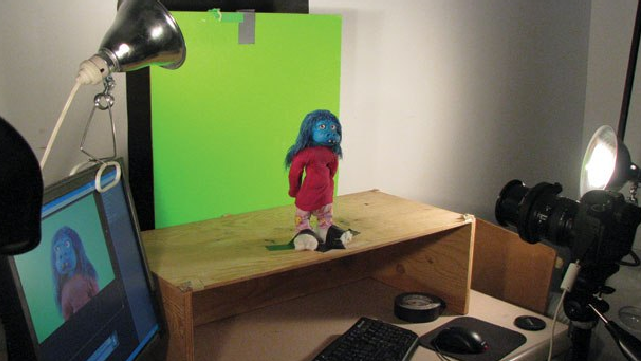
Step 1
Pick a small corner or tabletop where you want to make your mini studio.
Step 2
Clear the chosen space by putting away toys and clutter so the area is tidy.
Step 3
Set the small table or box and place the chair or cushion where you will sit.
Step 4
Bring your art supplies and music supplies to the studio area.
Step 5
Put the supplies where they are easy to reach for example pencils in a cup and instruments on a tray.
Step 6
Decorate the walls or table with stickers posters or fabric to make the space feel special.
Step 7
Add a lamp or fairy lights to brighten the studio area.
Step 8
Display one finished drawing or your favorite instrument where visitors can see it.
Step 9
Tidy loose items into the small tray or box so everything looks neat.
Step 10
Wipe the table surface with the clean cloth to make the area photo-ready.
Step 11
Ask an adult to help you take a clear photo of your mini studio from a few different angles.
Step 12
Choose your best photo write a short caption about your studio and share it on DIY.org
Help!?
What can we use instead of a lamp, fairy lights, or a small tray if we don't have them?
If you don't have a lamp, fairy lights, or a small tray for Steps 6 and 9, bright natural daylight or a flashlight can light the space and a clean shoebox or baking tray can hold loose items and instruments.
My photo came out blurry or the studio still looks messy in pictures—what should I fix?
For blurry photos and messy-looking surfaces, wipe the table with the clean cloth from Step 10, tidy loose items into the small tray or box from Step 9, and ask an adult to hold the camera steady or prop it up when taking photos in Step 11.
How can I adapt this mini studio activity for younger or older kids?
For younger kids, limit choices to one chair, one tray, and simple stickers and ask an adult to help with Steps 2, 10, and 11, while older kids can organize supplies by type, add a themed backdrop, and write a longer caption before sharing on DIY.org in Step 12.
How can we personalize or extend the studio after it's set up?
To personalize and extend the studio, create a rotating mini gallery by displaying a new finished drawing on the wall from Step 7 each week, add labeled pencil cups or a color-coded supply system on the table from Step 5, and record a short performance with your instrument to include in your caption on DIY.org.
Watch videos on how to share a picture of your mini studio
Art Project For Kids: How To Design A Diorama
4 Videos
Art Project For Kids: How To Design A Diorama
Easy DIY Pottery with Make It Real Mini Pottery Wheel Studio

Art Studio Tour 🎨 How I Set Up and Organized my Small, Cozy, Minimalist Home Studio on a Budget
My Small Art Studio Setup ✶ Room & Desk Tour ✏️🌷 working from home | artist diaries vlog
Facts about creating mini studios for kids
🎨 Many artists keep a tiny corner or portable sketchbook — small spaces are perfect for big ideas!
📸 Window light (especially mid-morning or late afternoon) gives soft, even photos without needing a flash.
🧰 Everyday things like jars, shoeboxes, and muffin tins make amazing organizers and props for a mini studio.
🎧 You can record multi-track music at home with just a smartphone or free apps — tiny studios can make full songs.
🌟 Sharing one clear photo of your setup can inspire people around the world and start creative friendships.
How do I create and photograph a mini studio corner to share?
What materials do I need for a mini studio corner and to photograph it?
What ages is the mini studio picture-sharing activity suitable for?
What are the benefits of creating and sharing a picture of a child's mini studio?
