Make a toilet roll rocket
Build a toilet roll rocket using a cardboard tube, paper fins, tape, and a straw launcher, then test and improve flight stability and distance.


Step-by-step guide to make a toilet roll rocket
Step 1
Gather all the materials and find a clear space to work.
Step 2
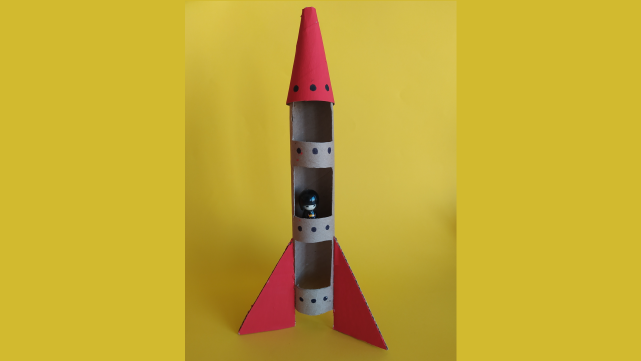
Use colouring materials to decorate the outside of your tube however you like.
Step 3
Cut a cone-shaped nose from paper or cardstock to fit one end of the tube.
Step 4
Put a small bit of clay or sticky tack inside the paper cone for nose weight.
Step 5
Tape the paper cone over one end of the tube so it stays on firmly.
Step 6
Use your pencil and ruler to mark three or four evenly spaced spots around the open end for fins.
Step 7
Draw fin shapes on paper at a size that looks good for your tube.
Step 8
Cut out the fin shapes with scissors.
Step 9
Tape the fins to the marked spots on the tube so the flat edge is against the tube.
Step 10
Slide the open end of the rocket onto the straw so the straw sits centered inside the tube.
Step 11
Blow a sharp puff into the straw to launch your rocket and watch it fly.
Step 12
Measure how far your rocket flew using a ruler or by counting steps.
Step 13
Watch whether the rocket wobbled tilted or flew straight and remember what happened.
Step 14
Make one change to improve flight such as moving the clay trimming a fin or bending a fin slightly.
Step 15
Take a photo or write what you tried and share your finished toilet roll rocket on DIY.org.
Help!?
What can I use if I don't have sticky tack, clay, or a plastic straw?
If you don't have clay or sticky tack for nose weight, use a small coin or a wad of aluminum foil taped inside the paper cone, and if you don't have a straw make a launch tube by tightly rolling and taping a strip of paper so you can slide the open end of the rocket onto it.
My rocket keeps wobbling or won't launch smoothly—what should I try?
If it wobbles, ensure the three or four fins are taped evenly and straight around the open end, try bending or trimming a fin and moving the clay inside the cone for balance, and if it won't slide onto the straw trim the straw end or slightly widen the tube opening so you can blow a sharp puff into the straw to launch your rocket smoothly.
How can I adapt this activity for younger or older kids?
For younger children, pre-cut the cone and fin shapes and let them decorate the outside of the tube and stick pieces on with tape while an adult handles scissors and the straw launch, and for older kids have them use the pencil and ruler to mark fin spacing, test different nose weights, and measure how far your rocket flew after each change.
How can we extend or personalize the toilet roll rocket for more experiments or display?
To extend the activity, decorate and name each toilet roll rocket, record how changes like moving the clay or trimming/bending a fin affect distance when you measure how far your rocket flew, build a cardboard launch stand for consistent launches, or attach a small paper parachute or streamer to change landing behavior.
Watch videos on how to make a toilet roll rocket
HOW TO: MAKE YOUR OWN ROCKET | DIY WITH A TOILET ROLL
4 Videos

HOW TO: MAKE YOUR OWN ROCKET | DIY WITH A TOILET ROLL

Easy Kids Crafts | How to make a Rocket

How to make a Rocket from a Paper Roll? | Easy Rocket | Build a Rocket | Rocket Ship Crafts | DIY

How To Make A Paper Rocket At Home | Zoom Zoom Rocket DIY Kids Craft
Facts about aerodynamics and basic model rocketry
🚀 Little rockets (like a toilet-roll launcher) fly best when their center of mass is a bit forward—real rockets do the same!
🪁 Three fins often make a stable tripod that helps small rockets fly straight instead of tumbling.
🎯 Tiny differences in fin shape or placement can make a rocket drift a lot, so neat, identical fins help accuracy.
♻️ Using a cardboard tube and scrap paper turns trash into a toy—an easy upcycle activity kids love.
🔬 Engineers change one thing at a time when testing rockets—try only one tweak (fin size or nose weight) to see what helps most.
How do I build a toilet roll rocket that flies well?
What materials do I need to make a toilet roll rocket?
What ages is a toilet roll rocket activity suitable for?
What are the benefits, safety tips, and variations for toilet roll rockets?
