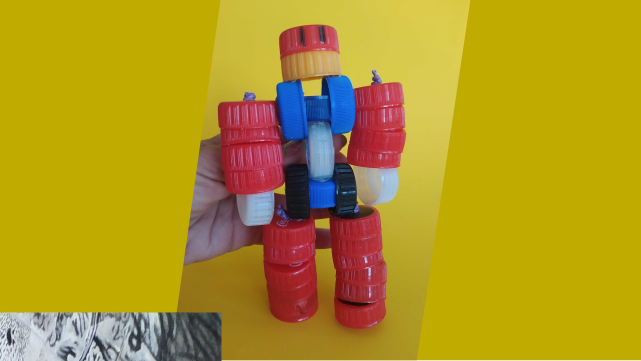
Build a plastic cap robot
Make a small robot using plastic bottle caps, cardboard, glue, and pipe cleaners; design movable arms and decorate while learning about balance and creativity.


Step-by-step guide to build a plastic cap robot
Step 1
Gather all your materials and put them on a clear workspace.
Step 2
Pick two bottle caps one for the body and one for the head.
Step 3
Cut a small rectangle of cardboard about the same width as the body cap to make a base.
Step 4
Glue the body cap to the center of the cardboard base.
Step 5
Glue the head cap on top of the body cap.
Step 6
Carefully make two small holes opposite each other near the rim of the body cap for the arms.
Step 7
Thread two pipe cleaners through the holes so equal lengths stick out on both sides.
Step 8
Twist the pipe cleaner ends inside the cap to anchor each arm.
Step 9
Bend the outer parts of the pipe cleaners to shape arms and make hands.
Step 10
Glue two small cardboard feet under the base to help the robot stand.
Step 11
Draw a face buttons and other details on the caps with your colouring materials.
Step 12
Stand the robot on a flat surface to check its balance.
Step 13
Adjust the feet or bend an arm slightly until the robot stands steady.
Step 14
Share your finished plastic cap robot on DIY.org
Help!?
What can we use instead of pipe cleaners or cardboard if we don't have them?
If you don't have pipe cleaners, use thin craft wire or twist ties threaded through the holes for arms, and if you lack cardboard for the base, cut a piece from a cereal box or use a sturdy plastic lid to glue the body cap onto.
My pipe cleaner arms keep slipping out or the head cap falls off—how do I fix that?
If arms slip, make the two small holes with a hole punch or heated needle and twist the pipe cleaner ends tightly inside the cap as instructed, and if the head cap comes loose, add a dab of stronger glue or a bit of hot glue between the body and head caps to secure them.
How can I adapt this activity for younger toddlers or older kids?
For toddlers, have an adult glue the body cap to the cardboard base and pre-punch holes so they can simply thread pipe cleaners and color the face, while older kids can cut their own base, use hot glue for stronger bonds, add small screws or LEDs, or build multi-cap robots.
What are creative ways to enhance or personalize the plastic cap robot after finishing it?
Personalize your robot by gluing on buttons or googly eyes, drawing button-controls as the instructions suggest, bending extra pipe cleaners to make antennae, adding cardboard arms or cap-wheel attachments under the feet so it can roll, and then share photos on DIY.org.
Watch videos on how to build a plastic cap robot
How to make a Robot| Robot DIY| Robot with unused materials| Kids craft| DIY Robot Craft for Kids
4 Videos
How to make a Robot| Robot DIY| Robot with unused materials| Kids craft| DIY Robot Craft for Kids
10 Robotics Projects Kids Can Really Make!
10 Easy Robotics Projects Made With Cardboard | Perfect For Education
DIY Mini Robot: Simple Motorized Creation Using Everyday Materials | How to Make Mini Robot Easy Art
Facts about upcycling crafts for kids
♻️ Plastic bottle caps are often made from polypropylene and can take hundreds of years to break down if not recycled.
🧩 Upcycling turns waste into new creations — many craft projects save energy and materials compared with manufacturing new items.
📦 Corrugated cardboard is lightweight but strong because of its fluted inner layer, which is why builders and model-makers love it.
⚖️ A robot stays upright when its center of mass stays over its base — moving the arms shifts that point and can make it topple or balance.
🧵 Pipe cleaners were originally used to clean smoking pipes, but crafters adopted them because they're easy to bend and hold shapes.
How do I build a plastic cap robot with my child?
What materials do I need to make a plastic cap robot?
What ages is this activity suitable for?
What are the benefits of building a plastic cap robot?
