Make the plastic bottle guiro
Create a guiro from a plastic bottle by cutting shallow ridges and scraping with a stick or spoon to explore rhythm, sound, and vibration.


Step-by-step guide to make a plastic bottle guiro
Step 1
Peel off the label from the bottle.
Step 2
Use scissors to cut off the bottle cap and neck.
Step 3
Use scissors to cut off the bottom of the bottle so you have a middle sleeve.
Step 4
Draw several parallel lines around the sleeve with the marker about one centimetre apart.
Step 5
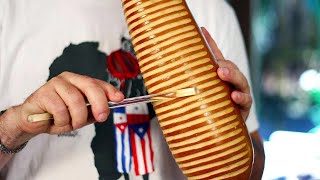
Make shallow short cuts along each marked line with the scissors to form ridges without cutting all the way through.
Step 6
Rub the cut edges lightly with sandpaper or a nail file to smooth any sharp bits.
Step 7
Hold the plastic sleeve firmly in one hand keeping the ridged side facing out.
Step 8
Scrape a wooden stick or spoon across the ridges to make sound and listen to the rhythm.
Step 9
Try scraping at different speeds and angles to explore different tones and vibrations.
Step 10
Carefully deepen a few ridges slightly if you want a louder or sharper sound.
Step 11
Decorate your guiro with the marker if you want to personalize it.
Step 12
Share a photo or video of your finished guiro and what sounds you discovered on DIY.org.
Help!?
I don't have sandpaper or a nail file; what can I use to smooth the cut edges?
If you don't have sandpaper or a nail file, gently rub the cut edges (step 'Rub the cut edges lightly with sandpaper or a nail file to smooth any sharp bits') with the rough side of a kitchen sponge, a folded fine-grit emery board, or a strip of denim until smooth.
The guiro makes almost no sound — what troubleshooting steps should I try?
Ensure you made shallow short cuts along each marked line (step 'Make shallow short cuts along each marked line') without cutting through, then carefully deepen a few ridges (step 'Carefully deepen a few ridges slightly if you want a louder or sharper sound') and scrape firmly with the wooden stick or spoon at different speeds and angles while holding the sleeve steady (step 'Hold the plastic sleeve firmly').
How can I adapt this activity for different age groups?
For preschoolers have an adult do the scissor and sanding steps while the child draws the parallel lines and decorates (steps 'Draw several parallel lines...' and 'Decorate your guiro with the marker...'), for elementary-aged kids supervise as they cut shallow ridges and practise scraping (steps 'Make shallow short cuts...' and 'Scrape a wooden stick...'), and for older kids encourage experimenting with deeper ridges, different bottle sizes (step 'cut off the bottom of the bottle') and mounting the sleeve to a box for more resonance.
How can we enhance or personalize the guiro beyond the basic instructions?
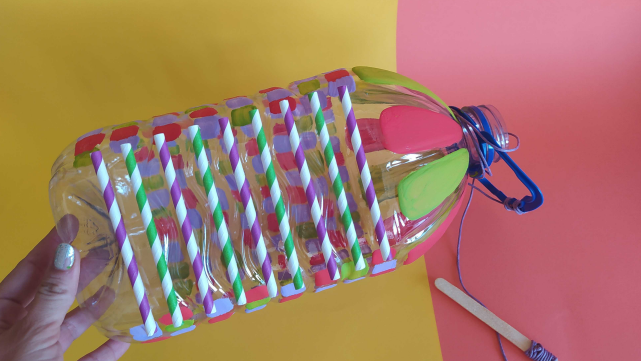
To enhance and personalize your guiro, attach the sleeve to a small wooden box or empty tissue box to amplify the sound, try different scrapers like a comb or metal spoon to change tones, and decorate the sleeve with markers or stickers as in step 'Decorate your guiro with the marker'.
Watch videos on how to make a plastic bottle guiro
Soundworks: How to Make a Guiro Using a Water Bottle
4 Videos
Soundworks: How to Make a Guiro Using a Water Bottle

DIY Music - Let's Make a Guiro!
How To Make A Bottle Guitar (3 Parts and NO Tools)
Plastic Bottle Guitar | How to Make Musical Instruments using Recycled Materials
Facts about recycled musical instruments
🥁 The güiro is a Latin American scraped percussion instrument traditionally made from a hollow gourd with parallel notches.
♻️ Hundreds of billions of plastic bottles are sold worldwide each year, so upcycling bottles into instruments helps reduce waste.
🎶 Scraping ridges produces vibrations that make sound — change the scrape speed or ridge spacing to alter rhythm and tone.
🧰 A simple bottle guiro needs just a plastic bottle, a stick or spoon for scraping, and shallow ridges cut into the side.
🌱 Making instruments from trash is a fun hands-on way for kids to learn about music, science, and sustainability.
How do I make a guiro from a plastic bottle?
What materials do I need to make a plastic bottle guiro?
What ages is the plastic bottle guiro activity suitable for?
What are the benefits, safety tips, and variations for the plastic bottle guiro?
