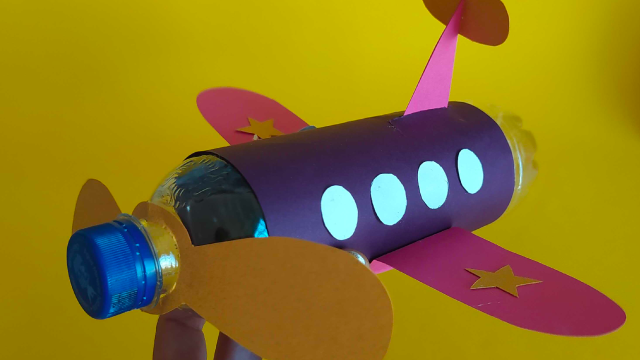
Create a bottle airplane
Make a flying model airplane from a recycled plastic bottle, adding wings, tail, and a nose cone to test balance and glide performance.


Step-by-step guide to create a bottle airplane
Step 1
Empty the bottle completely so it is light and ready to use.
Step 2
Dry the bottle with a towel until no water remains.
Step 3
Peel off the label so the bottle surface is clean.
Step 4
Use the marker and ruler to draw a straight centerline along the length of the bottle.
Step 5
Balance the bottle on your finger to find the balance point and mark that spot with the marker.
Step 6
Cut two wing shapes from the cardboard using scissors.
Step 7
Cut a horizontal tailplane and a vertical fin from the cardboard.
Step 8
Roll a cone from cardboard and tape it closed to make a nose cone.
Step 9
Tape the two wings to the bottle at the marked balance point so they sit straight and level.
Step 10
Tape the horizontal tailplane and the vertical fin to the back of the bottle.
Step 11
Tape the nose cone onto the bottle’s front opening securely.
Step 12
Press a small piece of modeling clay or a coin into the nose area to start the balance tuning.
Step 13
Stand at chest height and gently toss your bottle airplane forward to test its glide.
Step 14
Make small adjustments to balance or wing position and retest until the glide is smooth.
Step 15
Share a photo or video of your finished bottle airplane on DIY.org.
Help!?
What can we use if we don't have modeling clay or a coin for the nose weight?
Use tightly rolled aluminum foil, small metal washers, a few pebbles sealed in tape, or a dab of hot glue pressed into the bottle's nose area to tune the balance point.
My bottle airplane keeps nosediving or stalling — what should I check?
Check that the cardboard wings are taped straight and level at the marked balance point, move the modeling clay or nose weight slightly forward or backward, and make sure the nose cone and tailplane are taped on securely for a smoother glide.
How can I adapt this activity for younger or older kids?
For younger children, pre-cut the cardboard wings, nose cone, and tailplane and let them tape and decorate the bottle, while older kids can cut precise wing shapes with scissors and a ruler, add dihedral, and fine-tune balance with coins or washers.
How can we extend or personalize the bottle airplane once it flies well?
Try different wing shapes and sizes from cardboard, add small tape trim tabs to the horizontal tailplane, experiment with coin or clay positions in the nose, attach a popsicle-stick landing gear, and decorate before sharing a photo on DIY.org.
Watch videos on how to create a bottle airplane
5 Easy Paper Airplanes that Fly REALLY Far! — How to Make the Easiest Paper Airplanes
4 Videos

5 Easy Paper Airplanes that Fly REALLY Far! — How to Make the Easiest Paper Airplanes
Origami Airforce Paper Airplane | Easy Tutorial!
FLIES OVER 100 FEET!!! How to Make an EASY Paper Airplane in 1 Minute (60 Seconds)
How to Make the Perfect Paper Airplane | Paper Airplane Tutorial - Step-by-Step Guide
Facts about model airplane building for kids
✈️ Model gliders rely heavily on their center of gravity — move the weight just a little and the flight can change from smooth to nosedive or stall.
♻️ About 1 million plastic bottles are bought worldwide every minute, so turning one into a toy plane helps reduce waste in a tiny, fun way.
🪂 A longer wingspan and slender wing shape usually give a better glide ratio, while shorter, wider wings make the model more stable at low speeds.
🧰 Small trim adjustments like taped flaps or a tiny clay weight on the nose let you fine-tune balance and steer the glide without rebuilding.
🏆 Schools and STEM clubs often use simple recycled-bottle airplanes to teach test-and-improve engineering: iterative tweaks lead to much better flights.
How do you make a flying model airplane from a recycled plastic bottle?
What materials do I need to build a bottle airplane?
What ages is making a recycled bottle airplane suitable for?
What safety tips and variations can we try with a bottle airplane?
