Design Your Own Flying Machine
Design and build a simple model flying machine using paper, cardboard, straws, tape, and balloons, then test and improve its flight safely.


Step-by-step guide to Design Your Own Flying Machine
Step 1
Pick one flying machine idea you want to test.
Step 2
Draw a simple sketch that shows the body wings tail and where the balloon will go.
Step 3
Gather all the materials from the list and bring them to your work surface.
Step 4
Cut a rectangular piece of cardboard to make the body of your machine.
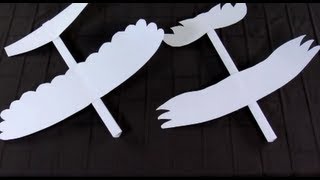
Step 5
Make two paper wings by folding or cutting paper to the size in your sketch.
Step 6
Make a small paper tail by cutting and folding a paper piece.
Step 7
Tape a straw along the front edge of each wing to make the wings stiffer.
Step 8
Tape the wings and the paper tail to the cardboard body in the positions from your sketch.
Step 9
Insert a straw partway into the balloon mouth and tape the balloon to the straw to make a sealed nozzle.
Step 10
Tape the balloon and straw assembly to the body so the straw points backward.
Step 11
Go to an open area away from people pets and fragile things for your test.
Step 12
Inflate the balloon by blowing air through the straw.
Step 13
Pinch the straw to hold the air in the balloon.
Step 14
Release the straw to launch your machine and step back to watch.
Step 15
Share your finished flying machine and what you learned on DIY.org
Help!?
What can we use if we don't have straws, balloons, or cardboard from the materials list?
If you don't have straws, use the hollow barrel from a ballpoint pen or a short rolled-paper tube for the 'Insert a straw...' step, cut a cereal-box panel instead of cardboard for the body, and if you lack balloons use the finger of a clean rubber glove taped to the tube as the air bladder.
My flying machine spins, dives, or barely moves—what should I check or fix?
If it spins or dives, recheck and reseal the balloon-to-straw nozzle ('tape the balloon to the straw'), stiffen the wings by adding more tape along the front edge as in 'Tape a straw along the front edge of each wing', and move the paper tail or add a small nose weight on the cardboard body to correct the balance.
How can I adapt the activity for younger or older kids?
For ages 3–6 have an adult pre-cut the rectangular cardboard body and wings and help attach the balloon assembly so the child can place and decorate parts, while older kids can follow 'Draw a simple sketch', try different wing shapes and sizes, and record flight distance after inflating and launching.
How can we extend or personalize our flying machine after the basic test?
To extend the activity decorate the cardboard body, experiment by taping two balloon-and-straw assemblies to the body ('Tape the balloon and straw assembly') for more thrust, or add a small paperclip nose weight to compare how balance changes flight distance and share results on DIY.org.
Watch videos on how to Design Your Own Flying Machine
Design a Flying Machine
4 Videos
Design a Flying Machine
DIY Wind Turbine Science Project
Simple Science Project for School: Build a Mini Airplane to Impress Your Class | inventions
Making Flying Machines (fun STEM activity for kids)
Facts about aerodynamics for kids
✈️ The Wright brothers made the first controlled, powered flight in 1903 at Kitty Hawk — it lasted 12 seconds and proved human flight was possible!
🎈 The first manned hot‑air balloon flight in 1783 in Paris opened up a whole new way to think about lift and buoyancy.
📄 The world record for the farthest paper airplane flight is 69.14 meters (226 ft 10 in), showing tiny tweaks can make a huge difference!
🧠 Leonardo da Vinci sketched lots of flying-machine ideas in the late 1400s, including an “aerial screw” that looks a bit like a helicopter prototype.
🪁 Simple models like paper planes and gliders teach lift and drag — changing wing shape, angle, or weight helps you tune how far and steady they fly.
How do I design and build a simple flying machine with balloons?
What materials do I need to build a paper and balloon flying machine?
What ages is designing a flying machine suitable for?
What are some fun variations and ways to improve the flying machine?
