Practice drawing a hand
Practice drawing a hand step-by-step using simple shapes, tracing, and shading to learn proportions, finger placement, and improve observation and confidence.

Drawing Apps
Step-by-step guide to practice drawing a hand
Step 1
Place a sheet of paper flat on a table and put your pencil and eraser next to it.
Step 2
Place your non-dominant hand flat on the paper with fingers slightly apart.
Step 3
Trace lightly around your hand with the pencil to get the basic outline.
Step 4
Lift your hand straight up off the paper.
Step 5
Smooth the traced outline with your pencil and draw a short wrist line.
Step 6
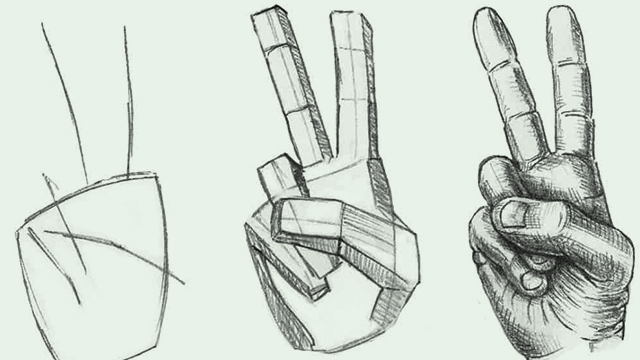
Mark each finger’s knuckle positions with small dots or light lines.
Step 7
Divide each finger into three segments by drawing light lines for the joints.
Step 8
Connect the segment edges to turn the segments into rounded finger shapes.
Step 9
Draw small curved shapes at the tips of the fingers to make fingernails and add a few palm creases.
Step 10
Shade lightly along one side of each finger and in the palm creases to show roundness.
Step 11
Erase the light construction lines so only your clean hand drawing remains.
Step 12
Share your finished hand drawing on DIY.org
Help!?
What can we use instead of a pencil or eraser if we don't have them?
If you don't have a pencil, use a ballpoint pen, colored pencil, or crayon to trace, and if you lack an eraser, use a white vinyl eraser or gently lift marks with a clean soft cloth after shading.
My tracing keeps smudging or the outline looks messy—how can I fix that?
Trace very lightly as step 3 says, lift your hand straight up without sliding (step 4), then smooth the traced outline (step 5) and erase only the light construction lines so your rounded finger shapes and shading stay clean.
How can I adapt this activity for younger or older kids?
For younger children, simplify by tracing with a thick marker and skipping knuckle dots and segment lines, while older kids can add knuckle dots, divide each finger into three segments, refine rounded finger shapes, draw fingernails and palm creases, and practice light shading for roundness.
What are some ways to extend or personalize the finished hand drawing?
Extend the activity by drawing different hand poses, adding details like painted fingernails, rings or bracelets, experimenting with stronger side shading for depth, and sharing the best version on DIY.org.
Watch videos on how to practice drawing a hand
LEARN TO DRAW A HAND EASY WITH BLOCKS! (ART LESSONS FOR KIDS)
3 Videos
LEARN TO DRAW A HAND EASY WITH BLOCKS! (ART LESSONS FOR KIDS)
![How to Draw Hands [ Simple Techniques to Remember ]](https://img.youtube.com/vi/yR9Tc-nYX4U/mqdefault.jpg)
How to Draw Hands [ Simple Techniques to Remember ]

How to draw Hands in 10 Minutes | Tutorial | Drawlikeasir
Facts about drawing for kids
✋ The human hand has 27 bones — tiny parts add up, so breaking a hand into simple shapes helps!
✏️ Many artists start hand drawings with basic shapes (ovals for palms, cylinders for fingers) to nail proportions fast.
👍 The opposable thumb makes pinching and gripping possible — studying its angle is key to realistic finger placement.
⏱️ Quick gesture sketches (30–60 seconds) sharpen observation and make poses look more natural.
🧑🎨 Masters like Leonardo da Vinci made detailed hand studies; copying old studies is a super practice shortcut.
How do I practice drawing a hand step-by-step?
What materials do I need to practice drawing a hand?
What ages is this hand drawing activity suitable for?
What are the benefits and safe variations of practicing hand drawing?
