Show us the settings of your canvas on procreate
Create a step-by-step poster showing Procreate canvas settings, including size, DPI, orientation, and layers, using screenshots or simple drawings with labels.


Step-by-step guide to show the settings of your canvas on Procreate
Step 1
Open Procreate and create a new canvas or open the canvas you want to show.
Step 2
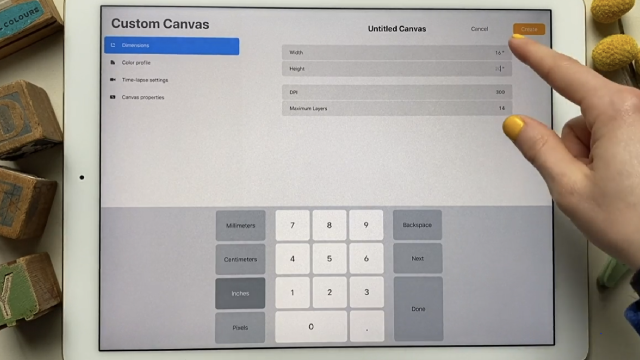
Go to the screen in Procreate that displays the canvas size DPI and orientation.
Step 3
Take a screenshot of that canvas settings screen.
Step 4
Open the Layers panel in Procreate so the layer stack is visible.
Step 5
Take a screenshot of the Layers panel showing the layers and layer count.
Step 6
If you did not take screenshots draw simple sketches of the two screens on plain paper now.
Step 7
Cut out your printed screenshots or your drawn sketches with scissors.
Step 8
Arrange the cutouts on a clean sheet of plain paper in a clear poster layout.
Step 9
Use your pencil to write clear labels for Size DPI Orientation and Layers next to each picture.
Step 10
Use colouring materials to add arrows highlights and color to make each label easy to read.
Step 11
Use tape to glue the cutouts and labels in place on your poster.
Step 12
Add a big title at the top that says "Procreate Canvas Settings" and write your name below it.
Step 13
Take a photo or scan your finished poster so it is ready to upload.
Step 14
Share your finished creation on DIY.org
Help!?
What can I use instead of a printer, scissors, or tape if I don't have them?
If you don't have a printer, scissors, or tape, redraw the two screenshots by hand as the instructions allow, use safety scissors or carefully tear the paper for cutouts, and substitute a glue stick or double-sided tape (or assemble the poster digitally in Procreate) to attach pieces.
I can't find the Canvas Size/DPI screen or the Layers panel—what should I do?
Open Procreate's Actions (wrench) > Canvas > Crop & Resize to view Size and DPI, tap the Layers icon in the top-right to show the layer stack, use your iPad's screenshot shortcut (Side+Volume Up or Home+Side) or AssistiveTouch to capture screens, and if screenshots fail follow the instruction to draw simple sketches instead.
How can I adapt this project for different ages?
For younger kids have an adult pre-print and pre-cut the screenshots so the child only colors and labels, for elementary kids let them cut, arrange, and write the Size/DPI/Orientation and Layers labels themselves, and for teens have them make the entire poster digitally in Procreate using actual screenshots and annotated layers.
How can we extend or personalize the poster to make it more interesting?
Extend the activity by adding a comparison section with two different canvas settings (different DPI or orientations), color-code and arrow-annotate the Layers on the poster, decorate with stickers or washi tape, and include a photo/scan of the finished poster when you upload it.
Watch videos on how to show the settings of your canvas on Procreate
How To Use Procreate For Beginners (and everything I use it for)
4 Videos
How To Use Procreate For Beginners (and everything I use it for)

PROCREATE Drawing for Beginners - EASY Step by Step Tutorial
Procreate for Kids Tutorial // How to Use Procreate for Kids!
Procreate for Beginners: The Ultimate Introduction to Procreate
Facts about Procreate and digital art for kids
🎨 Procreate was created by Savage Interactive and launched for iPad artists in 2011 — it's now one of the most popular digital painting apps.
📏 DPI stands for "dots per inch"; for crisp printed posters aim for around 300 DPI, while screens usually show 72–132 DPI.
🖼️ Canvas size × DPI determines pixel dimensions and file size — bigger canvases and higher DPI can make files grow into hundreds of megabytes.
🧩 The number of layers you can use in Procreate depends on canvas size and your iPad's memory — smaller canvases let you add many more layers.
💾 Procreate can export layered PSD files so you can preserve layers and continue editing in Photoshop or other programs.
How do you make a step-by-step poster showing Procreate canvas settings?
What materials do I need to create a Procreate canvas settings poster?
What ages is this Procreate canvas settings poster activity suitable for?
What are the benefits, safety tips, and variations for this activity?
