Ink your comic book
Ink your comic book pages by tracing pencil sketches with pens and markers, practicing line weight, shading, corrections, and clean black areas for expressive storytelling.


Step-by-step guide to ink your comic book
Step 1
Gather all your materials and set them on a flat clean workspace so everything is easy to reach.
Step 2
Place one pencil-sketched comic page on the workspace and a scrap paper next to it for testing.
Step 3
Test each pen on the scrap paper to see how thin or thick the lines look and how the black fills appear.
Step 4
Use your ruler and a medium fineliner to ink the panel borders so your frames are neat and straight.
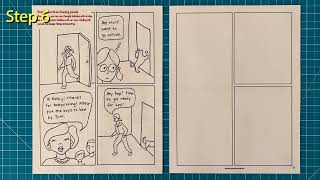
Step 5
Ink the main character lines and important details with a thin fineliner following your pencil sketch.
Step 6
Add line weight by retracing outer shapes with a thicker pen or pressing a little harder to make some lines thicker.
Step 7
Add shading using thin pen hatching or stippling in shadow areas to build depth without smudging.
Step 8
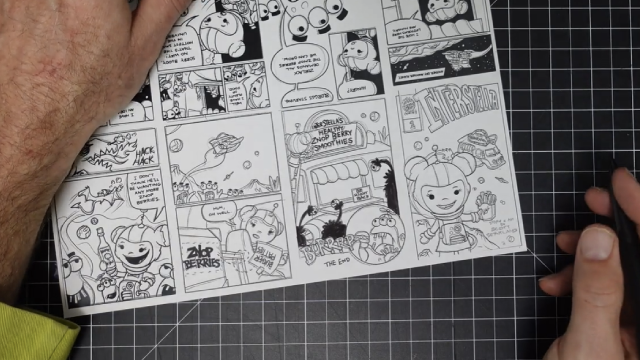
Fill large black areas with your brush pen or black marker using smooth even strokes for a clean look.
Step 9
Let all ink dry completely for a few minutes so it does not smear.
Step 10
Gently erase the pencil lines with your eraser to reveal clean inked art.
Step 11
Fix small mistakes and tidy edges with a white gel pen or correction fluid and make any final touch ups.
Step 12
Share your finished inked comic page on DIY.org
Help!?
What can I use if I don't have a brush pen or black marker to fill large black areas?
Use India ink with a flat paintbrush or black acrylic paint applied in smooth strokes to fill large black areas, then let it dry completely.
My ink keeps smudging or bleeding—what should I check or change while following the steps?
If ink smudges, wait longer before erasing, test pens on the scrap paper to check for bleed, and use the ruler with a medium fineliner for neat borders while filling blacks with steady, even strokes.
How can I adapt this inking activity for different age groups?
Give younger kids pre-sketched panels and thick washable markers to ink main shapes, while older kids can use thin fineliners, add line weight, hatching, and brush-pen fills following the full steps.
How can we extend or personalize the finished inked comic page after erasing pencil lines?
Scan the cleaned inked page and add color digitally or apply watercolor washes, then add highlights with a white gel pen or correction fluid before sharing on DIY.org.
Watch videos on how to ink your comic book
Kids Make Comics #7: Making Comic Panels
4 Videos

Kids Make Comics #7: Making Comic Panels
How to Make a Comic Book

How to ACTUALLY make your First Comic?
How I Make Mini Comics? (step by step) PART I
Facts about comic book inking
🎨 Inking isn't just tracing — many professional inkers reinterpret or refine pencils to improve clarity and storytelling.
✒️ Traditional inking tools include brushes, dip pens, and technical pens, each giving different line weights and textures.
🖤 Solid black areas (flats) are a powerful storytelling tool — they can set mood, show depth, and guide the reader's eye.
⏱️ Depending on detail and workflow, a pro inker typically finishes about 2–6 pages a day.
👩🎨 Famous inkers like Joe Sinnott and Klaus Janson played huge roles in defining how iconic comic characters look on the page.
How do you ink your comic book pages?
What materials do I need to ink comic book pages?
What ages is this inking activity suitable for?
What are the benefits of inking comic book pages?
