Design a cover for your mini comic
Design and create an illustrated cover for your mini comic using drawing, color, lettering, and layout to practice composition and storytelling skills.


Step-by-step guide to design a cover for your mini comic
Step 1
Think of one scene or character that best shows your mini comic story and decide the mood you want the cover to feel like.
Step 2
Write a short punchy title idea on scrap paper so you can try different words quickly.
Step 3
Make three tiny thumbnail sketches on scrap paper showing different cover layouts to try out ideas fast.
Step 4
Circle the thumbnail you like best so you know which design to make larger.
Step 5
Draw light pencil margins and a title box on your cover paper to plan where everything will sit.
Step 6
Lightly sketch the main image or character inside the central area using simple shapes.
Step 7
Add background shapes or a few supporting elements around the main image to balance the page.
Step 8
Sketch the title lettering in the title box and try one clear style for the letters.
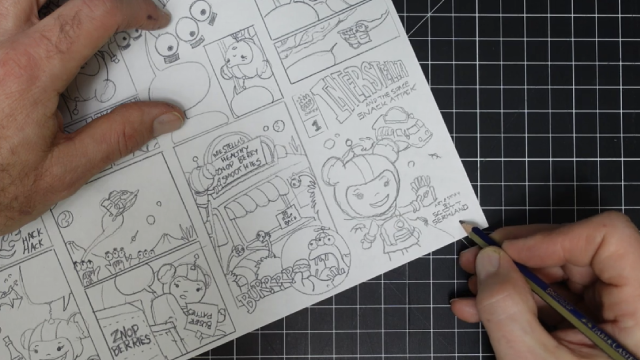
Step 9
Trace over your final pencil lines with a black pen or fineliner to make the outlines bold.
Step 10
Gently erase the pencil marks once the ink is fully dry so the cover looks clean.
Step 11
Choose three main colors on scrap paper to make a simple color palette for your cover.
Step 12
Color your cover using your chosen colors filling large areas first then small details.
Step 13
Add highlights or tiny details with your pen or a light color to make things pop.
Step 14
Make one small tweak if you see a spot that needs fixing to finish your cover.
Step 15
Share your finished mini comic cover on DIY.org
Help!?
What can I use if I don't have a black fineliner or pen to trace the final lines?
If you don't have a black fineliner, carefully trace the final pencil lines from the 'Trace over your final pencil lines with a black pen or fineliner' step using a thin-tipped permanent marker or a sharpened dark pencil held firmly for a clean outline.
My ink keeps smudging when I erase—how do I prevent that?
Follow the 'Gently erase the pencil marks once the ink is fully dry' instruction by waiting until the ink is completely dry and then erase gently with a soft eraser, wiping outward from the ink lines to avoid smudges.
How can I adapt this activity for different ages or skill levels?
For younger kids, simplify the 'Lightly sketch the main image or character using simple shapes' step and let them use broad markers for the 'Color your cover' step, while older kids can add detailed background elements, more complex 'title lettering', and finer shading.
What are easy ways to personalize or extend the mini comic cover after finishing?
To personalize and extend the cover, add a small collage piece or textured paper in the background during the 'Add background shapes' step, use metallic gel pens for extra 'highlights or tiny details', and scan the result to make matching interior pages before you 'Share your finished mini comic cover on DIY.org'.
Watch videos on how to design a cover for your mini comic
How To Make A Mini-Comic with One Sheet Of Paper
4 Videos

How To Make A Mini-Comic with One Sheet Of Paper
How I Make Mini Comics? (step by step) PART I
How to Make Your Own Comic | Toontorial | @cartoonnetworkuk
How I Make a Mini-Comic
Facts about comic illustration and design for kids
🎨 Many classic comic covers use a limited palette (3–4 colors) to create bold, eye-catching designs.
📚 A great cover tells a mini-story — readers often decide to pick up a comic just from the cover image.
✍️ Lettering style affects tone: blocky letters feel loud and heroic, while script feels graceful or mysterious.
🏆 Action Comics #1 (1938) — Superman’s first cover — has sold at auction for over $3 million, making it one of the most valuable comic covers.
📝 Professional cover artists usually start with tiny thumbnail sketches to plan composition before making the final art.
How do I design a cover for my mini comic?
What materials do I need to create a mini comic cover?
What ages is designing a mini comic cover suitable for?
What are the benefits of making a mini comic cover?
