Show us your comic with word balloons and lettering
Draw a short comic strip with word balloons and lettering, design characters, write dialogue and sound effects, ink and color your panels.

Step-by-step guide to draw a short comic strip with word balloons and lettering
Step 1
Draw a rectangle for your comic strip layout using your pencil and ruler so you have a stage for your story.
Step 2
Divide the rectangle into 3 to 6 panels by drawing straight pencil lines to create separate scenes.
Step 3
Sketch tiny thumbnail ideas on scrap paper to try out different character poses and actions quickly.
Step 4
Write a short 2 to 3 sentence story outline on scrap paper to plan what happens in each panel.
Step 5
Lightly draw your characters and simple backgrounds in each panel with your pencil.
Step 6
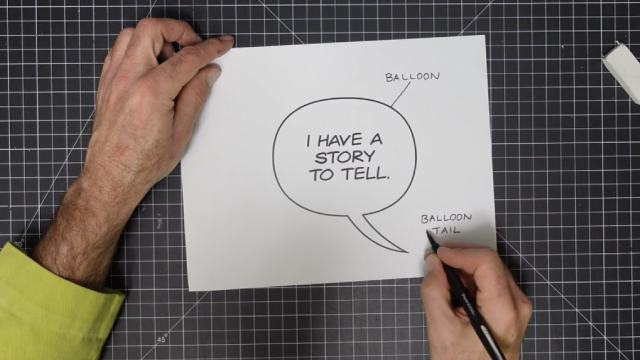
Draw word balloons in each panel where characters will speak leaving clear space for words.
Step 7
Write the dialogue inside the word balloons lightly with pencil so you can check spacing.
Step 8
Add small sound-effect words lightly with pencil where you want noises like "BAM" or "whoosh".
Step 9
Ink the characters and panel borders with your black pen or fineliner to make your drawings pop.
Step 10
Ink the word balloons and lettering carefully with your black pen to make the words clear.
Step 11
Wait until the ink is completely dry so it won’t smudge.
Step 12
Erase the pencil lines gently after the ink is dry to clean up your comic.
Step 13
Color your panels with colouring materials to bring your story to life.
Step 14
Add bold lettering or extra small details with your black pen to emphasize action and sound effects.
Step 15
Share your finished comic on DIY.org
Help!?
I don't have a fineliner or black pen to ink the comic (steps 9–11); what can I use instead?
Use a regular ballpoint pen, a thin-tipped marker, or a sharpened graphite pencil to ink characters, panel borders, word balloons, and lettering in steps 9–11, testing on scrap paper first to check for smudging.
My pencil lines smudged or erased the ink when I tried to clean up after inking (step 12); how can I prevent or fix that?
Prevent smudging by waiting until the ink is completely dry as advised in step 10, use a low-smudge pen or marker, and gently remove pencil lines with a soft or kneaded eraser in step 12.
How can I adapt this comic activity for younger children or older kids (steps 1–6 and 9–15)?
For younger children, limit to 1–3 large panels, pre-draw simple characters for them to color in steps 5 and 13, and have them fill short phrases in word balloons in step 6, while older kids can expand to 6 panels, use detailed thumbnail planning in step 3, refine inking in steps 9–11, and experiment with bold lettering and extra effects in step 14.
What are ways to extend or personalize the comic after finishing (steps 13–15)?
Scan or photograph the colored panels from step 13 to add digital effects, create a series using the thumbnail workflow in step 3, customize sound-effect lettering in step 14, and share your finished or expanded comic on DIY.org in step 15.
Watch videos on how to draw a short comic strip with word balloons and lettering
How To Letter Comics - Word Balloons!
4 Videos
How To Letter Comics - Word Balloons!
Drawing word balloons • #4/12 of Lettering Comic Books & Manga in Procreate
How to Make Your Own Comic | Toontorial | @cartoonnetworkuk
How to draw Basic Comic Effects #1 - Lettering and Speech Bubbles - Live with Frank Rodgers
Facts about comic art and cartooning for kids
🗨️ The Yellow Kid, from the 1890s, is often credited as the first modern comic strip.
✍️ Before digital fonts, most comics were hand-lettered by specialist letterers who were as important as the artists.
💥 Comic sound effects like “BAM!” and “POW!” are examples of onomatopoeia that help readers 'hear' the action on the page.
🎨 Many newspaper comic strips ran in black-and-white on weekdays and in full color on Sundays.
🧑🎨 Charles M. Schulz drew the Peanuts comic strip every day for nearly 50 years (1950–2000).
How do I help my child draw a short comic strip with word balloons and lettering?
What materials do I need to make a comic with word balloons, lettering, inking and coloring?
What ages is making a short comic strip suitable for?
What are the benefits of making comics for kids?
