Draw the 3 layers of landscape of your comic
Draw three landscape layers for your comic: a detailed foreground, a clear middle ground, and a distant background to show depth and mood.

Drawing Apps
Step-by-step guide to draw the three landscape layers for your comic
Step 1
Gather your materials and find a comfortable table or floor spot to work.
Step 2
Decide what kind of comic scene you want and choose the mood (happy spooky calm exciting).
Step 3
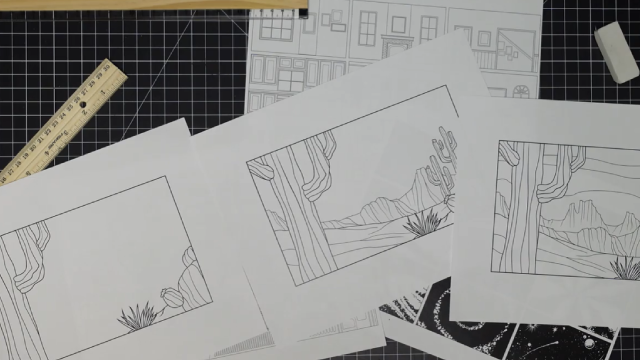
Use your pencil and ruler to lightly draw two horizontal lines to divide the page into three layers: foreground middle ground and background.
Step 4
In the background layer draw simple soft shapes for faraway things like hills clouds or a tiny city on the horizon.
Step 5
In the middle ground draw clearer medium-sized elements like trees houses or a road that are bigger than the background shapes.
Step 6
In the foreground draw large detailed objects like rocks a character or big plants that take up the front of the page.
Step 7
Draw at least one object that overlaps between two layers so the layers connect and look like they sit in front of each other.
Step 8
Add small details only to the foreground like textures lines leaves or facial features to make it look close and interesting.
Step 9
Use lighter softer colors and less detail for the background and stronger darker colors and contrast for the foreground as you color.
Step 10
Outline important shapes with your black pen to make them pop and erase any stray pencil lines.
Step 11
Look over your comic and make one small change to improve the mood or depth like darkening a shadow or adding a tiny cloud.
Step 12
Share your finished comic with the three layers on DIY.org.
Help!?
What can we use instead of a ruler or a black pen if we don't have them?
If you don't have a ruler to lightly draw the two horizontal guide lines, use the straight edge of a book or a piece of cardboard, and if you lack a black pen to outline important shapes use a dark marker or sharpened colored pencil instead.
My layers look messy and not separate — how can I fix that?
If your layers look flat or messy, erase stray pencil marks, redraw the two horizontal lines lightly with a straight edge, make foreground objects bigger and more detailed while softening background shapes and colors, then outline key shapes with your black pen to increase contrast and depth.
How can I change this activity for different ages?
For younger kids simplify by drawing one big foreground object and using stickers or crayons for the background with adult help for the pencil-and-ruler lines, while older kids can add perspective lines, multiple overlapping elements, detailed foreground textures, and subtler color contrasts as described in the coloring step.
How can we enhance or personalize the comic beyond the basic instructions?
To personalize your comic, add speech bubbles or a torn-paper collage for foreground texture, experiment with darkening a shadow or adding a tiny cloud to change the mood as the instructions suggest, then outline important shapes and share the finished piece on DIY.org.
Watch videos on how to draw the three landscape layers for your comic
How To Draw a Landscape--Art Lesson For Kids
4 Videos
How To Draw a Landscape--Art Lesson For Kids
Comic Frames in Clip Studio Paint - Comic Panels Tutorial
How To Draw A Spring Landscape

Let's Draw a Landscape Drawing Easy For Kids and Beginners.
Facts about landscape composition in comic art
🎨 Many comic artists divide scenes into foreground, middle ground, and background to guide the reader's eye.
👀 Your eyes judge distance using cues like overlap, relative size, and sharpness.
🌫️ Atmospheric perspective makes distant objects look paler and bluer, helping show depth.
🖌️ Adding lots of detail in the foreground and simplifying the background instantly creates a sense of distance.
✏️ Cartoonists often use thicker lines for foreground objects and thinner lines for background ones to show depth.
How do I draw the three layers of landscape for my comic?
What materials do I need to draw three landscape layers for a comic?
What ages is this three-layer landscape activity suitable for?
What are the benefits of drawing foreground, middle ground, and background in a comic?
