Fold your dummy comic book
Fold and assemble a simple dummy comic book from paper, design panels and characters, then staple and read your short illustrated story aloud.


Step-by-step guide to fold your dummy comic book
Step 1
Gather all your materials and put them on a clear table or floor space.
Step 2
Decide how many pages you want your comic to have and pick that many sheets of paper.
Step 3
Stack the chosen sheets neatly on top of each other so the edges line up.
Step 4
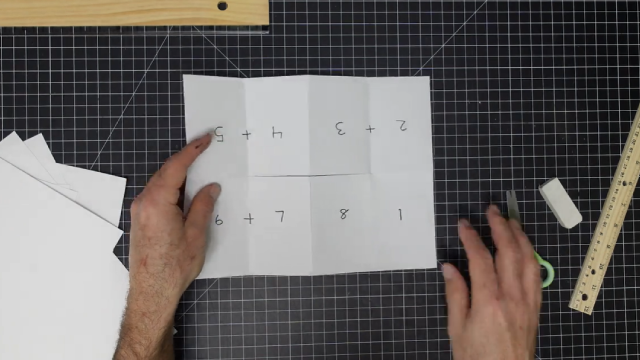
Fold the stacked sheets in half down the middle to make a small booklet shape.
Step 5
Press firmly along the fold with your finger or a ruler to make a sharp crease.
Step 6
Trim the open edges with scissors if any pages stick out so all pages are even.
Step 7
Draw a title and picture on the front page to make a fun cover.
Step 8
Open each page and draw panel borders with your pencil to divide the page into scenes.
Step 9
Sketch characters and action inside each panel using your pencil.
Step 10
Add speech bubbles captions and short dialogue to tell your story in the panels.
Step 11
Colour your drawings with your colouring materials to make the comic bright and bold.
Step 12
Staple once or twice along the folded spine to bind your comic into a booklet.
Step 13
Read your finished comic aloud with expression so others can enjoy your story.
Step 14
Share your finished comic book on DIY.org
Help!?
What can I use if I don't have a stapler to bind the folded spine?
If you don't have a stapler for the 'Staple once or twice along the folded spine' step, bind the folded booklet by gluing the spine with school glue, sewing the fold with strong thread, or folding and securing the spine with clear tape or a binder clip.
My pages are uneven or the fold is floppy—how do I fix this before trimming and drawing?
If pages stick out or the fold is floppy after 'Stack the chosen sheets...Fold...Press firmly', square the edges by tapping them on the table, clamp the booklet under heavy books for a minute, then run a ruler along the fold to make a sharp crease before using scissors to trim the open edges.
How can I adapt this comic-making activity for different ages?
For younger kids use 4–6 sheets, pre-draw panel borders and give chunky crayons for colouring, while older children can use more pages, draw smaller panels, add detailed dialogue and captions, and experiment with inking and shading.
What are simple ways to make the comic more special or shareable after finishing it?
To enhance and personalise your comic, glue a piece of cardboard behind the front page for a sturdy cover, add stickers or a title in metallic pen on the 'Draw a title and picture on the front page' step, laminate the cover if available, and then share the finished comic on DIY.org as suggested.
Watch videos on how to fold your dummy comic book
How to Make Your Own Comic | Toontorial | @cartoonnetworkuk
4 Videos
How to Make Your Own Comic | Toontorial | @cartoonnetworkuk
How To Make A Comic Book At Home (St Teresa's RC Primary School) | Mr Mckenzie
How I Make Mini Comics? (step by step) PART I

How To Make A Mini-Comic with One Sheet Of Paper
Facts about comic-making for kids
📚 Action Comics #1 (1938) introduced Superman and helped launch the superhero comic boom.
🖊️ Cartoonists use "closure"—your brain fills gaps between panels to turn still images into a story.
✂️ You can fold and cut a single sheet of paper into an 8-page mini-comic with no glue or sewing.
🎨 Panel size and shape control pacing—big panels slow things down and small panels speed the action.
📎 Stapling along the fold is called "saddle-stitch" binding and is the easiest way to make a booklet.
How to fold and assemble a simple dummy comic book with my child?
What materials do I need to make a dummy comic book at home?
What ages is folding and creating a dummy comic book suitable for?
What are some fun variations to try with a dummy comic book?
