Watercolor Watermelon
Paint a colorful watercolor watermelon using simple paints and brushes, practice blending and texture techniques, then add seeds to finish the fruit painting.


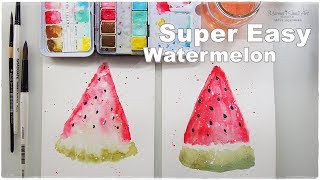
Step-by-step guide to paint a watercolor watermelon
Watercolor Watermelon Easy Art Tutorial for Kids
Step 1
Set up your workspace by placing your watercolor paper flat and arranging your paints brushes cup of water and paper towel within reach.
Step 2
Draw a large semicircle for the watermelon slice and a curved inner line to mark the rind with your pencil.
Step 3
Wet a brush pick a light green paint and paint the rind area between the outer edge and the inner curved line.
Step 4
Rinse and blot your brush mix a light pink wash and paint the inner flesh area inside the rind.
Step 5
While the pink is still wet drop a little darker pink or red near the top edge and let it blend gently into the lighter pink.
Step 6
Sprinkle a pinch of table salt over the still-wet pink area to create a speckled texture.
Step 7
Leave the painting to dry completely without touching it.
Step 8
Gently brush off the salt once the paint is dry so the speckled texture appears.
Step 9
Use a small brush with darker green paint to add thin wavy stripes on the rind for extra detail.
Step 10
Erase any visible pencil lines carefully so the paper stays smooth.
Step 11
Draw small teardrop-shaped seeds across the pink flesh using the fine-tip black marker.
Step 12
Share your finished watercolor watermelon on DIY.org.
Help!?
I don't have watercolor paper or a fine-tip black marker—what can I use instead?
Use heavy mixed-media paper or thick cardstock instead of watercolor paper and substitute the fine-tip black marker for a sharpened black colored pencil or thin waterproof pen to draw the seeds after the paint is dry.
My darker pink didn't blend into the lighter pink and the salt didn't make speckles—how can I fix that?
Be sure to drop the darker pink or red while the pink wash is still wet as the instructions say and sprinkle the table salt immediately on the wet paint so the crystals pull pigment, then let the painting dry completely before brushing off the salt.
How can I adapt this activity for different ages?
For toddlers pre-draw the semicircle and let them dab color with a sponge or big brush, for preschoolers let them paint the rind and flesh washes with help, and for older kids challenge them to add the thin wavy green stripes, carefully erase pencil lines, and draw detailed teardrop seeds with the fine-tip marker.
How can we enhance or personalize the watercolor watermelon?
Try adding a light blue background wash before painting the slice, experiment with coarse versus table salt for different speckled textures, use masking fluid to preserve white highlights on the rind, or mount several finished slices into a card to share on DIY.org as in the final step.
Watch videos on how to paint a watercolor watermelon
Super Easy Beginners Watercolor Watermelon for Kids ♡ Maremi's Small Art ♡
4 Videos
Super Easy Beginners Watercolor Watermelon for Kids ♡ Maremi's Small Art ♡

How to paint easy watercolor watermelons using basic shapes

This Watermelon Painting is TOO Easy! | Easy Watercolor Painting 🍉 | Beginner-Friendly Tutorial

How to Paint a Watermelon | Watercolor Sketchbook Series
Facts about watercolor painting for kids
🎨 Watercolor paints are mostly transparent, so the white of your paper makes colors shine — no white paint needed!
🍉 A watermelon is about 90–92% water, which is why it's so juicy and such a fun subject for watery paint techniques!
🖌️ Brush sizes help you control detail: small brushes for seeds and lines, big brushes for washing in color over the slice.
💧 The wet-on-wet watercolor technique blends colors smoothly when paper is damp — perfect for creating juicy gradients on a watermelon.
🌈 You can mix just a few colors (red + yellow + blue) to create lots of shades — try adding a touch of green for the rind.
How do I paint a watercolor watermelon with my child?
What materials do I need for a watercolor watermelon activity?
What ages is this watercolor watermelon activity suitable for?
What are the benefits of painting a watercolor watermelon with kids?
