Stitch the phrase "Discover In You'
Stitch the phrase 'Discover In You' onto fabric using simple embroidery stitches, tracing letters, threading a needle, developing fine motor skills with adult supervision.


Step-by-step guide to stitch the phrase 'Discover In You'
Step 1
Gather all materials and put them on a flat clean table.
Step 2
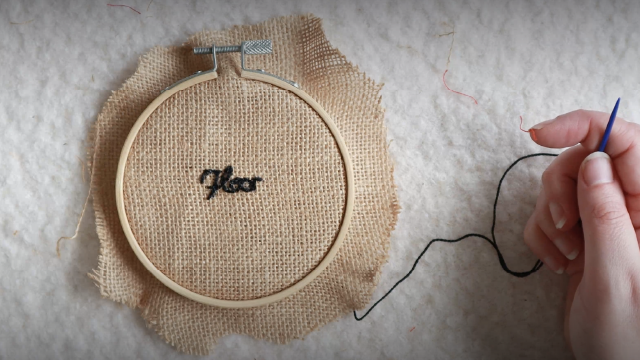
Place the fabric square over the inner ring of the embroidery hoop.
Step 3
Press the outer ring over the fabric and inner ring to hold the fabric in place.
Step 4
Tighten the hoop screw so the fabric feels smooth and taut.
Step 5
Put the tracing paper or printed phrase template over the fabric where you want the words.
Step 6
Trace the phrase "Discover In You" onto the fabric with a pencil or washable fabric marker.
Step 7
Cut an 18 inch length of embroidery floss.
Step 8
Split the cut floss into two strands by gently pulling them apart.
Step 9
Thread one end of the split floss through the eye of the embroidery needle.
Step 10
Tie a small knot at the loose end of the floss to stop it from pulling through the fabric.
Step 11
Bring the needle up through the fabric at the starting point of the first letter.
Step 12
Sew along the traced letters using a backstitch to follow the lines precisely.
Step 13
Continue stitching each letter until the whole phrase is finished.
Step 14
Tie a small knot on the back of the fabric to secure the thread and then trim the excess floss close to the knot.
Step 15
Share your finished stitched "Discover In You" creation on DIY.org.
Help!?
What can we use if we don't have an embroidery hoop, tracing paper, or a washable fabric marker?
If you don't have an embroidery hoop, tape the fabric flat to cardboard or an old picture frame; for tracing hold the printed phrase against a sunny window or use tissue paper over the fabric; and mark the letters with a pencil or tailor's chalk instead of a washable marker.
My fabric puckers in the hoop or my thread keeps tangling while backstitching—how do we fix that?
Retighten the hoop screw and smooth the fabric so it feels taut before tracing, use shorter 12–18 inch lengths of embroidery floss, split the floss into the two strands as instructed, and tie a small knot at the back to stop stitches from pulling through while you backstitch.
How can we change the steps to make this activity easier for little kids or more challenging for older kids?
For younger children use a larger hoop, thicker yarn or blunt plastic needle, pre-traced bold letters and simple running stitches instead of backstitch, while older kids can split the 6-strand floss into two strands, use a finer needle, and practice precise backstitches to follow the traced phrase.
What are some fun ways to personalize or upgrade the finished 'Discover In You' stitched piece?
After completing the backstitch outline, personalize it by using multiple floss colors, filling letters with satin stitch, adding seed beads or a fabric patch, trimming excess floss close to the knots, and framing or sharing the finished hoop on DIY.org.
Watch videos on how to stitch the phrase 'Discover In You'
The Basics of Storyboarding in Under 5 Minutes - Film Camp for Kids & Youth Free Class Tutorials
4 Videos
The Basics of Storyboarding in Under 5 Minutes - Film Camp for Kids & Youth Free Class Tutorials

Make short educational videos for the classroom fast and free with Canva

How To Create STORY BOOK For Kids Using AI 🤩 | Amazon KDP

My Entire Children's Book Illustration Process
Facts about embroidery and hand sewing for kids
🧵 Embroidery floss usually has 6 separate strands you can split to make thinner or thicker stitches.
🪡 Humans have used needles made from bone and metal for tens of thousands of years—ancient people stitched clothing long ago!
✍️ Tracing letters onto fabric before stitching makes it much easier to keep words neat and avoid mistakes.
🤲 Stitching helps develop fine motor skills—those tiny finger movements support handwriting and hand-eye coordination.
🌟 Different stitches change the look: backstitch for outlines, satin stitch to fill letters, and French knots for decorative dots.
How do I guide my child to stitch the phrase 'Discover In You' onto fabric?
What materials do I need to stitch 'Discover In You' with my child?
What ages is stitching 'Discover In You' suitable for?
What are the benefits and safety tips for children stitching 'Discover In You'?
