Stitch your favorite logo of all time!
Use simple hand stitching to embroider your favorite logo onto fabric, practicing tracing, basic stitches, and safe needle handling while personalizing your design.


Step-by-step guide to stitch your favorite logo of all time
Step 1
Gather all the materials listed and set them on a flat table so your workspace is ready.
Step 2
Pick a simple version of your favorite logo and draw or print it on a piece of paper about the size of your palm.
Step 3
Place your fabric in the embroidery hoop and tighten the screw so the fabric is snug and smooth.
Step 4
Slide the paper with your logo under the fabric inside the hoop and move it until the logo is centered where you want to stitch.
Step 5
Trace the logo onto the fabric with the washable fabric marker using light lines that you can follow with your needle.
Step 6
Cut an 18-inch length of embroidery floss with the scissors.
Step 7
Ask an adult to help separate the floss into two strands and thread those two strands through the needle for safer handling.
Step 8
Tie a small knot at the end of the thread so your stitches will stay put.
Step 9
Practice three running stitches on the scrap fabric to feel how the needle goes in and out smoothly.
Step 10
Practice three backstitches on the scrap fabric so you know how to make a tight outline stitch.
Step 11
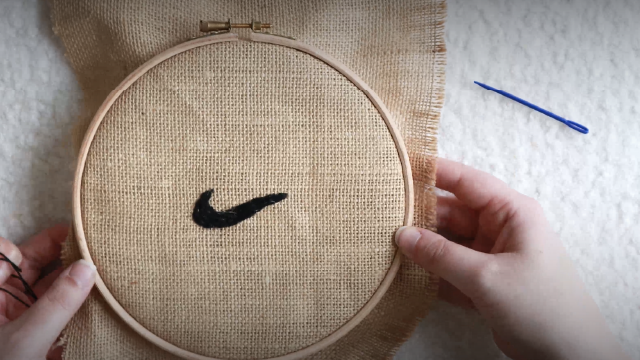
Start stitching the traced outline of your logo on the hoop using backstitches, following the line slowly and evenly.
Step 12
Fill any larger shapes in the logo with satin stitches or short parallel stitches to add solid color.
Step 13
Tie off the thread neatly on the back of the fabric with a small knot and trim the extra thread with scissors.
Step 14
Share your finished creation on DIY.org.
Help!?
What can I use if I don't have an embroidery hoop or embroidery floss?
If you don't have an embroidery hoop, stretch and tape the fabric over a small picture frame or a stiff cardboard circle before the step 'Place your fabric in the embroidery hoop and tighten the screw so the fabric is snug and smooth', and if you lack embroidery floss use two strands of regular sewing thread or thin yarn separated to match the 'cut an 18-inch length of embroidery floss' and 'ask an adult to help separate the floss into two strands and thread those two strands through the needle' step.
My fabric puckers or the stitches look uneven—what should I try?
If the fabric puckers or stitches pull unevenly, stop stitching, loosen the hoop screw, re-smooth the fabric so it is 'snug and smooth', re-center the traced logo under the fabric, then retighten the screw and continue with the backstitch outline slowly and evenly.
How can I adapt this project for different age groups?
For younger kids choose a very simple logo, use pre-threaded blunt plastic needles and thicker yarn and have an adult help with the 'ask an adult to help separate the floss' and tie the knot steps, while older children can pick more detailed logos, practice running and backstitches on scrap fabric, and try satin stitches to fill shapes.
How can we extend or personalize the stitched logo after finishing?
To personalize your finished piece, add beads or metallic threads along the backstitch outline, embroider your name and date on the back, trim and tie off neatly as in the 'tie off the thread neatly' step, and display the hoop or share it on DIY.org.
Watch videos on how to stitch your favorite logo of all time
How to Design a Logo in Adobe Illustrator | Easy Guide
4 Videos

How to Design a Logo in Adobe Illustrator | Easy Guide
Beginner Logo Design with Affinity Designer | Tutorial

School Logo Design Tutorial | Step-by-Step Guide for Beginners | Adobe Illustrator || Part.2
"How to Design a Logo in Canva | Step-by-Step Logo Tutorial for Beginners"
Facts about hand embroidery and sewing for kids
🧵 Embroidery has been used for thousands of years to decorate clothing and tell stories across many cultures.
🪡 Needles with eyes date back to prehistoric times — early people stitched hides and fabrics to make clothes and gear.
🎨 Designers keep logos simple so they’re easy to recognize, reproduce, and stitch by hand or machine.
🧷 The Bayeux Tapestry is actually embroidery and stretches nearly 70 meters, showing scenes from 11th-century history.
🔁 Basic stitches like running stitch, backstitch, and satin stitch can create outlines, fills, and texture when embroidering a logo.
How do you embroider your favorite logo using simple hand stitching?
What materials do I need to stitch a logo onto fabric?
What ages is stitching a favorite logo suitable for?
What are the benefits, safety tips, and variations for this stitching activity?
