Embroider a pet cat
Embroider a simple pet cat design on fabric using basic stitches, child-safe needles, and colorful thread to learn stitching and observation skills.


Step-by-step guide to embroider a pet cat
Step 1
Gather all the materials and a clean flat workspace.
Step 2
Place the fabric inside the embroidery hoop and tighten the hoop so the fabric is smooth and taut.
Step 3
Use the fabric marker or pencil to draw a simple cat shape with a round head a rounded body two triangle ears a tail and two whisker lines.
Step 4
Pick a thread color to start and cut one length about 18 inches long.
Step 5
Thread the needle with the cut thread and tie a small knot at the end of the thread.
Step 6
Use a running stitch to sew along the cat outline by pushing the needle up and down through the fabric in even small stitches.
Step 7
Use satin stitch to fill the body by making short parallel stitches close together until the area is filled.
Step 8
Use backstitch to sew the tail and whisker lines by making a small stitch backward and a longer stitch forward for a continuous line.
Step 9
Make French knots for the eyes and nose by bringing the needle up wrapping the thread once around the needle and pushing the needle back down close to where it came up.
Step 10
Tie off each thread on the back of the fabric with a small knot and trim the excess thread with the scissors.
Step 11
Remove your finished cat from the hoop if you like and share your finished creation on DIY.org.
Help!?
What can I use if I don't have an embroidery hoop or a fabric marker?
If you don't have an embroidery hoop, stretch the fabric over a sturdy piece of cardboard or a small picture frame to keep it taut, and replace a fabric marker with a sharpened pencil or tailor's chalk when drawing the cat shape.
My stitches look uneven or the fabric puckers—what should I check?
Make sure the fabric is smooth and taut in the hoop as instructed, shorten your thread to about 18 inches to avoid tangles, and keep even tension while using running stitch and satin stitch so the body fills without puckering.
How can I adapt this embroidery for different ages or skill levels?
For younger children, pre-draw the cat and use a blunt plastic needle with thicker yarn and larger stitches, while older kids can use finer embroidery floss, practice backstitch for the tail and multiple French knots for detailed eyes and nose as described.
How can we personalize or extend the embroidered cat project?
Personalize the finished cat by adding a backstitched name or collar, sewing small beads for eyes or a bell, filling the background with seed stitch, or framing the piece after removing it from the hoop to share on DIY.org.
Watch videos on how to embroider a pet cat
Floral cat Embroidery pattern || Tutorial || Hand embroidery for beginners - Let's Explore
4 Videos
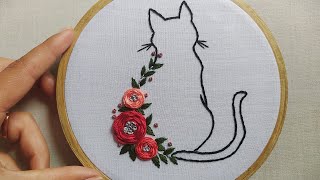
Floral cat Embroidery pattern || Tutorial || Hand embroidery for beginners - Let's Explore
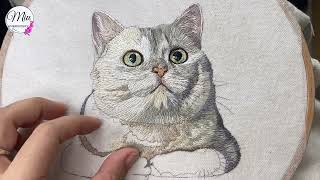
Thread Painting Cat 🐱🐈Hand Embroidery Pet Portrait
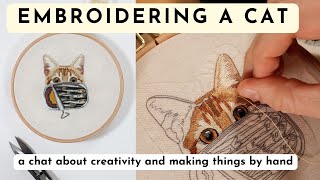
Embroider A Cat With Me: A Chat About Creativity and Making Things By Hand
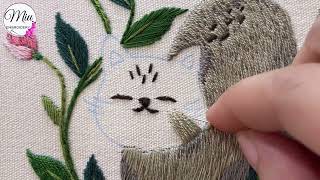
Cat on Flowers 🌸 🐈⬛ Beginners Embroidery Kit Tutorial
Facts about hand embroidery for kids
🧵 Embroidery dates back thousands of years — archaeologists have found embroidered textiles over 4,000 years old!
🐱 A cat's whiskers help it judge spaces and balance — a fun detail to add when stitching a cat's face.
🪡 The running stitch is one of the oldest and simplest stitches, great for outlining shapes like a kitty silhouette.
🧷 Child-safe embroidery needles are blunt-tipped (often plastic) with large eyes to protect little fingers while threading.
🎨 Embroidery floss comes in hundreds of colors (many brands offer 400–600 shades), so kids can mix any fur pattern they imagine.
How do I teach my child to embroider a simple pet cat?
What materials do I need to embroider a pet cat with my child?
What ages is this embroidery activity suitable for?
What are the benefits and safety tips for kids learning to embroider a pet cat?
