Embroider a french knot
Learn to embroider French knots on fabric using a needle, embroidery hoop, and thread, practicing small stitches to make neat textured dots.


Step-by-step guide to embroider a French knot
Step 1
Loosen the screw and place the fabric inside the embroidery hoop and tighten the screw until the fabric is pulled smooth and taut.
Step 2
Use the water-soluble marker or pencil to draw a line of small evenly spaced dots where you want your French knots.
Step 3
Cut a 24-inch length of embroidery floss.
Step 4
Gently pull out two strands from the floss so your thread will be thinner and easier to knot.
Step 5
Thread the needle with the two-strand thread.
Step 6
Tie a small knot at the end of the thread to stop it from slipping through the fabric.
Step 7
Push the needle up through the fabric from the underside at the center of your first dot and pull the thread until the knot on the end stops at the back.
Step 8
Hold the thread gently taut with your non-sewing hand near the fabric.
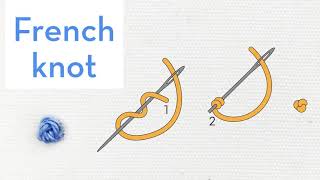
Step 9
Wrap the thread around the needle two times for a small neat knot.
Step 10
While keeping the wraps tight, insert the needle back into the fabric very close to where it first came up (but not the exact same hole).
Step 11
Hold the wrapped thread with your finger and pull the needle and thread down and through the fabric slowly until the little knot sits snug on top.
Step 12
Trim the thread close to the fabric underside if needed and re-thread the needle to make more knots along your dotted line.
Step 13
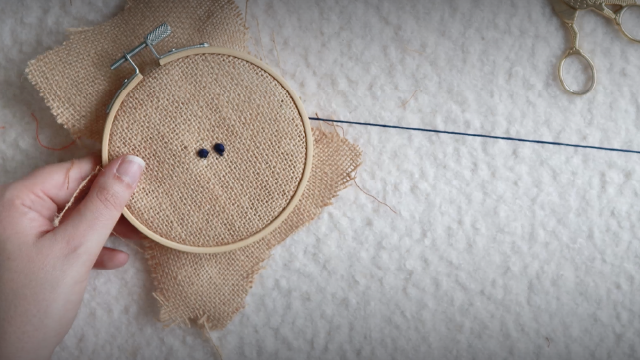
Practice making more French knots on each dot until your row looks neat and textured.
Step 14
Take a picture of your finished French-knot practice and share your creation on DIY.org
Help!?
What can we use if we don't have an embroidery hoop, water-soluble marker, or embroidery floss?
If you don't have an embroidery hoop, stretch the fabric over a small picture frame and tape the edges tight; swap the water-soluble marker for a sharpened pencil or tailor's chalk to draw the dots; and replace embroidery floss with thin craft thread or crochet thread if needed.
My French knots are slipping or sinking under the fabric—what should I try?
Make sure the screw on the hoop (or tape on your frame) keeps the fabric taut, pull the knot at the back until it stops before wrapping, hold the wraps tight with your finger, insert the needle very close to (but not in) the original hole, and pull the needle down slowly so the knot sits on top.
How can I adapt this activity for different age groups or skill levels?
For younger children, use a plastic blunt tapestry needle, leave all six strands of floss or use thicker yarn and have an adult pre-thread and tie the starting knot, while older kids can use the two-strand thread as instructed, practice tighter two-wrap or three-wrap knots, and work on closer dot spacing for finer texture.
How can we extend or personalize our French-knot practice after finishing the dotted line?
Try changing floss colors between knots to make a gradient, form simple shapes or letters by following new dot patterns, sew a bead onto the needle before pulling it through for jeweled knots, or frame your finished practice and upload the photo to DIY.org as the instructions suggest.
Watch videos on how to embroider a French knot
How to make perfect French Knots 🪡Quick Step-by-Step Guide | Hand Embroidery Tutorial for Beginners
4 Videos
How to make perfect French Knots 🪡Quick Step-by-Step Guide | Hand Embroidery Tutorial for Beginners
How To Make A French Knot - EASY and simple method
How to do a French Knot
French knot - How to quick video tutorial - hand embroidery stitches for beginners
Facts about embroidery for kids
🪡 The French knot is made by wrapping thread around the needle one or more times before pulling it through — more wraps make a bigger knot.
🧵 Using shorter lengths of embroidery floss (about 18 inches / 45 cm) helps prevent tangles and keeps knots neater.
🎯 French knots are perfect for tiny textured dots like flower centers, eyes on stitched animals, and speckled patterns.
✅ For consistent knots: keep hoop tension steady, use the same number of wraps, and pull the thread with a gentle, even motion.
🌍 Despite its name, the French knot appears in embroidery styles around the world, not just in France.
How do I teach my child to embroider French knots?
What materials do I need to embroider French knots with kids?
What ages are French knot lessons suitable for?
What safety tips should parents follow when teaching French knots?
