Stitch a curved line!
Sew a smooth curved line on fabric using simple running and backstitches, practicing tracing, pinning, and controlling the needle and thread safely.


Step-by-step guide to stitch a curved line
Step 1
Wash your hands so your fabric and thread stay clean.
Step 2
Lay your fabric flat on a clean table and smooth out any wrinkles with your hands.
Step 3
Draw a smooth curved line on the fabric using a fabric marker or chalk.
Step 4
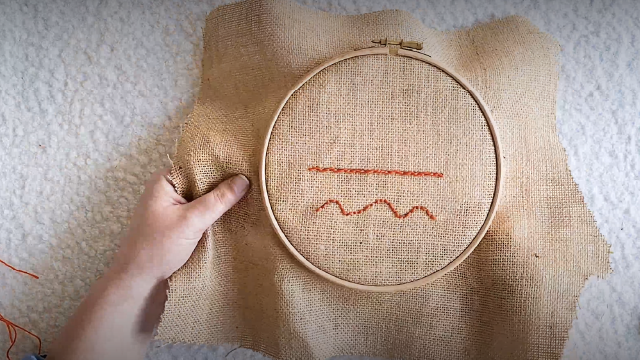
Place the fabric inside the embroidery hoop with the curved line in the center.
Step 5
Tighten the hoop screw until the fabric feels tight like a drum.
Step 6
Pin small pins along the traced curve to hold the fabric steady while you sew.
Step 7
Cut a length of thread about the length of your arm.
Step 8
Thread the needle by pushing the thread through the eye of the needle.
Step 9
Tie a small knot at the far end of the thread to stop it from pulling through the fabric.
Step 10
Push the needle up from the back of the fabric at the start of the curve so the knot stays hidden on the back.
Step 11
Sew a running stitch along the traced curve using short even stitches about 2–3 mm apart.
Step 12
Use backstitch to smooth the line by pushing the needle forward one stitch length then inserting it back into the end of the previous stitch to make a continuous line.
Step 13
Tie a secure knot on the back of the fabric to finish and trim the extra thread close to the knot.
Step 14
Share a photo of your finished stitched curve and what you learned on DIY.org.
Help!?
What can we use if we don't have an embroidery hoop or a fabric marker?
If you don't have an embroidery hoop, tape your fabric tightly to a piece of sturdy cardboard or a clipboard to mimic 'Place the fabric inside the embroidery hoop' and, instead of a fabric marker, use tailor's chalk or a soft pencil to 'Draw a smooth curved line on the fabric'.
My curve looks bumpy or my fabric puckers—what should I check?
Check that you smoothed out wrinkles, tightened the hoop screw until the fabric feels like a drum, removed pins that pull the fabric, and kept stitches short and even about 2–3 mm apart as you sew the running stitch to avoid puckering.
How can I adapt this stitching activity for different ages?
For toddlers use felt, a large plastic needle and thick yarn with pre-drawn curves to practice pushing the needle up, while older kids can use fine thread, follow the 2–3 mm running stitch, and practice the backstitch for a smooth continuous line.
How can we extend or personalize the stitched curve once it's finished?
After you 'Tie a secure knot on the back of the fabric', personalize the outcome by stitching additional colored curves for an ombré effect, adding beads or French knots along the line, and then share a photo and what you learned on DIY.org.
Watch videos on how to stitch a curved line
How to sew curved lines and straight lines! (FREE PRACTICE SHEETS INCLUDED!)
3 Videos
How to sew curved lines and straight lines! (FREE PRACTICE SHEETS INCLUDED!)
3 TIPS for Sewing Straight & Curved Lines | Sewing Machine Basics
Sew a Curved Seam | Your Guide to Start Sewing
Facts about hand-sewing for kids
🪡 The running stitch is one of the oldest needle techniques—archaeologists have found sewn garments thousands of years old.
🧵 The backstitch makes a very strong, continuous line of thread, so it’s often used where seams need extra durability.
📏 Shorter stitches and plenty of tiny pins help you sew smooth, tidy curves without puckering the fabric.
🧒 Practicing simple hand stitches like running and backstitch builds fine motor skills and hand–eye coordination in kids.
⚠️ Using a thimble, pointing the needle away from fingers, and cutting threads with small scissors greatly reduces the chance of pricks and snags.
How do I stitch a smooth curved line on fabric with my child?
What materials do I need to stitch a curved line?
What ages is this stitching activity suitable for?
What safety tips should I follow when teaching my child to stitch a curved line?
