Describe the main plot of your comic
Create a short comic by planning characters, settings, and a three-part plot; draw panels, write dialogue, and arrange scenes to tell the story.


Step-by-step guide to create a short comic
Step 1
Gather all the materials from the list and find a tidy workspace to draw.
Step 2
Write four short character ideas on separate sticky notes with a name and one trait for each.
Step 3
Pick one sticky note as your main character and one as a helper or opponent and put them aside.
Step 4
Choose a single setting for your story and write it on a sticky note.
Step 5
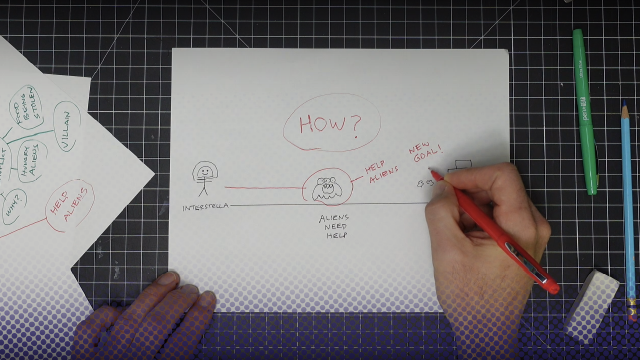
Write three one-sentence plot points on three sticky notes labeled Beginning Middle End.
Step 6
Arrange the three plot sticky notes in order so the story flows from problem to solution.
Step 7
Draw a small thumbnail layout of panels on a sheet to plan how many boxes you need.
Step 8
Label each thumbnail with which scene happens there and which characters appear.
Step 9
Lightly sketch the larger full-size panels on your paper following the thumbnail plan.
Step 10
Add speech bubbles and write the dialogue and captions in pencil inside each panel.
Step 11
Ink the final pencil lines you want to keep using the black pen or fine-liner.
Step 12
Wait until the ink is completely dry before touching the page.
Step 13
Erase any remaining pencil marks gently so the ink stays clean.
Step 14
Color your comic with your coloring materials and add final details like sound effects.
Step 15
Share your finished comic on DIY.org.
Help!?
What can we use instead of sticky notes or a fine-liner if we don't have them?
If you don't have sticky notes, cut small squares of scrap paper and tape them for your character, setting, and plot notes, and if you lack a black pen or fine-liner you can carefully ink over your pencil sketches with a thin-tipped marker or a well-sharpened pencil after your thumbnail plan.
What should we do if the ink smudges or panels feel cramped?
To avoid smudging and cramped dialogue follow the instruction to wait until the ink is completely dry before touching the page, gently erase remaining pencil marks, and use the thumbnail layout and label step to resize or rearrange panels so speech bubbles and characters fit comfortably.
How can we adapt this comic activity for different ages?
For younger kids simplify by writing only two character sticky notes and using pre-drawn panel templates with crayons, while older kids can expand the thumbnail layout to more panels, write fuller dialogue in the speech bubble step, and ink with a fine-liner before coloring.
How can we extend or personalize the comic after finishing the basic steps?
Personalize and extend the project by designing a custom cover, adding layered backgrounds and mixed-media textures during the coloring and final details step, including extra sound-effect lettering, and scanning the finished comic to edit or animate before sharing on DIY.org.
Watch videos on how to create a short comic
5 Tips For Making Comics
4 Videos
5 Tips For Making Comics
How To Create A Graphic Novel: Step By Step For Beginners
How to Create a Comic Strip

How to Make Comics - Marvel's The Art of Storytelling
Facts about comic-making and storytelling
🖼️ Comics are made by stringing panels together so readers 'see' time pass — that's called sequential art!
🎭 A three-part plot (setup, confrontation, resolution) keeps short comics snappy and satisfying.
🗨️ Speech balloons evolved from early cartoon labels and help show who’s talking without extra description.
📘 Scott McCloud's book Understanding Comics teaches how readers mentally 'fill in the gutter' between panels.
✏️ Many famous cartoonists began with just paper, a pencil, and a big imagination — you can too!
How do I create a short comic with a three-part plot?
What materials do I need to make a short comic?
What ages is making a short comic suitable for?
What are the benefits of planning characters and a three-part plot?
