Build a 3D scissor lift
Build a 3D scissor lift model from cardboard, craft sticks, brads, and a crank; test lifting weights while exploring simple machines and mechanics.

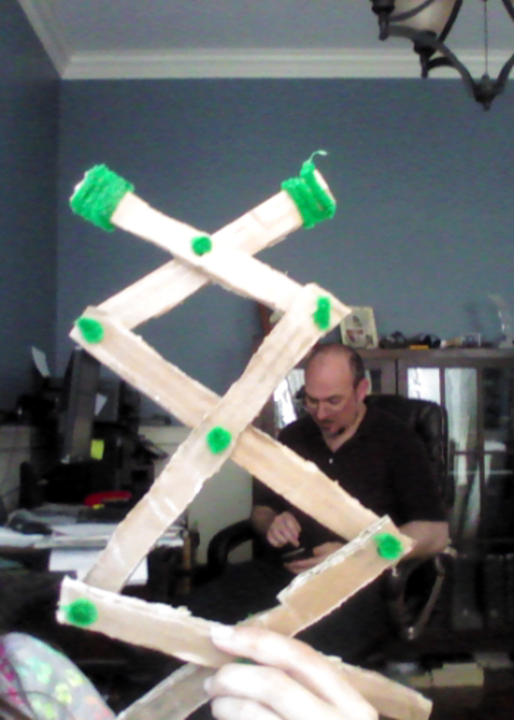

Step-by-step guide to build a 3D scissor lift model
Science Projects | Scissor Lift Working Model
Step 1
Gather all materials and set them on a clear table or floor so you can reach everything easily.
Step 2
Measure and cut a cardboard base about 20 cm by 15 cm and a top platform about 10 cm by 10 cm.
Step 3
Make one scissor X unit by overlapping two craft sticks in an X and pushing a brass brad through the center so they can pivot.
Step 4
Repeat making X units until you have a total of four identical X pairs.
Step 5
Make small holes near the ends of each craft stick pair where the sticks will join with other brads or attach to the base and platform.
Step 6
Connect the X units end-to-end by overlapping each free end with the next and inserting a brad at each overlap to make one long scissor column.
Step 7
Attach the bottom end of the scissor column to the cardboard base by pushing a brad through the base into the bottom stick so it can pivot.
Step 8
Attach the top end of the scissor column to the platform by pushing a brad through the platform into the top stick so it can pivot.
Step 9
Cut a small hole near the edge of the base big enough for the skewer to pass through as an axle.
Step 10
Tie one end of the string securely to the center underside of the platform so it will pull the platform up when wound.
Step 11
Thread the free end of the string down along the side of the scissor column and through the hole in the base.
Step 12
Insert the wooden skewer through the base hole so it can rotate freely and sit under the platform area.
Step 13
Wind the free string around the skewer several times and secure the string end to the skewer with a tight knot or a piece of tape.
Step 14
Place small weights on the top platform and slowly turn the skewer crank to test how well your scissor lift raises and lowers the load.
Step 15
Share a photo and a short description of your finished 3D scissor lift on DIY.org.
Help!?
What can I use if I don't have craft sticks, brass brads, or a wooden skewer?
Use popsicle sticks or cut thin cardboard strips instead of craft sticks, paper fasteners or split pins for the brass brads, and a pencil or wooden dowel as the skewer axle so you can still make the X units, pivot at the holes, and wind the string through the base hole.
The platform wobbles or the scissor column jams—what should I check or fix?
If the lift jams or wobbles, make sure the holes you made in step 4 are centered and slightly enlarged so brads can pivot freely, loosen or replace overly tight brads at overlaps, add a small washer or bead to reduce friction, and wrap tape or carve a shallow groove on the skewer (steps 12–13) to prevent the string from slipping.
How can I modify the project for younger children or make it more challenging for older kids?
For younger kids, pre-cut the cardboard base and platform and pre-punch holes and use only two scissor X units to simplify steps 2–6, while older kids can build six X units, reinforce the base, and experiment with different string winding ratios and added weights in steps 11–15.
How can we extend or personalize the 3D scissor lift once it's built?
Personalize the top platform from step 2 with paint or stickers, add a simple hand-crank gear or small motor to the skewer in step 13 for smoother lifting, or attach a ruler alongside the scissor column to measure lift height before sharing your photo and description on DIY.org.
Watch videos on how to build a 3D scissor lift model
3D Printed Scissor Lift! Electric Motor and Limit Switches - Or Hand Crank!
4 Videos
3D Printed Scissor Lift! Electric Motor and Limit Switches - Or Hand Crank!
How to Build a Scissor Lift Using LEGO Spike Prime
FreeCAD Scissor Lift with Kinematic Skeleton in Assembly 4 Animation Mechanical Movement Beginners
AUTODESK INVENTOR TUTORIAL OF A SCISSOR LIFT
Facts about simple machines and mechanics
🏗️ Scissor lifts on construction sites can raise workers tens of feet — your tiny cardboard version uses the same basic idea!
⚙️ Turn a crank and you convert circular motion into up-and-down motion, which makes the lift move.
📦 Corrugated cardboard has a wavy inner layer between flat sheets, which gives it surprising strength for building models.
🧷 Brads (paper fasteners) act like little pivots so pieces can swing smoothly — perfect for moving parts.
🧠 A scissor lift is a type of linkage (like a pantograph) that spreads movement and force across joined bars.
How do you build a 3D scissor lift model from cardboard and craft sticks?
What materials do I need to make a cardboard scissor lift with a crank?
What ages is a 3D scissor lift model activity suitable for?
What are the benefits of building a scissor lift model with kids?
