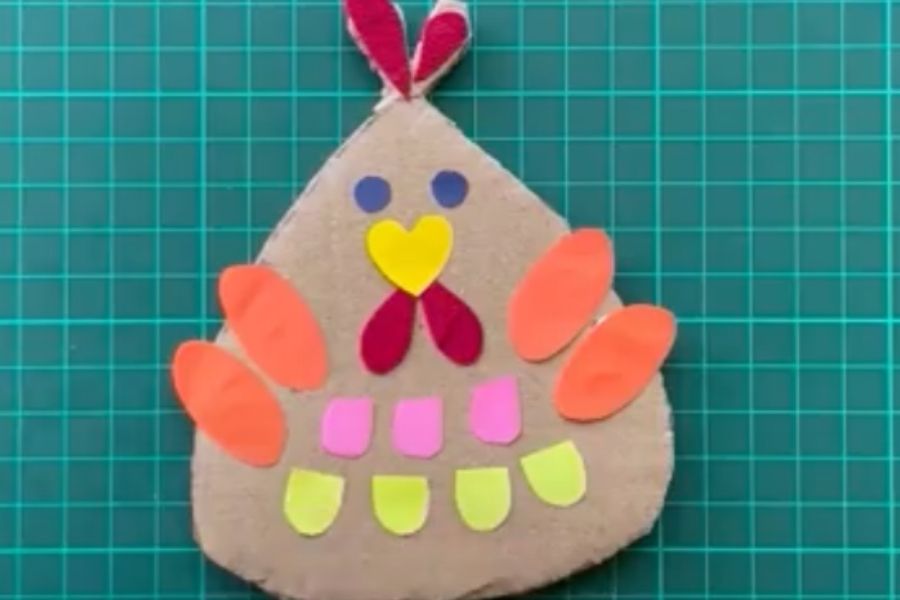
Make Cute Cardboard Creatures
Make cute cardboard creatures from recycled boxes using scissors, glue, markers, googly eyes, and pipe cleaners to decorate and add movable parts.


Step-by-step guide to make cute cardboard creatures
Step 1
Gather all the materials listed and put them on a clear workspace.
Step 2
Pick one piece of recycled cardboard to be the main body of your creature.
Step 3
Decide what kind of cute creature you want to make (for example a cat bird robot or monster).
Step 4
Use a pencil to draw the body shape and any extra parts like ears wings or legs on the cardboard.
Step 5
Cut out the main body shape from the cardboard using scissors with an adult nearby.
Step 6
Cut out the extra parts you drew such as legs wings ears or a tail.
Step 7
Fold small tabs on the extra parts where they will join the body to make movable joints.
Step 8
Attach the extra parts to the body using glue or tape so the tabs can move a little.
Step 9
Color and decorate your creature with your coloring materials to make it bright and fun.
Step 10
Glue on googly eyes to give your creature a silly or sweet face.
Step 11
Twist pipe cleaners into antennae arms or tails and attach them to your creature with tape or by poking small holes and securing them.
Step 12
Share your finished cute cardboard creature on DIY.org
Help!?
What can I use if I don't have googly eyes or pipe cleaners?
If googly eyes or pipe cleaners aren't available, glue on buttons or draw eyes with coloring materials and twist small strips of aluminum foil or cut yarn for antennae, then attach them to the cardboard body with tape as in the instructions.
My extra parts (legs/wings) won't move after I attach them—how do I fix that?
If the folded tabs are glued flat and parts don't move, refold the small tabs on the extra parts and attach them to the cardboard body with a small dab of glue only on the tab base or use tape that leaves a little space so the joint can pivot and the legs or wings move a little.
How can I adapt the steps for younger or older kids?
For toddlers, pre-cut the cardboard body and extra parts and let them color and stick on large googly eyes with glue, while older kids can draw and cut their own detailed shapes, fold tabs, and twist pipe cleaners into complex antennae following the instructions.
What are some ways to enhance or personalize our cardboard creature project?
To personalize and extend the activity, add a paper hinge for a movable mouth, glue on recycled bottle caps or buttons for texture, and build a shoebox diorama to display and share your finished cute cardboard creature on DIY.org.
Watch videos on how to make cute cardboard creatures
Build Cardboard Animals in 3D - Creative Hands-on Activity for Kids
3 Videos
Build Cardboard Animals in 3D - Creative Hands-on Activity for Kids
How to Make Cardboard Animal #66 - DIY Cat and Horse From Paper

How to Make Cardboard Puppets
Facts about recycled cardboard crafts
📦 Cardboard is one of the most recycled packaging materials — turning old boxes into new things keeps tons of paper out of landfills.
♻️ Upcycling is a crafty superpower: artists and kids can transform trash (like boxes) into toys, decorations, and art.
🧼 Pipe cleaners, often called chenille stems, were originally practical cleaners before crafters adopted them for fuzzy arms and antennae.
👀 Googly eyes can instantly make a creation feel alive — just one pair can change a box into a character with personality.
✂️ Scissors, glue, and markers are a kid-maker dream team: they build creativity, fine motor skills, and storytelling all at once.
How do I make cute cardboard creatures from recycled boxes?
What materials do I need to make cardboard creatures?
What ages is making cardboard creatures suitable for?
What safety tips should I follow when making cardboard creatures?
