Share a screenshot of Your Editing Software
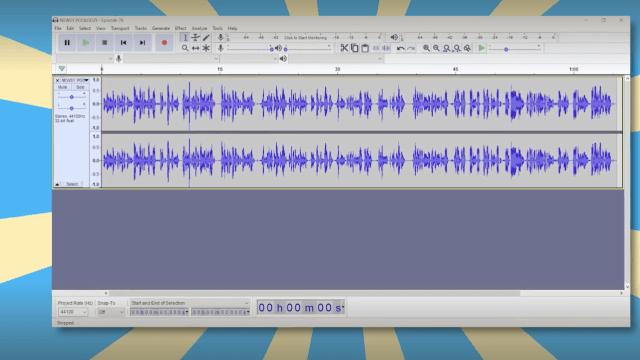
With adult permission, take a screenshot of your editing software, label main tools, and share it to explain how you make edits to media.


Step-by-step guide to share a screenshot of your editing software
Step 1
Ask an adult for permission to use the editing software.
Step 2
Open your editing software.
Step 3
Open or create the project or media file you want to explain.
Step 4
Arrange the screen so the main toolbars panels and media area are all visible.
Step 5
Close or hide any windows or names that show personal information.
Step 6
With the adult's help take a screenshot of the editing window.
Step 7
Open the screenshot file in your markup or image editor.
Step 8
Draw arrows or shapes to point to each main tool you use.
Step 9
Add short text labels to name each tool you pointed to.
Step 10
Write one short sentence under each label that explains what the tool does.
Step 11
Save or export your labeled screenshot as a single image file.
Step 12
Share your finished labeled screenshot on DIY.org with an adult's help.
Help!?
What can we use if we don't have a separate markup or image editor?
Use built-in tools like Snipping Tool (Windows), Screenshot/Preview (macOS) or free web editors like Pixlr to open your screenshot and draw arrows as directed in the step 'Open the screenshot file in your markup or image editor'.
My main toolbars or panels won't all fit on the screen — how do we make them visible for the screenshot?
Resize or rearrange the editing software workspace, hide unnecessary panels and any personal-info windows, or take multiple screenshots and stitch or crop them so the 'main toolbars panels and media area are all visible' before you capture the image.
How can I adapt this activity for different ages?
For younger children have an adult take the screenshot and let the child add simple arrows and one-word labels, while older kids can write full explanatory sentences under each label and include extra zoomed-in insets as part of the 'Write one short sentence under each label' step.
How can we improve or personalize the labeled screenshot before sharing on DIY.org?
Enhance the image by color-coding arrows to match tool functions, adding numbered steps or magnified insets for tiny icons, and optionally recording a short voiceover or screen capture to accompany the saved image before exporting and sharing on DIY.org.
Watch videos on how to share a screenshot of your editing software
Microsoft Word Basics For Kids
4 Videos

Microsoft Word Basics For Kids
Best Editing Software for Beginners
How To Edit Videos (Video Editing For Beginners - Complete Guide!)
Video Editing Tutorial: 5 Steps From Start to Finish | Beginners Guide
Facts about digital media editing
🖼️ Taking a screenshot is like freezing a moment on your screen — most devices have quick shortcuts to capture it.
✂️ Cut, copy, and paste are editing superpowers used for moving layers, clips, and pixels in creative projects.
🎨 Layers act like transparent sheets you can stack and edit independently — a core idea in many image editors.
💾 Many editors autosave and offer dozens (sometimes hundreds) of undo steps so mistakes can be easily fixed.
🔍 Designers often zoom to 200%–400% and use guides/rulers to perfect tiny details and align elements precisely.
How do I do the activity of sharing a screenshot of editing software?
What materials do I need for this screenshot activity?
What ages is this activity suitable for?
What safety tips should I follow when sharing editing software screenshots?
