Upgrade a cookie dunker
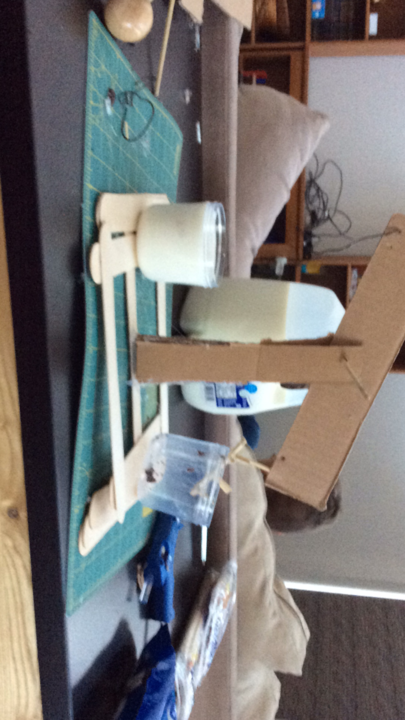
Modify a cookie dunker to hold and dip cookies more easily using recycled materials, simple mechanics, and testing to improve dunking performance.


Step-by-step guide to upgrade a cookie dunker
10 Cookie Shaping Hacks to Impress All the Cookie Lovers!! So Yummy
Step 1
Gather all your materials and pick the cookie you want to dunk.
Step 2
Wrap a rubber band around one end of two popsicle sticks to make a hinge.
Step 3
Bend a paper clip into a small hook shape that can catch the edge of a cookie.
Step 4
Tape the paper clip hook to the far ends of the popsicle sticks so it faces outward.
Step 5
Cut two small rectangular cardboard pads about the size of your thumb.
Step 6
Tape the cardboard pads to the inner tips of the popsicle sticks to protect the cookie.
Step 7
Tape a straw or wooden skewer along the back of the popsicle sticks to make a long handle.
Step 8
Place the cookie on the paper clip hook and gently squeeze the sticks together to hold it.
Step 9
Pour milk into the small cup until it is about half full.
Step 10
Lower the cookie into the milk using the handle so the cookie edge touches the liquid.
Step 11
Lift the cookie straight up to see how well it held together after dunking.
Step 12
Try two or three different dunk times to find the best balance between soggy and firm.
Step 13
Cut a small cardboard circle to use as a drip catcher under the cookie.
Step 14
Tape the cardboard circle underneath the cookie holder to catch drips.
Step 15
Share your finished cookie dunker on DIY.org.
Help!?
What can we use if we don't have popsicle sticks, a paper clip, or a rubber band?
Use two flat wooden craft sticks or short paint stirrers in place of popsicle sticks, bend a thin piece of coat-hanger wire or a sturdy twist tie into the hook shape from step 3, and substitute a small hair elastic or twist-tie loop for the rubber band hinge in step 2.
The cookie keeps slipping off or cracking when I squeeze the sticks — how do I fix that?
Make a deeper hook when you bend the paper clip (step 3), add extra tape over the taped hook ends in step 4, and be sure to tape the cardboard thumb pads from step 5 to cushion and distribute pressure so the cookie grips without breaking.
How can I adapt this activity for younger kids or older kids to make it safer or more challenging?
For younger kids, have an adult pre-wrap the rubber band hinge (step 2), pre-bend and tape the paper clip hook (step 4), and cut the cardboard pads (step 5), while older kids can change hinge tension, experiment with precise dunk times (step 11), or design a sturdier handle from a wooden skewer (step 8).
What are easy ways to upgrade or personalize the cookie dunker after making the basic version?
Add a second paper-clip hook to hold two cookies, tape a ruler along the straw or skewer handle to set repeatable dunk depths for step 9, decorate the popsicle sticks and cardboard circle (steps 5 and 12), and then share photos and Dunk Time results on DIY.org (step 13).
Watch videos on how to upgrade a cookie dunker
DIY Easy Heart Cookie Cutter
3 Videos
DIY Easy Heart Cookie Cutter

5 Easy Decorated Cookies for Beginners!
Top 10 Cookie Decorating Tools - Beginners Guide to Cookie Decorating
Facts about engineering and design for kids
🍪 Dunking a cookie briefly in milk or tea softens it and releases more aroma and flavor — but dunk too long and it can fall apart!
♻️ Many easy dunker parts can be made from recycled cardboard, plastic bottles, and bottle caps, turning trash into tools.
🛠️ Simple machines like levers, pivots, and elastic-band catapults can give you precise, repeatable dunking motion without motors.
🔁 Engineers improve designs fast by prototyping and iterating—build a quick version, test it, tweak it, repeat!
⏱️ Timing matters: most cookies soften in about 1–3 seconds of dunking, so adding a simple timer or stop mechanism helps reproducible results.
How do I modify a cookie dunker to hold and dip cookies more easily using recycled materials?
What materials do I need to upgrade a cookie dunker with simple mechanics and recycled parts?
What ages is this cookie dunker upgrade activity suitable for?
What are the benefits, safety tips, and fun variations for a cookie dunker upgrade project?
