Animate a head turn - Part 1!
Create a small flipbook that shows a character's head turning. Learn key frames, smooth motion, and practice careful sequential drawing techniques.


Step-by-step guide to Animate a head turn - Part 1!
Step 1
Gather all your materials and clear a flat workspace where you can draw comfortably.
Step 2
Trim or prepare about 20 to 30 pages that are the same size using scissors with adult supervision.
Step 3
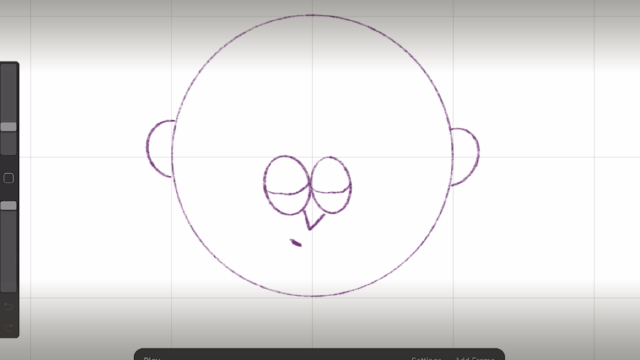
Decide what your character looks like and draw the starting head on the first page with a circle and a center and eye guide line.
Step 4
Draw the final turned head on the last page using the same size circle and guide lines so the head stays the same size.
Step 5
Choose five pages spaced evenly through the stack and mark them lightly to be your key frames.
Step 6
On each marked key frame page draw the head positions from start to full turn (start slight turn half turn three-quarter full profile).
Step 7
Place the blank page after a key frame over it against a window or lamp and lightly draw the head a little closer to the next key frame.
Step 8
Repeat placing each new blank page over the last drawn page and draw the head a small step toward the final turn until every page is filled.
Step 9
Flip quickly through the stack with your thumb to see the motion play and watch for any jumps.
Step 10
Put a small dot on any page that looks jumpy so you know which pages to fix.
Step 11
Redraw small changes on each dotted page to smooth the movement between frames.
Step 12
Trace darker final lines on every page with your thin marker to make the drawings clear.
Step 13
Gently erase extra pencil guide lines from each page so only the clean drawings remain.
Step 14
Stack the pages in order and secure the short edge with a stapler or binder clip with adult supervision.
Step 15
Flip your finished flipbook to enjoy the head turn and share your creation on DIY.org
Help!?
What can I use if I don't have a thin marker, stapler, or a bright window for tracing?
Use a fine-tip colored pencil or pen instead of the thin marker, secure the short edge with a binder clip or elastic band if you don't have a stapler, and substitute your phone flashlight or a desk lamp for the window when placing blank pages over a light source for tracing.
My flipbook looks jumpy when I flip it — what should I check and how do I fix it?
Flip through the stack as instructed, mark any jumpy page with a small dot, then redraw small changes on each dotted page and confirm your starting and final circles plus eye guide lines are the same size so frames match smoothly.
How can I adapt the steps for younger children or older kids/teens?
For younger children use fewer pages (8–12), pre-cut pages and thicker paper with adult supervision for scissors/stapler, while older kids can use the full 20–30 pages, choose five key frames and add more in-between drawings before tracing darker final lines with a thin marker.
How can we extend or personalize the flipbook after finishing the head turn?
After tracing darker final lines and erasing guide lines, personalize by adding color, hair or background details with colored pencils or markers, or scan the stacked pages to make a digital GIF and share the result on DIY.org.
Watch videos on how to Animate a head turn - Part 1!
Head Turn Animation Made Easy! Toon Boom Harmony Tutorial
4 Videos
Head Turn Animation Made Easy! Toon Boom Harmony Tutorial

How to Make a Head Turn 2D Animation In Blender Part 1 Drawing (step by step tutorial)
How to animate a HEAD TURN
Adobe Animate: 360° Character Head Turn Rigging (Step by Step)
Facts about basic animation principles and flipbook techniques
🕰️ The flipbook (patented as the "kineograph") was first registered in 1868 and is one of the earliest toys that created motion from still pictures.
🎞️ Standard film plays at 24 frames per second, but a flipbook with about 12 drawings per second can still look pleasantly smooth and lively.
👀 Persistence of vision is the trick our eyes/brain use to blend separate images into continuous motion—it's why flipbooks appear animated.
✏️ Animators usually create a few strong keyframes (the main poses) and then draw 'inbetweens' to make motion feel smooth.
🧭 You can often read a head turn clearly with just 3–5 key poses (e.g., front, 3/4, profile, 3/4 back, back) before adding inbetweens.
How do you animate a head turn for a flipbook (Part 1)?
What materials do I need to create a head-turn flipbook?
What ages is a flipbook head-turn activity suitable for?
What are the benefits and safety tips for making a head-turn flipbook?
