Make Some Arcs!
Use a string, pencil, and tape to make a simple compass and draw different arcs and circles, exploring radii, centers, and symmetry.

Drawing Apps
Step-by-step guide to make some arcs
Step 1
Gather your string pencil tape paper ruler and colouring materials.
Step 2
Lay the paper flat on a table.
Step 3
Use the pencil to make a small dot where you want the circle center to be.
Step 4
Tape one end of the string to the pencil about 5 cm from the pencil tip.
Step 5
Tape the other end of the string to the center dot on the paper.
Step 6
Pull the pencil outward until the string is taut and the pencil tip touches the paper.
Step 7
Keeping the string taut draw a full circle by moving the pencil all the way around the taped center.
Step 8
Peel the tape off the pencil.
Step 9
Move the string along the pencil to a new distance from the tip and press tape down to secure it.
Step 10
Draw a larger or smaller circle or draw only part of the rotation to make an arc.
Step 11
Peel the tape from the paper center.
Step 12
Stick the string anchor tape to a new spot on the paper to make a different center.
Step 13
Draw overlapping circles and arcs from the different centers to explore radii symmetry and patterns.
Step 14
Share a photo of your finished arcs and circles on DIY.org.
Help!?
What can we use if we don't have string or tape?
Use yarn, thin shoelace, or dental floss instead of the string and secure it to the pencil with masking tape or a rubber band, and if you lack tape for the paper center, anchor the string under a paperclip or a small washer placed on top of the dot.
My circles come out wobbly or the tape keeps slipping off the pencil—what should I do?
Re-tape the string about 5 cm from the pencil tip using stronger tape or wrap the string once around the pencil before taping, make sure the paper is flat and taped at the edges, and keep the string taut as you draw the circle.
How can I adapt this activity for younger or older children?
For younger children, pre-mark the center dot, use a thick marker and adult help to hold the anchor, while older kids can use the ruler to set exact radii, shift the string to precise distances, and record measurements to study symmetry.
How can we extend or personalize our arcs and circles once we've drawn them?
Try changing the taped distance on the pencil to create layered radii, move the paper center to make overlapping patterns, color different arcs with your colouring materials, or paint inside selected arcs and share a photo on DIY.org as suggested.
Watch videos on how to make some arcs
How To Use a Compass to Draw Circles
4 Videos
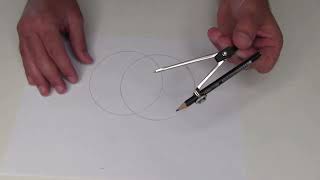
How To Use a Compass to Draw Circles
Easy Paper Crafts Anyone Can Do ▶ 2
Easy Origami Heart | Quick and Fun Paper Folding Tutorial

How to Make Paper Flowers | Easy Paper Flower Tutorial for Kids | DIY Easy Paper Crafts For Kids
Facts about geometry for kids
🧭 A DIY string compass can draw circles as big as your string — fix one end and swing the pencil to set the radius!
📏 The radius is the distance from a circle's center to its edge — double the radius and the circumference doubles too.
🎯 Every point on a circle is exactly the same distance from its center, which is why circles look perfectly round.
🎨 String art uses lots of straight-line segments to create the illusion of smooth arcs and curves — neat trick for kids!
♾️ A perfect circle has infinitely many lines of symmetry: any straight line through the center splits it into matching halves.
How do I make a simple compass to draw arcs and circles for the 'Make Some Arcs!' activity?
What materials do I need to make arcs using string, a pencil, and tape?
What ages is the 'Make Some Arcs!' activity suitable for?
What are the learning benefits of making arcs and exploring centers, radii, and symmetry?
