Create a 3D Custom Engraved Ring Using Tinkercad
Design and customize a 3D engraved ring in Tinkercad, add text or shapes, check dimensions for fit, and export for 3D printing.


Step-by-step guide to create a 3D custom engraved ring using Tinkercad
Step 1
Open Tinkercad and start a new design to get a fresh workplane ready.
Step 2
Measure your finger or an existing ring and write down the inner diameter in millimeters.
Step 3
Pick a wall thickness you like (for example 2 mm) and add twice that thickness to your inner diameter to get the outer diameter.
Step 4
Drag a solid cylinder onto the workplane and set its diameter to the outer diameter and its height to the band height you want.
Step 5
Create a second cylinder configured as a hole and set its diameter to your measured inner diameter and its height to match the band height.
Step 6
Use the Align tool to center the hole cylinder inside the solid cylinder.
Step 7
Group the aligned cylinders to form the ring base.
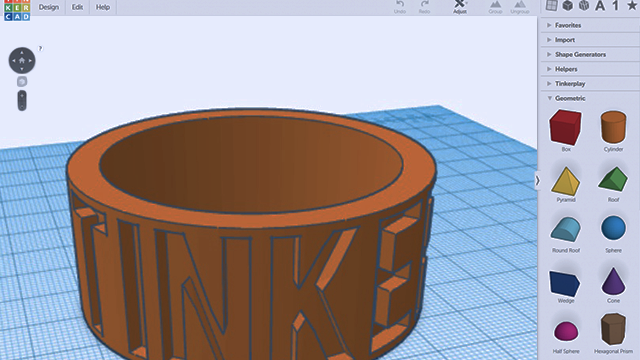
Step 8
Drag the Text shape onto the workplane and type the letters or symbol you want engraved.
Step 9
Resize and position the text so it sits on the outer face of the ring where you want the engraving.
Step 10
Convert the text to a hole and set its depth so it cuts slightly into the ring surface for an engraved look.
Step 11
Align the text hole to the ring face exactly where you want the engraving.
Step 12
Group the ring and the text hole to apply the engraving to your ring.
Step 13
Use the Ruler tool to check the ring's inner diameter and wall thickness and adjust sizes if anything feels off.
Step 14
Save your design export it as an STL and with adult help send the STL to your 3D printer or a 3D printing service to print your ring.
Step 15
Share your finished 3D engraved ring creation on DIY.org.
Help!?
What can we use if we don't have a 3D printer at home?
Export your design as an STL (step: Save your design export it as an STL) and send that STL to an online 3D printing service, local library, or maker space to print the ring.
Why doesn't the engraving appear on my printed ring and how do I fix it?
Make sure you converted the Text shape to a hole, set its depth to cut slightly into the ring surface, aligned the text hole to the ring face, and grouped the ring and text hole before exporting the STL.
How can I change this activity for younger or older kids?
For younger kids use pre-set cylinder sizes and have an adult open Tinkercad and export the STL, while older kids can measure their finger, choose wall thickness, place and size the Text shape, use the Ruler tool to fine-tune dimensions, and export the STL themselves.
How can we personalize or enhance the engraved ring design?
Add extra Text shapes or symbols, try using solid text instead of holes for raised lettering, experiment with different font sizes and hole depths before grouping, and consider printing in colored filament or using a finishing service after printing.
Watch videos on how to create a 3D custom engraved ring using Tinkercad
Arts and Crafts for Kids and Adults | Twinkl Crafts
4 Videos

Arts and Crafts for Kids and Adults | Twinkl Crafts
Creative Ways Of Using 3D-Pen For Any Situation || DIY Jewelry, Mini Crafts And Repair Tricks
Cute 3D-Pen DIY Ideas That Will Brighten Your Life || Mini Crafts, DIY Jewelry And Accessories
Cute 3D-Pen DIY Crafts That Will Amaze You | Easy Repair Tricks, Home Decor Ideas And DIY Jewelry
Facts about 3D modeling and 3D printing for kids
🖥️ Tinkercad is a free, browser-based 3D design tool used by millions and was acquired by Autodesk in 2013—so you can design without installing software.
🖨️ Many hobby 3D printers can print layers thinner than 0.1 mm (100 microns), letting you create fine engraved details.
💍 Jewelers often 3D-print a wax or resin model of a ring first and then cast it in metal for a real shiny finish.
✍️ Carving text as a recessed engraving in your 3D model keeps the lettering from rubbing off over time.
📏 Ring fit is picky: a 0.5 mm change in inner diameter can make a ring feel much tighter or looser, so always check dimensions.
How do I design and customize a 3D engraved ring in Tinkercad?
What materials and tools do I need to create a 3D engraved ring using Tinkercad?
What ages is designing and 3D printing a custom engraved ring appropriate for?
What safety precautions should I follow when making a 3D engraved ring?
