Create a 3D Coffee Mug Using Tinkercad
Design and build a 3D coffee mug in Tinkercad by arranging shapes, adding a handle, resizing for use, and exporting for safe printing.


Step-by-step guide to create a 3D coffee mug using Tinkercad
Step 1
Open Tinkercad and sign in then click "Create new design" to start a blank project.
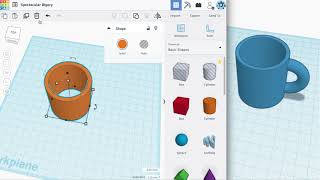
Step 2
Drag a solid cylinder shape onto the workplane from the Basic Shapes menu.
Step 3
Click the cylinder and set its X and Y dimensions to 80 mm and its height (Z) to 90 mm to make the mug body.
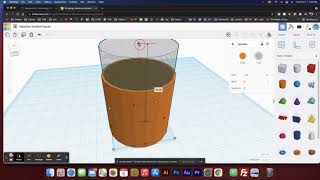
Step 4
Drag a second cylinder onto the workplane and change it to a Hole in the Shape panel.
Step 5
Resize the hole cylinder to 74 mm for X and Y and 85 mm for height to make the mug’s inner cavity.
Step 6
Select both cylinders and use the Align tool to center the hole cylinder perfectly inside the solid cylinder.
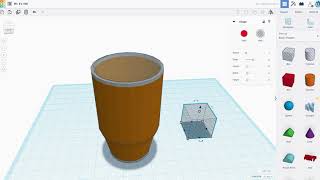
Step 7
Group the two cylinders to create a single hollow mug shell.
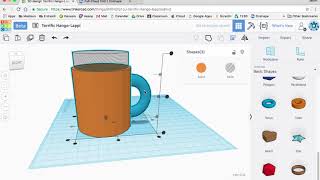
Step 8
Drag a Torus shape onto the workplane to make a handle.
Step 9
Rotate the Torus 90 degrees so it stands upright like a mug handle.
Step 10
Resize the Torus to about 45 mm outer diameter with a tube thickness around 8 mm for a comfy grip.
Step 11
Move the Torus so it overlaps the mug side by at least 3 mm and sits at the height you like.
Step 12
Select the handle and mug and group them so the handle joins the mug as one solid object.
Step 13
Click Export and choose .STL for 3D printing then ask an adult to review the STL and prepare it for safe printing.
Step 14
Share a picture or screenshot of your finished 3D coffee mug design on DIY.org.
Help!?
What can we use if Tinkercad or a 3D printer isn’t available?
If Tinkercad or a printer isn’t available, recreate the project in free CAD tools like Fusion 360 or Blender using a solid cylinder, a hole cylinder, and a torus, then export an .STL and send it to an online printing service.
The inner cavity didn’t cut out when I grouped the cylinders—what should I check?
Ensure the second cylinder is changed to a Hole in the Shape panel, that it reaches inside the solid cylinder (set to 74 mm X/Y and 85 mm height inside the 80×80×90 mm mug), that both are centered with the Align tool, and then select both and click Group so the hole subtracts correctly.
How can I adapt the steps for younger or older kids?
For younger kids have an adult pre-set the 80×80×90 mm outer cylinder and 74×74×85 mm hole so the child only drags and places a torus handle with a 3 mm overlap, while older kids can add engraved Text, change wall thickness, design a lid, or fine-tune the torus dimensions before exporting the .STL.
What are simple ways to personalize or improve the mug before exporting?
Add a Text shape to engrave a name on the mug wall, tweak the hole size to change wall thickness, adjust the torus to a 45 mm outer diameter with an ~8 mm tube for grip, smooth the rim with a fillet or add a saucer, and then export the final grouped object as an .STL for slicing.
Watch videos on how to create a 3D coffee mug using Tinkercad
How to create a simple coffee mug in Tinkercad
4 Videos
How to create a simple coffee mug in Tinkercad
Making a Mug in TinkerCad
Tinkercad Tutorial - Coffee Cup
How to model a tumbler-style mug in Tinkercad
Facts about 3D modeling and 3D printing
🖥️ Tinkercad runs right in your web browser—no software install needed—and it's free for students and hobbyists.
🧩 Designing a mug in Tinkercad is like digital LEGO: stack and merge cylinders, holes, and toruses to shape walls and handles.
☕ Most common 3D-printing plastics (like PLA) aren't automatically food-safe—use certified food-safe filament or apply a food-safe coating before sipping.
🖨️ 3D printers build objects layer by layer; a simple PLA coffee mug usually takes a few hours to print depending on size and settings.
📁 Export your design as an STL or OBJ file—these are standard formats that most 3D printers and print services accept.
How do I design and build a 3D coffee mug in Tinkercad?
What materials and tools do I need to create a 3D coffee mug with Tinkercad?
What ages is designing a 3D coffee mug in Tinkercad suitable for?
What safety tips and printing considerations should I know for a kid-made Tinkercad mug?
