Make A Clip Puppet
Make a clip puppet using a clothespin, paper, markers, glue, and yarn; decorate it, add movable limbs, and perform short puppet stories.


Step-by-step guide to make a clip puppet
Easiest and Shortest Way to Make a Puppet | Making a Sock Puppet
Step 1
Gather all the materials on a clean table so everything is ready.
Step 2
Decide what character your puppet will be and imagine how it will look.
Step 3
Draw a head and a body shape for your character on the paper with markers.
Step 4
Color and decorate the head and body with markers to give your puppet personality.
Step 5
Cut out the head and body shapes carefully with scissors.
Step 6
Cut two or four thin strips of paper for arms and legs and set them aside.
Step 7
Carefully poke a small hole at the end of each paper limb and at matching spots on the paper body.
Step 8
Cut short pieces of yarn—one for each limb—to use as connectors.
Step 9
Thread a yarn piece through a limb hole and through the matching body hole and tie a knot to secure the limb; repeat for each limb.
Step 10
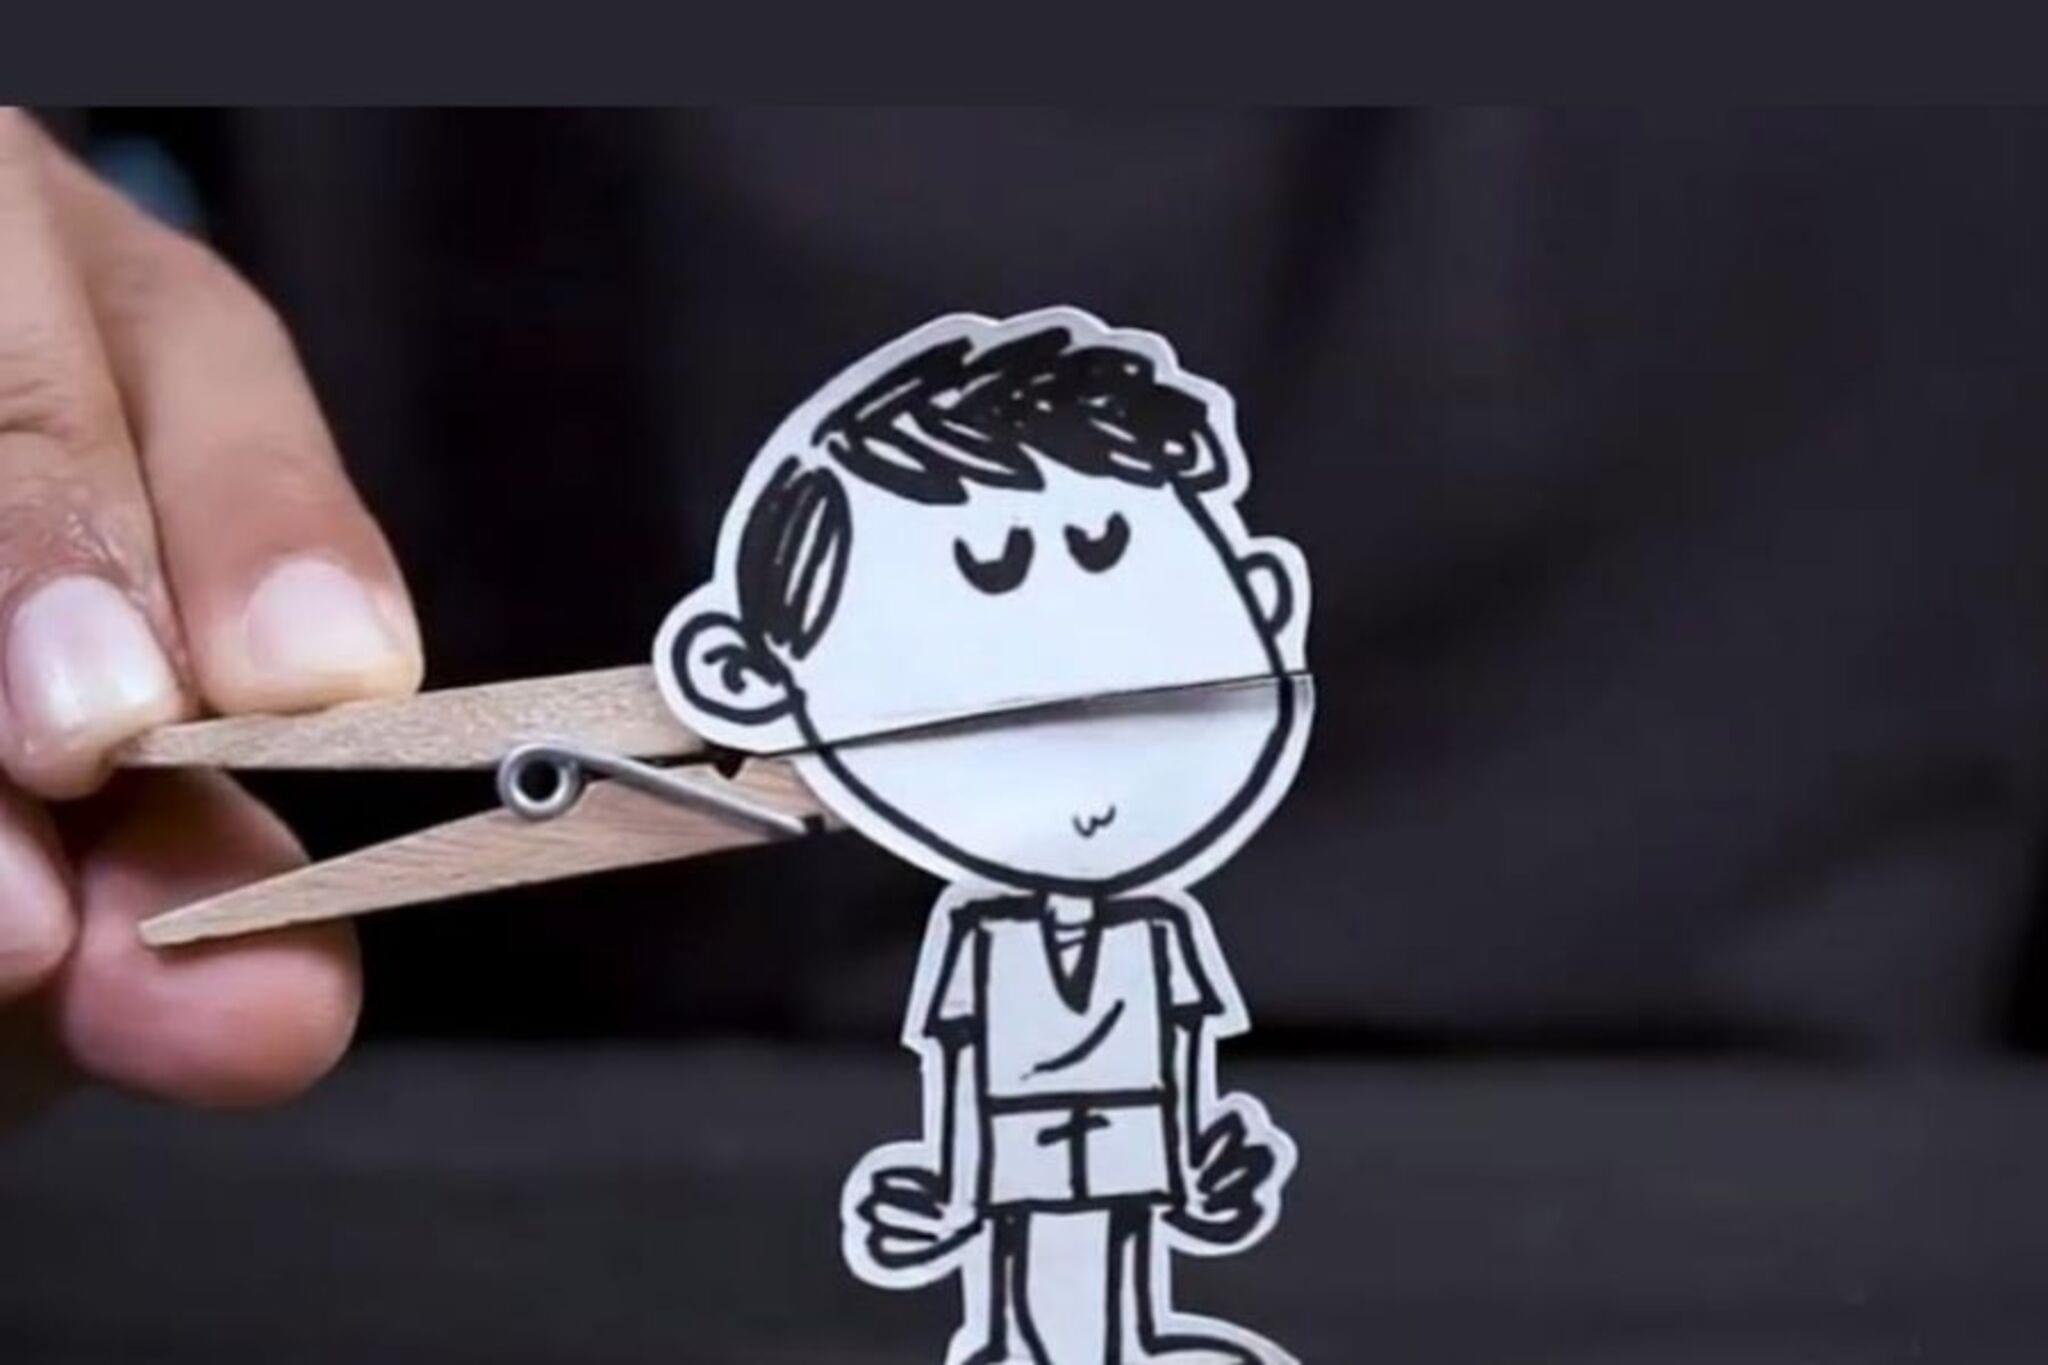
Glue the paper head to the top of the clothespin so the clothespin opens like the puppet’s mouth.
Step 11
Glue the paper body to the front of the clothespin so the yarn limbs hang freely and can move.
Step 12
Let the glue dry completely before touching the puppet.
Step 13
Practice opening and closing the clothespin to make the puppet talk and gently pull the yarn to move the limbs.
Step 14
Share your finished clip puppet creation and a short puppet story on DIY.org
Help!?
What can I use instead of a clothespin if I can't find one?
Use a binder clip or chip clip and glue the paper head to the top so the clip still opens like the puppet's mouth as described in the glue-the-paper-head-to-the-clothespin step.
My paper limbs keep tearing when I poke holes—how can I fix that?
Reinforce the limb and matching body holes with a small piece of clear tape or use a hole punch before threading the yarn so the yarn doesn't tear the paper when you tie the knots.
How can I adapt the steps for a 3-year-old versus a 10-year-old?
For a 3-year-old, pre-cut the head and body shapes, pre-poke or punch the limb holes, and let them color and stick on decorations, while a 10-year-old can draw detailed designs, cut their own shapes, and replace yarn connectors with brads for stronger movable joints.
How can we make the puppet more durable or personalized after finishing it?
Glue the paper head and body onto thin cardboard before cutting, paint or decorate the clothespin, add googly eyes or fabric clothing, and build a small cardboard stage to rehearse and then share the puppet story on DIY.org.
Watch videos on how to make a clip puppet
NO SEW Puppet Build - Easy to Follow - Make a Puppet Easy
4 Videos
NO SEW Puppet Build - Easy to Follow - Make a Puppet Easy
How To Make A Puppet! - Puppet Building 101 - How to Make a Snoof
How to Make Practice Puppets! Easy Fun Puppets!

How to Make a Muppet from Scratch! - Puppet Nerd - DIY
Facts about puppet-making for kids
🪵 Wooden clothespins were mass-produced starting in the 1800s — their simple springy shape makes a perfect tiny puppet body!
🎭 Puppetry is one of the world's oldest storytelling arts — people have been performing puppet shows for thousands of years.
🧶 A few strands of yarn can become hair, whiskers, or beards — yarn comes in endless colors and textures for puppet-making.
✂️ Papercraft is great for upcycling: cereal boxes, scrap paper, and old drawings make fast puppet clothes and props.
🎨 Add simple joints with brads, yarn, or split pins and a paper arm can 'wave' — movable limbs make stories come alive!
How do you make a clip puppet?
What materials do I need to make a clip puppet?
What ages is the clip puppet activity suitable for?
What are the benefits of making clip puppets and fun variations?
