Craft an origami elephant
Fold paper to craft an origami elephant, learn precise folding steps, follow diagrams, and decorate your elephant to explore geometry and fine motor skills.

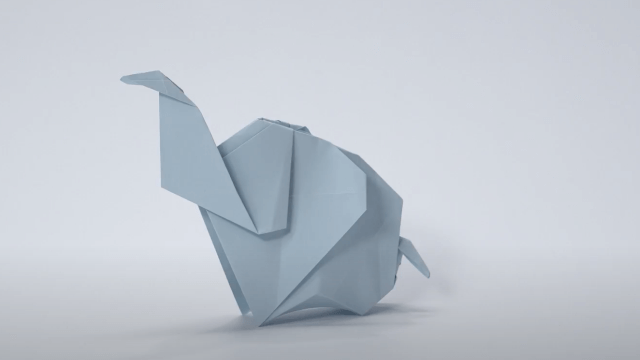

Step-by-step guide to craft an origami elephant
Step 1
Place your square paper color side down on a flat table so the white or plain side is facing up.
Step 2
Fold the paper in half from left edge to right edge to make a center crease and then unfold to return to the flat square.
Step 3
Fold the left edge of the paper in to meet the center crease and press the fold firmly.
Step 4
Fold the right edge of the paper in to meet the center crease and press the fold firmly so you now have a kite shape.
Step 5
Fold the top point of the kite down about one third of the way toward the bottom to form the elephant’s head area and press the crease.
Step 6
Make a small fold at the tip of the head by folding a tiny bit back up to form the trunk tip and press the crease.
Step 7
Fold the top left flap down diagonally to make the left ear and press the crease.
Step 8
Fold the top right flap down diagonally to make the right ear and press the crease.
Step 9
Fold the entire model in half from left to right so the ears sit on the outside and the trunk points forward.
Step 10
Fold the bottom edge back about 1 inch to create flat legs so your elephant can stand and press the crease.
Step 11
Decorate your elephant with coloring materials by drawing eyes patterns and any fun designs.
Step 12
Share your finished origami elephant on DIY.org
Help!?
What can we use if we don't have square origami paper?
Cut a 6–8 inch square from printer paper, wrapping paper, or a magazine and follow the same folding sequence with the color side down so the white/plain side faces up.
Why won't my elephant stand after I fold the bottom edge back about 1 inch?
If the elephant won't stand after you fold the bottom edge back about 1 inch, make that leg fold slightly wider, press the crease firmly with a fingernail or ruler, and gently spread the two legs so the flat legs support the model.
How can I simplify or make this origami elephant more challenging for different ages?
For younger children use a larger square (10–12 inches) and pre-fold the center and kite folds (steps 2–4), while older kids can refine the trunk tip fold, shape the ears more precisely, add a small paper tusk, and decorate with detailed patterns using markers.
How can we personalize or extend the activity after decorating the elephant?
After decorating (step 11), personalize by gluing on googly eyes or stickers, tucking a small folded paper tail into the back, making a herd of elephants in different colors and sizes, and photographing them to share on DIY.org.
Watch videos on how to craft an origami elephant
Easy and Beautiful Elephant Origami Tutorial - Paper Elephant Step by Step
4 Videos
Easy and Beautiful Elephant Origami Tutorial - Paper Elephant Step by Step

Cute Origami Elephant - Easy Paper Elephant Making
Easy Origami Elephant - Paper Elephant instructions

EASY ELEPHANT ORIGAMI TUTORIAL | DIY PAPER CRAFT ANIMALS FOR KIDS BEGINNERS
Facts about origami and paper folding
📰 Origami comes from Japanese ori ('folding') + kami ('paper'), mixing art and language!
🐘 Elephants use their trunks like hands — they can pick up tiny objects with surprising precision.
📄 A single paper fold doubles the layers, so after 5 folds you'll have 32 layers — a neat example of exponential growth!
📐 Paper folding teaches symmetry: a fold creates a mirror line so both sides match.
🖐️ Folding tiny corners and creases helps kids build fine motor skills and concentration.
How do I fold an origami elephant step by step?
What materials do I need to make an origami elephant?
What ages is folding an origami elephant suitable for?
What are the benefits of making an origami elephant with my child?
