Animate a Balloon
Animate a balloon puppet using straws, string, tape, and markers; build movable limbs and practice storytelling by making your balloon character act out short scenes.

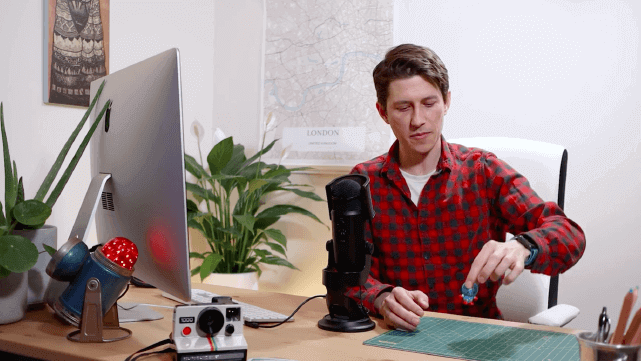

Step-by-step guide to animate a balloon
Step 1
Blow up the balloon until it is about the size of your fist.
Step 2
Tie a tight knot at the balloon's neck to keep the air in.
Step 3
Use markers to draw a face with eyes a nose and eyebrows on the balloon.
Step 4
Cut four pieces of string each about 25 cm long for the limb control lines.
Step 5
Cut eight straw pieces about 2 to 3 cm long to make bendy sections for the limbs.
Step 6
Thread each string through two or three straw pieces so each string becomes a bendy limb and knot the string ends to keep the straws from sliding.
Step 7
Tape the knotted ends of the four string-limbs to the balloon where you want two arms and two legs.
Step 8
Gather the four free string ends and tape them neatly to a longer straw or stick to make a handle for controlling the limbs.
Step 9
Fold the small square of paper in half to make a simple mouth and tape it under the drawn face so it can open and close.
Step 10
Hold the handle and gently pull different strings to make the balloon's arms and legs move.
Step 11
Think of a short scene like waving saying hello or pretending to jump and plan how the puppet will move.
Step 12
Practice your scene and give your balloon character a voice and personality as it acts out the movements.
Step 13
Share a photo or video of your finished balloon puppet and its best scene on DIY.org.
Help!?
What can I use instead of the 2–3 cm straw pieces or the 25 cm string if I can't find them?
If you don't have drinking straws use short rolled paper tubes or beads as bendy sections and swap the 25 cm string for embroidery floss, thin ribbon, or fishing line while using a pencil, chopstick, or wooden dowel instead of the longer straw handle.
My taped limbs keep falling off or the straws slide—what can I do?
Make sure you don't overinflate past the 'size of your fist', double-knot the balloon neck and the string ends, wrap extra tape around the knotted string where you tape it to the balloon from the step that says 'tape the knotted ends', and thread two or three straw pieces per string so they sit snugly before knotting to prevent sliding.
How can I adapt this activity for different ages so it's safe and fun?
For 3–5 year olds have an adult blow up and knot the balloon and pre-cut and pre-thread the 25 cm strings and 2–3 cm straw pieces, for 6–9 year olds let them cut and tape with supervision, and for 10+ let kids add extra straw segments, detailed marker faces, and choreograph longer scenes from the 'think of a short scene' step.
How can we extend or personalize the balloon puppet beyond the simple scene?
Personalize by gluing on googly eyes or fabric clothes, replace the folded paper mouth with a hinged paper mouth or small paperclip for bigger movement, add more straw segments for bendy limbs, or build simple props and a backdrop to film a longer puppet show to share on DIY.org.
Watch videos on how to animate a balloon
Flying Balloons animation - After effects tutorial for beginners
4 Videos

Flying Balloons animation - After effects tutorial for beginners

How make balloons Animation in PowerPoint || Flying Balloons .....
How To Draw A Hot Air Balloon Challenge

12 Balloon Animals Everyone Should Know / Easy One Balloon Animals
Facts about puppetry for kids
🎈 The word "balloon" comes from the French "ballon," which means "large ball."
🧵 Puppetry is one of the oldest forms of theatre—examples of puppet-like figures appear in ancient Egypt and Greece over 3,000 years ago.
🎬 Filmmakers used stop-motion as early as the 1890s to make toys and models appear to move on their own.
🥤 Straws, string, and tape are popular DIY puppet tools—straws make excellent lightweight hinges for movable limbs.
🎭 Playing with puppets boosts storytelling, language, and empathy—pretend play supports social and emotional learning.
How do I animate a balloon puppet for storytelling?
