Make a Flipbook
Create a small animated flipbook by drawing sequential images on paper, then bind and flip pages to watch your drawings come to life.


Step-by-step guide to make a flipbook
Step 1
Gather all the materials and place them on a clean flat table.
Step 2
Decide how many pages you want for your flipbook and stack that many sheets neatly with the edges lined up.
Step 3
Secure the short edge of the stack with a binder clip or staple to make a simple binding.
Step 4
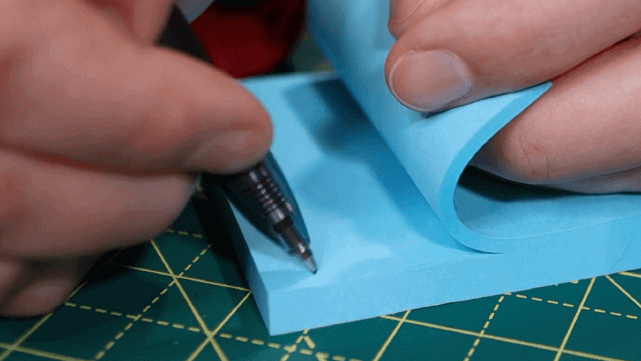
Put the scrap cardboard under the stack to give a firm surface to draw on.
Step 5
Lightly sketch a simple starting pose on the top page using your pencil.
Step 6
Flip to the next page and draw the same character with a very small change in position or expression.
Step 7
Repeat flipping one page and making tiny changes on each page until every page has a frame of the animation.
Step 8
Trace over the pencil sketches with the fine-tip black pen to make the drawings clearer.
Step 9
Erase the pencil lines from each page after the ink is dry.
Step 10
Add color to the frames using your coloring materials if you like.
Step 11
Hold the bound edge with one hand and flip the pages quickly with your thumb to watch your animation come to life.
Step 12
Share your finished flipbook creation on DIY.org
Help!?
What can we use if we don't have a binder clip/stapler or scrap cardboard?
If you don't have a binder clip or stapler, tightly wrap a rubber band or strong tape around the short edge to secure the stack (step 3), and use a cereal box panel or a thin book cover as the scrap cardboard under the stack (step 4).
My flipbook looks jumpy or the ink smudges—what should I check and do?
If the animation jumps or the ink smears, make sure the sheets are neatly stacked with edges aligned and firmly secured (steps 2–3), keep the scrap cardboard under the stack while drawing to hold positions steady (step 4), and let the fine-tip black pen fully dry before erasing (step 9).
How can I adapt this flipbook activity for different ages?
For younger children, use fewer sheets, make larger pose changes between pages, and allow crayons on thicker paper (steps 2, 6, 10), while older kids can use more pages with finer incremental changes and trace with a fine-tip black pen for cleaner frames (steps 2, 6, 8).
How can we personalize or extend the finished flipbook?
Personalize it by adding a decorated cardboard cover from the scrap cardboard, writing a title and credits on the first page, coloring frames with your coloring materials (steps 4, 10), and scanning the pages to create a GIF or video to share on DIY.org (step 12).
Watch videos on how to make a flipbook
How to Make a FLIPBOOK for Beginners!
4 Videos
How to Make a FLIPBOOK for Beginners!
How to make a Flip Book Animation
How to make a simple flipbook. The complete process

How to Make a Flip Book - Step-by-Step Guide for Beginners (DIY Animation at Home!)
Facts about hand-drawn animation
🎞️ The flip book (also called a flick book) was patented in 1868 and became a popular pocket-sized way to show motion.
🧠 Our brains can blend as few as 12–24 still images per second into the illusion of smooth movement—movies typically use 24 fps.
🌀 The zoetrope is a spinning ancestor of the flipbook from the 19th century that shows motion through slits in a drum.
✏️ Professional animators often make tiny sketchy tests (pencil tests) just like flipbooks to check timing and action before final frames.
📐 You only need about 12–24 drawings to create a short, smooth flipbook animation—perfect for quick experiments and fun stories.
How do you make a flipbook?
What materials do I need for a flipbook?
What ages is this activity suitable for?
What are the benefits of making flipbooks and are there safety tips?
