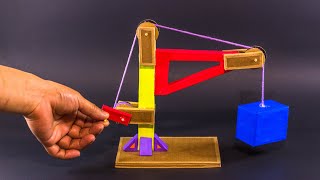
Build a machine that flips a light switch
Build a small mechanical arm that flips a wall light switch using cardboard, levers, rubber bands, and a safe battery motor, with adult help.


Step-by-step guide to build a machine that flips a light switch
How to Build a Simple Electrical Circuit — At-Home Science Activity for Kids
Step 1
Ask an adult for permission and help to build a safe switch-flipping machine.
Step 2
Promise the adult you will not touch any electrical wiring and that only the adult will touch wires or the inside of the switch.
Step 3
Gather all the materials on a clean table so they are easy to reach.
Step 4
Cut a rectangular piece of cardboard about 20 cm by 10 cm to use as your base.
Step 5
Ask the adult to make a small hole in the bottle cap so it will fit onto the motor shaft.
Step 6
Glue the bottle cap to one end of the craft stick to make a simple arm connector and let the glue dry.
Step 7
Tape or glue the motor to the cardboard near one short edge so the motor shaft faces outward over the base.
Step 8
Push the craft stick connector onto the motor shaft so the stick will turn when the motor spins.
Step 9
Hook a rubber band from the tip of the craft stick to a staple or tape anchor on the cardboard to pull the arm back after it moves.
Step 10
Place the cardboard base against the wall so the arm tip sits just under the light switch toggle.
Step 11
Ask the adult to install the battery and briefly turn the motor on while you watch to see how the arm moves.
Step 12
Move the arm position or change the rubber band anchor point until the arm reliably pushes the switch up or down.
Step 13
Secure the base with extra tape or a small weight so it does not slide when the arm moves.
Step 14
Share a photo or video of your finished switch-flipping machine on DIY.org.
Help!?
What can we use instead of a small motor, bottle cap, or craft stick if those are hard to find?
If you can't find a small motor or bottle cap, use a battery-powered toy motor for the motor shaft, a small plastic lid or a short piece of drinking straw instead of the bottle cap hole, and substitute a popsicle stick for the craft stick when you glue the connector.
The arm doesn't reach or the machine slips—what should we check or change?
If the arm doesn't hit the toggle when you place the cardboard base against the wall so the arm tip sits just under the light switch, try moving the motor closer to the edge, change the rubber band anchor point, have the adult briefly test the motor with the battery to confirm motion, and secure the base with extra tape or a small weight as the instructions say.
How can we adapt this project for younger kids or make it more challenging for older kids?
For younger children have an adult pre-cut the 20 cm by 10 cm cardboard, make the hole in the bottle cap, and glue or tape the motor in place while the child attaches the craft stick and adjusts the rubber band, and for older kids add gearing, a longer arm, or a controlled switch or microcontroller (with adult help) for more precise flipping.
What are some ways to extend or personalize the switch-flipping machine after it works?
You can decorate the cardboard base, swap the bottle-cap connector for a longer craft stick arm, add a second rubber band anchor for push-and-pull motion, or (with adult supervision) add a relay or timer so the motor flips the light automatically before sharing a photo or video on DIY.org.
Watch videos on how to build a machine that flips a light switch
DIY Busy Board: Light Switch Box Toy for Toddlers - Sensory Box/Activity Board for kids
4 Videos
DIY Busy Board: Light Switch Box Toy for Toddlers - Sensory Box/Activity Board for kids
Simple Machine Projects | Pulley Working Model

How to make a switch (DIY) | Circuits Part 3| Learning Made Fun

How to make a simple switch
Facts about simple machines and basic electronics for kids
🤖 Rube Goldberg's cartoons inspired the name for crazy chain-reaction machines that do simple jobs in lots of silly steps.
⚙️ A lever makes work easier — the longer the arm you push, the less force you need to move something heavier.
🔋 Tiny battery-powered motors can spin thousands of times per minute and are used in toys, fans, and simple machines.
📦 Corrugated cardboard becomes much stronger when folded into tubes or beams — great for building sturdy arms and frames.
💡 A light switch simply opens or closes the electrical circuit to a lamp — always have an adult help when working near house wiring.
How do I build a small mechanical arm to flip a wall light switch?
What materials do I need to build a light-switch-flipping machine?
What ages is this cardboard lever light-switch project suitable for?
What safety tips and learning benefits come from making a switch-flipping machine?
