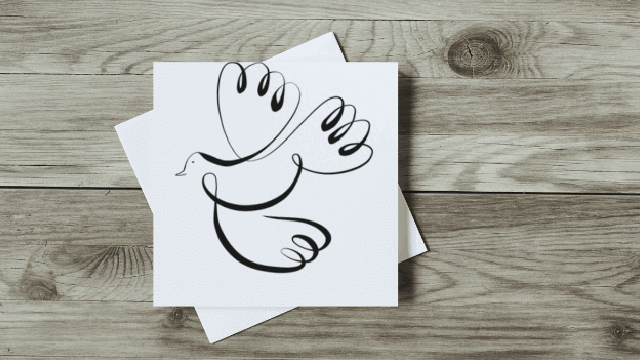
Make a Bird With One Line Patterns!
Draw a bird using continuous one-line patterns, practice smooth line control and creativity, add repeating motifs and simple shading to bring your bird to life.

Drawing Apps
Step-by-step guide to make a bird with one-line patterns
Step 1
Gather all your materials and set them on a flat table where you can draw comfortably.
Step 2
On your scrap paper practice drawing one continuous line by making spirals loops and waves without lifting your pencil.
Step 3
Practice drawing a simple shape like a circle or a leaf in one continuous line on the scrap paper.
Step 4
Look at pictures of birds or imagine a bird and decide the pose you want to draw.
Step 5
Put a small dot on your main paper where you will start your continuous line.
Step 6
Start at your dot and draw your bird in one continuous line forming the head body wing tail and feet without lifting your pencil.
Step 7
Continue the same uninterrupted line to add repeating motifs like scallops loops zigzags or feather shapes inside the bird.
Step 8
Thicken parts of the line by going over them once to create areas that look darker or more important.
Step 9
Carefully trace your finished pencil line with the fine tip pen or marker in one smooth motion.
Step 10
Wait a moment for the ink to dry then gently erase any remaining pencil marks.
Step 11
Add simple shading with closely spaced parallel lines or denser motifs and then color your bird using your coloring materials.
Step 12
Share your finished creation on DIY.org
Help!?
What can I use if I don't have a fine-tip pen, marker, or specific coloring materials listed?
Use a sharpened graphite or colored pencil or a ballpoint pen to trace the finished continuous pencil line and substitute crayons or washable markers for coloring, then wait for any wet ink to dry before erasing pencil marks.
I'm accidentally lifting my pencil or breaking the continuous line—how can I fix that?
Practice the continuous motion on scrap paper, start lightly at the dot on your main paper so you can confidently reconnect any accidental lifts by overlapping the break and then thicken that area when you go over it with ink.
How can I adapt this one-line bird activity for different ages?
For preschoolers, pre-draw a simple bird outline and let them add one continuous motif with chunky markers and crayons, while older kids can include complex repeating motifs, varied line weights by retracing, and detailed parallel-line shading before coloring.
How can we extend or personalize our finished one-line bird?
After tracing and erasing, personalize by adding a patterned background echoing the bird's internal motifs, experimenting with watercolor washes over the ink, or creating a mini-series of birds in different poses to share on DIY.org.
Watch videos on how to make a bird with one-line patterns
How To Draw A Bird Step By Step 🐦| Bird Drawing EASY| Super Easy Drawings For Kids
4 Videos
How To Draw A Bird Step By Step 🐦| Bird Drawing EASY| Super Easy Drawings For Kids

How to Draw A Bird Easy
How To Draw A Bird | Simple Drawing Lesson for Kids | Step By Step

How to draw a birds | Easy bird drawing tutorial | kids drawing
Facts about drawing and pattern techniques for kids
🐦 The bee hummingbird is the world's smallest bird at about 5 cm — a tiny inspiration for bird sketches!
🎨 Pablo Picasso created famous continuous one-line drawings that capture faces and animals with a single unbroken stroke.
🌀 The Zentangle method, popularized in the early 2000s, uses repeating patterns to relax the mind and spark creativity — great for one-line patterns.
✒️ Simple motifs like dots, loops, and hatch marks can create the illusion of texture and shading even when you don't lift your pen.
🧠 Practicing smooth continuous lines helps improve fine motor control, hand-eye coordination, and visual planning for young artists.
How do you make a bird using one-line patterns?
What materials do I need to make a one-line pattern bird?
What ages is this one-line bird activity suitable for?
What are the benefits of drawing birds with one-line patterns?
