Draw a Kawaii Eye with DIY Star KawaiiSilverWolf
Draw a KawaiiSilverWolf-style eye and create a matching DIY star accessory using simple shapes, shading, and colors to practice drawing skills.

Drawing Apps
Step-by-step guide to draw a Kawaii Eye with DIY Star (KawaiiSilverWolf style)
Step 1
Gather your materials and find a clean flat spot to draw.
Step 2
Lightly sketch a large tilted oval for the basic eye shape.
Step 3
Draw an arched upper eyelid line that overlaps the top of the oval.
Step 4
Draw a softer curved lower eyelid line beneath the oval to finish the eye outline.
Step 5
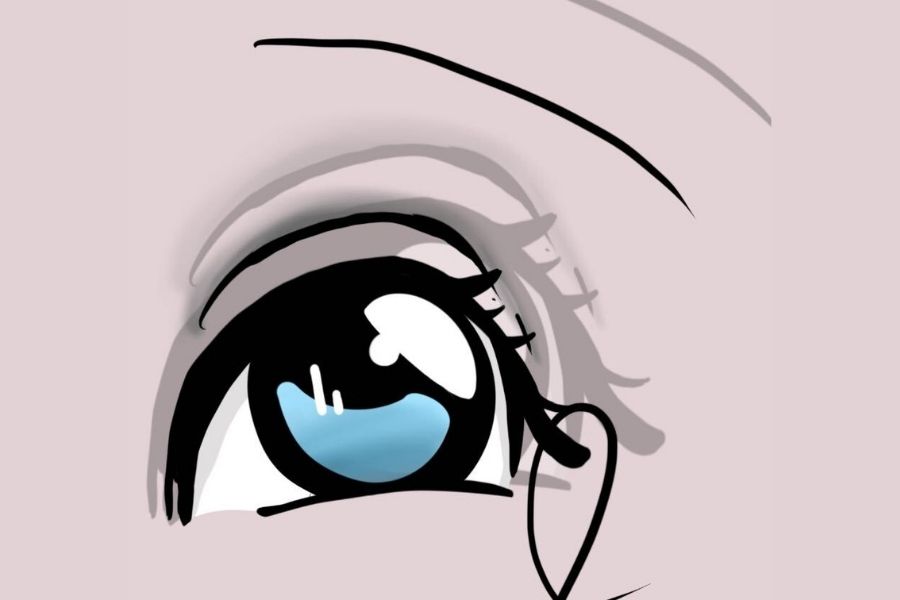
Draw a large circle inside the eye for the iris and a smaller circle for the pupil.
Step 6
Add two highlight shapes inside the iris like a big round sparkle and a smaller dot sparkle.
Step 7
Draw three short curved eyelashes on the outer top edge of the eye.
Step 8
Shade the iris with your pencil making the outer edge darker than the center.
Step 9
Gently blend the shaded iris with your fingertip or a tissue to smooth the tones.
Step 10
Carefully trace the final eye lines with your black pen and wait for the ink to dry.
Step 11
Erase any remaining pencil guidelines so the eye looks clean.
Step 12
Draw a simple five-point star accessory on the paper sized to match the eye.
Step 13
Add a cute tiny face to the star with two small eyes and little blush circles.
Step 14
Color the eye and the star using matching colors and finish bright spots with the white gel pen.
Step 15
Share your finished KawaiiSilverWolf-style eye and matching star accessory on DIY.org
Help!?
What can I use instead of a white gel pen or specialized blending tools?
If you don't have a white gel pen, use a white colored pencil or a tiny dab of white acrylic paint for the bright spots, and substitute a tissue or cotton swab for your fingertip when blending the shaded iris.
My ink smudged or my highlights disappeared—how can I fix that?
If the black pen smudges or highlights get covered, trace lightly and follow the instruction to wait for the ink to dry fully, then gently erase stray pencil marks and redraw highlights with the white gel pen or white colored pencil.
How can I change the activity to suit different ages or skill levels?
For younger kids, pre-sketch the tilted oval and five-point star and let them add the simple iris, two highlight shapes, and color, while older kids can refine the arched eyelid, add three curved eyelashes, deepen the iris shading, and blend with tissue or fingertip for realism.
How can we extend or personalize the finished Kawaii eye and star?
To personalize and extend the activity, make a matching pair of eyes, decorate the star with patterned cheeks or tiny accessories, glue the colored star onto cardstock to make a bookmark or pin, add a touch of glitter to the iris, and photograph your KawaiiSilverWolf-style set to share on DIY.org.
Watch videos on how to draw a Kawaii Eye with DIY Star (KawaiiSilverWolf style)
How to DRAW SUPER EASY AND CUTE EYES 6 DIFFERENT WAYS!
4 Videos
How to DRAW SUPER EASY AND CUTE EYES 6 DIFFERENT WAYS!
How to DRAW SUPER EASY AND CUTE EYES 4 DIFFERENT WAYS!
HOW TO DRAW CUTE EYES 💖
HOW TO DRAW CUTE EYES 💖 in just 15 seconds
Facts about kawaii drawing techniques
🎀 "Kawaii" literally means "cute" in Japanese and grew into a global style in fashion, toys, and art.
👁️ Kawaii eyes are often oversized and use multiple white highlights to look shiny and full of emotion.
⭐ You can draw a five-pointed star in one continuous line (a pentagram path) — a fun one-stroke trick!
✏️ Many artists start drawings with simple shapes like ovals and circles — even complex eyes begin that way.
🌈 Using just 3–5 bold colors on a star accessory makes it pop and matches the playful Kawaii style perfectly.
How do I draw a KawaiiSilverWolf-style eye and make a matching DIY star accessory?
What materials do I need to draw a kawaii eye and create the DIY star?
What ages is the KawaiiSilverWolf eye and star activity suitable for?
What are the benefits, safety tips, and fun variations for this drawing and craft activity?
