#PhotoFestival21 - Day 2 : Happiness
Create a mini photo story about happiness by taking five photos of joyful moments, arranging them, and writing short captions to explain each image.


Step-by-step guide to #PhotoFestival21 - Day 2 : Happiness
Photosynthesis 🌷 | What is photosynthesis? | Step-by-step process
Step 1
Choose a happiness theme for your mini photo story.
Step 2
Make a short list of five joyful moments you want to photograph.
Step 3
Ask an adult for permission to take photos and for any help you might need.
Step 4
Decide safe times and places where you will take each photo.
Step 5
Get your camera or smartphone ready by opening the camera app and checking the battery.
Step 6
Take five photos, one for each joyful moment on your list.
Step 7
Review the photos and pick the best five that tell your story.
Step 8
Print the five photos or move them into a folder or slideshow for arranging.
Step 9
Arrange the photos in an order that makes a happy story.
Step 10
Write a short caption for each photo explaining the joyful moment.
Step 11
Add a title and your name to the photo story.
Step 12
Decorate the layout with coloring materials and tape or glue to make it cheerful.
Step 13
Take a final photo or export a single file of your finished photo story.
Step 14
Share your finished creation on DIY.org
Help!?
What can we use instead of a printer or a fancy camera if we don't have them?
If you don't have a printer or a fancy camera, move the photos into a folder or slideshow (Step 8) and export a single file or take a screenshot from your smartphone or tablet instead of printing.
My photos are blurry or my phone dies while I'm taking the five photos—what should I do?
Before taking each joyful moment photo, follow Step 5 by charging the device, cleaning the camera lens, and choosing a well-lit, steady spot so you avoid blur or battery problems during Steps 6 and 7.
How can I change this activity to suit a 4-year-old versus a 12-year-old?
For a 4-year-old, shorten the plan from Step 2 to three moments and have an adult help with camera use and printing in Steps 3 and 8, while a 12-year-old can write longer captions in Step 10 and create a digital slideshow in Step 8.
How can we make the finished photo story more creative or special before sharing on DIY.org?
To personalize the story, add small thematic props when taking photos, write imaginative captions in Step 10, decorate with coloring materials, stickers, and tape or glue in Step 12, and include background music or a voice narration when you export the final file in Step 13.
Watch videos on how to #PhotoFestival21 - Day 2 : Happiness
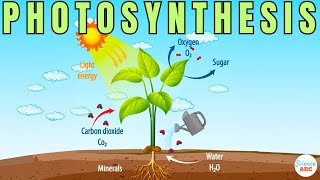
Photosynthesis
4 Videos
Photosynthesis

Photosynthesis: Crash Course Biology #8
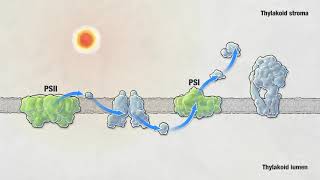
Photosynthesis | HHMI BioInteractive Video
Photosynthesis: The Biochemistry Behind How Plants Make Their Food
Facts about photography and storytelling for kids
📸 Cameras can freeze moments faster than your blink — some shutters work at 1/8000 of a second!
😊 Smiles are contagious: seeing someone smile activates your brain's mirror neurons and often makes you smile back.
🎞️ Photo stories usually use 3–7 images to show a beginning, middle, and end—five photos are perfect for a mini story!
🧭 The "rule of thirds" (imagine a tic-tac-toe grid) helps make photos feel balanced and more interesting.
✍️ A single short caption can change how you understand a picture — words + images make stories stronger.
How do I create a mini photo story about happiness for #PhotoFestival21 Day 2?
What materials do I need to make a mini photo story about happiness?
What ages is the #PhotoFestival21 Day 2 photo story activity suitable for?
What are the benefits of creating a mini photo story about happiness?
