Learn Mandala Art
Create colorful mandala drawings using pencil, compass, ruler, and markers. Practice symmetry, repeating patterns, and mindful focus while designing radial artwork step by step.


Step-by-step guide to Learn Mandala Art
Step 1
Gather your materials and find a flat comfy workspace.
Step 2
Put a small dot in the center of your paper with your pencil.
Step 3
Draw a small circle around the center dot using your compass.
Step 4
Draw three more concentric circles around the center with the compass to make rings.
Step 5
Mark points on the outermost circle every 45 degrees using the protractor.
Step 6
Draw light straight lines from the center through each mark to the outer edge to make spokes.
Step 7
Draw a simple shape like a petal or dot inside one wedge of a chosen ring.
Step 8
Repeat that same shape in every wedge of that ring so the pattern goes all the way around.
Step 9
Draw a different small shape inside one wedge of another ring.
Step 10
Repeat that new shape in every wedge of its ring to keep the design symmetric.
Step 11
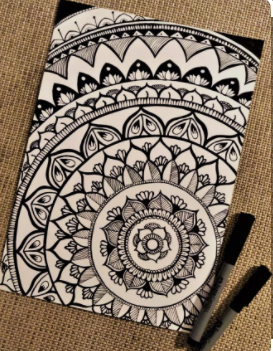
Trace your circles and shapes with the fine-tip black marker to make crisp outlines.
Step 12
Erase the pencil guide lines gently so only your inked design remains.
Step 13
Take three slow deep breaths to relax and focus before coloring.
Step 14
Color your mandala with markers using repeating colors to keep the symmetry balanced.
Step 15
Share your finished mandala on DIY.org
Help!?
What can we use if we don't have a compass or protractor?
If you don't have a compass, trace different-sized coins or cups to make the concentric circles and use a printable protractor or a ruler with folded paper to mark the points every 45 degrees for the spokes.
My spokes or repeated shapes look uneven—how can I fix that?
Make the light pencil guide lines with a straightedge for each spoke, redraw the repeated shape inside one wedge and use it as a visual template before repeating it in each wedge, and let ink dry fully before gently erasing pencil guides to keep outlines crisp.
How can I adapt the mandala activity for different ages?
For younger kids, pre-draw the concentric circles and spokes and use stickers or large simple shapes to fill wedges, while older kids can add more concentric rings, mark smaller-angle divisions with the protractor, and design more intricate repeating motifs to color.
What are ways to enhance or personalize our finished mandala?
After tracing with the fine-tip black marker and erasing pencil lines, personalize by adding metallic gel pens or glitter glue to some shapes, creating a watercolor wash behind the rings before coloring, or signing and sharing the finished mandala on DIY.org.
Watch videos on how to Learn Mandala Art
Mandalas Narrated Digital Storybook for Kids for Elementary Art Lessons
4 Videos
Mandalas Narrated Digital Storybook for Kids for Elementary Art Lessons
How to Draw a Mandala: Easy Step-by-Step Tutorial for Beginners!
Complete Beginner's Guide to Mandalas & Sacred Geometry Art

Let's create Mini Mandalas with some basic & easy Patterns ✨🥰 How to draw Mandala Art for beginners
Facts about mandala drawing and symmetry
🕉️ "Mandala" comes from a Sanskrit word meaning "circle" and has been used in Hindu and Buddhist art for thousands of years.
🎯 Mandalas use radial symmetry—artists often divide a circle into 4, 6, or 8 sections so patterns repeat perfectly around the center.
🧭 A compass and ruler are key tools for drawing concentric circles and guide lines that keep your mandala neat and balanced.
🧘 Making or coloring mandalas is a mindful practice—repeating patterns can help calm the mind and improve focus.
🏜️ Tibetan monks create intricate sand mandalas that can take days to finish and are ritually swept away to teach impermanence.
How do you create a mandala drawing step by step with kids?
What materials do I need to make mandala art with my child?
What ages is mandala art suitable for?
What are the benefits of practicing mandala art with kids?
