Decorate with Pumpkin Lights
Create pumpkin-shaped string lights using paper or mini-pumpkin covers, battery-powered LED fairy lights, scissors, and tape to decorate safely for fall.


Step-by-step guide to decorate with pumpkin lights
Step 1
Gather all materials and lay them out on a clean table.
Step 2
With an adult, test the fairy lights by turning them on and checking that the bulbs light up.
Step 3
Count how many bulbs are on the string so you know how many pumpkin covers to make.
Step 4
If using paper, place a bulb next to a paper sheet and draw a pumpkin shape about the size of the bulb with a pencil.
Step 5
Cut out the pumpkin shape carefully with scissors.
Step 6
Make a small slit or hole at the base of the paper pumpkin big enough for the bulb to fit through.
Step 7
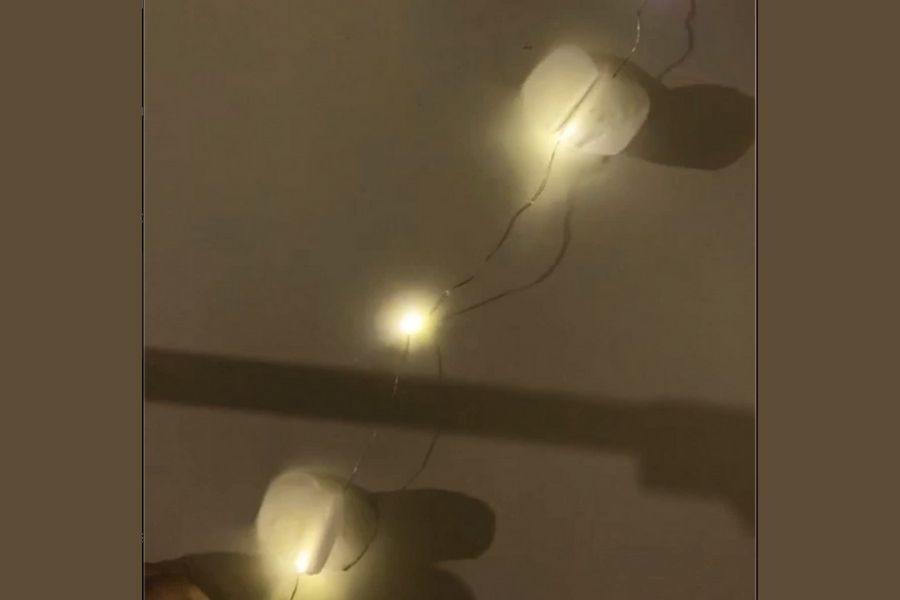
Slide a paper pumpkin or a mini-pumpkin cover gently over one bulb so the bulb sits inside the pumpkin.
Step 8
Secure the pumpkin cover to the light base with a small piece of clear tape so it won't fall off.
Step 9
Decorate the pumpkin cover with coloring materials to add faces or patterns.
Step 10
Repeat steps 4 through 9 for each remaining bulb until every bulb has a pumpkin cover.
Step 11
Hang your pumpkin string lights in your chosen spot using tape or hooks and adjust the spacing so they look even.
Step 12
Share your finished pumpkin-string lights creation on DIY.org
Help!?
What can we use if we don't have paper or mini-pumpkin covers?
If you don't have paper or mini-pumpkin covers, use craft foam sheets, coffee filters, or cut small plastic cups as pumpkin covers and follow step 6 to make a slit/hole so you can slide them over each bulb and secure with clear tape in step 8.
My pumpkin covers keep falling off or the paper rips when I slide them over the bulbs—how can I fix that?
If covers fall off or tear during steps 6–7, make the slit slightly smaller for a snug fit, reinforce the base with a small piece of clear tape as in step 8, or switch to a thicker material like foam to prevent ripping.
How can I adapt this activity for different ages?
For toddlers, have an adult handle steps 4–7 (trace, cut, and slit) and let the child do step 9 decorating, while older kids can complete steps 4–8 themselves and add more detailed faces or layered materials during step 9.
What are some ways to personalize or extend the pumpkin string lights after finishing step 11?
To personalize after step 11, glue small green felt stems to each paper pumpkin, write names or spooky faces with markers during step 9, add sequins or fake leaves between bulbs, or mix in different colored bulbs for a varied look.
Watch videos on how to decorate with pumpkin lights
Pumpkins for Kids
4 Videos

Pumpkins for Kids
How to Draw Pumpkins Easy 🎃Cute Halloween Fall Art
How To Draw A Pumpkin And Color
How To Make A Halloween Pumpkin Easy Origami Tutorial Step by Step Guide For Kid/ハロウィンかぼちゃの折り紙簡単な作り方
Facts about fall crafts for kids
🎃 Pumpkins are actually a fruit — they're a type of winter squash and are related to cucumbers and melons.
🕯️ The jack-o'-lantern tradition began in Ireland with carved turnips; settlers in North America started using pumpkins because they're larger and easier to carve.
✨ LED fairy lights use very little energy and stay cool to the touch, making them safer to use around paper decorations.
🔋 Many battery-powered string lights can run for 6–12 hours on a set of batteries, perfect for evening fall displays.
✂️ Well-folded papercraft shapes or mini pumpkin covers make lightweight, reusable lanterns — and paper decorations are easy to recycle.
How do I make pumpkin string lights for fall decorations?
What materials do I need to decorate with pumpkin lights?
What ages is this pumpkin lights craft suitable for?
Are pumpkin string lights safe and what safety tips should I follow?
