Draw Faces!
Draw expressive faces using simple shapes, pencils, and markers; practice proportions, emotions, and shading while experimenting with different styles and features.

Drawing Apps
Step-by-step guide to Draw Faces
Step 1
Gather your materials and find a comfy well-lit spot to draw.
Step 2
Choose a simple head shape like a circle or oval and lightly draw it with your pencil.
Step 3
Draw a straight vertical centerline down the middle of the head shape.
Step 4
Draw a horizontal eye line halfway down the head to mark where the eyes will sit.
Step 5
Draw two simple eyes on the eye line using circles or almond shapes.
Step 6
Draw a small nose on the centerline between the eye line and the bottom of the head.
Step 7
Draw a mouth below the nose that shows an emotion like a smile frown or surprise.
Step 8
Draw eyebrows and hair that match the emotion you chose to make the face expressive.
Step 9
Add light pencil shading under the chin and along one side of the nose to make the face look 3D.
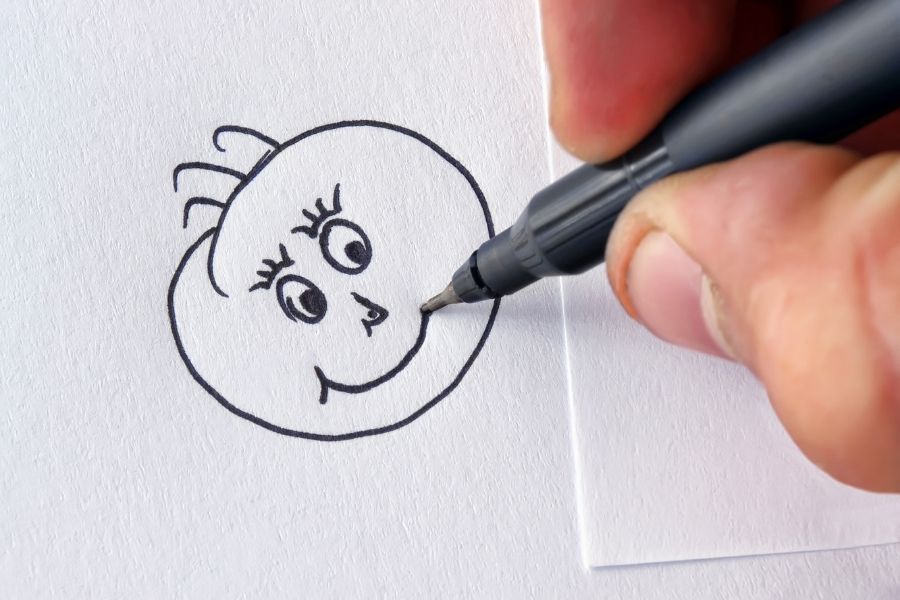
Step 10
Trace the lines you want to keep with your black marker then wait a moment for the ink to dry.
Step 11
Erase the pencil guidelines and then draw a second face in a different style like cartoon or more realistic to compare features.
Step 12
Share your finished faces on DIY.org.
Help!?
I don't have a black marker — what can I use to trace my final lines?
If you don't have a black marker, use a fine-tip black pen or a dark felt-tip pen to trace the lines you want to keep after penciling and then wait for the ink to dry.
My eyes end up uneven or the ink smudges when I erase — how do I fix that?
If the eyes look uneven, re-lightly sketch the vertical centerline and horizontal eye line to reposition the eyes before tracing, and if ink smudges wait longer for the marker to dry or erase gently with a clean eraser after the ink has set.
How can I adapt this Draw Faces activity for different ages?
For preschoolers, provide pre-drawn head shapes and crayons and skip the light pencil shading, while older kids can follow every step including light pencil shading under the chin, tracing with black marker, erasing guidelines, and drawing a second, more realistic face to compare styles.
How can we extend or personalize the faces after finishing both drawings?
After erasing pencil guidelines, add color with colored pencils or watercolors, create a flipbook of changing expressions, or photograph both faces and share them on DIY.org to compare styles and get feedback.
Watch videos on how to Draw Faces
How to Draw a Face for Kids
4 Videos
How to Draw a Face for Kids

How I Practice Drawing FACES (Beginner Friendly)
![HOW TO DRAW FACES FOR BEGINNERS [*EASY TUTORIAL*]](https://img.youtube.com/vi/Fhfx35Lwux8/mqdefault.jpg)
HOW TO DRAW FACES FOR BEGINNERS [*EASY TUTORIAL*]
Learn FACE DRAWING in 9 Minutes with LOOMIS METHOD!!
Facts about drawing facial expressions
😊 People can recognize a familiar face in as little as 100 milliseconds — faces are super fast to spot!
🎨 Portraits go way back — ancient Egyptians painted faces to remember people for thousands of years.
😲 Psychologist Paul Ekman found six basic emotions (like happiness and surprise) that show up in similar facial expressions across cultures.
✏️ A handy drawing rule: the eyes sit about halfway down the head, which helps get facial proportions right.
👀 The face uses about 20 muscles for expressions — that’s why you can make so many different looks!
How do I teach my child to draw expressive faces?
What materials do I need for the Draw Faces! activity?
What ages is the Draw Faces! activity suitable for?
What are the benefits of drawing expressive faces with kids?
