Peek-a-boo Card Challenge
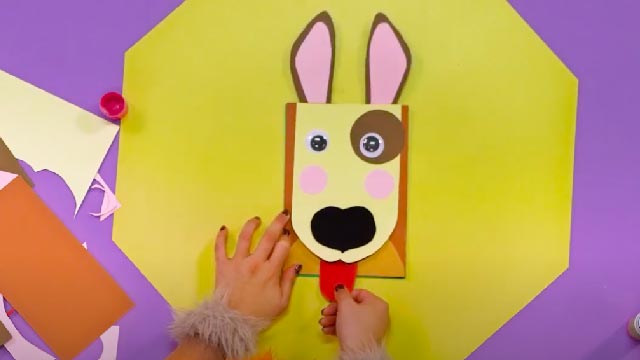
Make a peek-a-boo card with a movable flap, drawing hidden pictures and practicing cutting, folding, and simple mechanisms to surprise friends.


Step-by-step guide to Peek-a-boo Card Challenge
Step 1
Gather all materials and set them on a clean flat table!
Step 2
Choose one piece of cardstock and fold it in half to make the card base.
Step 3
With your pencil lightly draw a rectangle on the front of the folded card where you want the peek opening.
Step 4
Cut along three sides of the rectangle leaving the top side uncut so the cut piece becomes a flap.
Step 5
Open your card fully so you can work inside.
Step 6
On a separate plain paper draw the surprise picture you want to hide.
Step 7
Color the surprise picture using your coloring materials.
Step 8
Hold the colored picture behind the window to decide exactly where it should sit.
Step 9
Put small dots or a thin line of glue on the back of the colored picture.
Step 10
Press the picture onto the inside of the card behind the window until it sticks.
Step 11
Cut a small strip of paper to make a pull tab for the flap.
Step 12
Attach the pull tab to the bottom edge of the flap with glue or tape.
Step 13
Decorate the front of your card around the window without covering the flap edges.
Step 14
Test the flap by gently lifting the pull tab to reveal the hidden picture.
Step 15
Share your finished creation on DIY.org
Help!?
What can we use if we don't have cardstock or special tape?
Use the flattened back of a cereal box or glue two sheets of construction paper together for a sturdy card base, and substitute a glue stick or double-sided tape for the adhesive called for in the instructions.
My flap won't open smoothly or the pull tab keeps coming off — what should I check?
Confirm you only cut three sides of the rectangle (leaving the top uncut) and attach the pull tab to the bottom edge with a small strip of tape or a stronger dab of glue so the flap moves smoothly and the tab stays secure.
How can I adapt the Peek-a-boo Card Challenge for younger or older kids?
For younger children, have an adult pre-draw and pre-cut a larger window and use stickers for the surprise picture, while older kids can draw detailed scenes, add multiple windows, or decorate around the window with more complex materials as in the decorate step.
How can we extend or personalize the finished card beyond the basic instructions?
Make it reusable or more interactive by attaching the colored surprise picture behind the window with a small piece of removable tape so it can be swapped, add extra windows or patterned paper when you decorate the front, or create a pop-up element behind the window for an extra reveal.
Watch videos on how to make a peek-a-boo card
Peek-a-Boo: How This Fun Game Boosts Your Baby's Development | Must-Know Tips for Parents
4 Videos

Peek-a-Boo: How This Fun Game Boosts Your Baby's Development | Must-Know Tips for Parents

Peek A Boo Game for Babies 👶 Fun & Safe Learning for 1-4 Year Olds | Little LaLa's Nursery Rhymes
Preschool Teaching Tips: How To Teach The "Peekaboo" Song
Hide and Seek Face (Peek-a-boo): A Fun Game to Stimulate Baby's Emotions and Cognitive Skills
Facts about paper crafts for kids
👶 Peekaboo helps babies learn object permanence — a key cognitive milestone around 8–12 months!
✂️ Kirigami (paper cutting) comes from Japan and adds flaps, windows, and cut-out surprises to paper art.
📖 Pop-up books use 'paper engineering' techniques like tabs, folds, and living hinges to make pages move.
❤️ About 145 million Valentine's Day cards are exchanged in the U.S. each year — many people treasure handmade cards!
🧩 Simple card mechanisms include flaps, sliders, and rotating wheels you can build with just paper, a brad, and scissors.
How do I make a peek-a-boo card with a movable flap?
What materials do I need for a peek-a-boo flap card?
What ages is the peek-a-boo card challenge suitable for?
What are some variations or safety tips for the peek-a-boo card challenge?
