The Tissue Paper Craft Challenge
Create colorful tissue paper crafts by cutting, layering, and gluing sheets to make flowers, mosaics, and window art while practicing fine motor skills.


Step-by-step guide to create colorful tissue paper crafts
Step 1
Gather your materials and clear a flat workspace.
Step 2
Choose which project to make: flowers mosaics or window art.
Step 3
Prepare your base by laying down construction paper for flowers or mosaics or by sticking a long strip of clear tape sticky-side-up on a window or table for window art.
Step 4
Cut or tear the tissue paper into shapes like squares circles petals and thin strips.
Step 5
Arrange the cut pieces on your base without glue so you can plan colors and placement.
Step 6
Stick the first tissue piece where you want it using a glue stick or by pressing it onto the sticky tape.
Step 7
Continue gluing or pressing pieces in place working from the center outward or top to bottom.
Step 8
Layer smaller pieces on top of larger ones to build petals or add color depth.
Step 9
Fill an area with many small tissue squares placed close together to make a bright mosaic.
Step 10
Seal window art by covering the stuck pieces with another strip of clear tape pressed firmly over the design.
Step 11
Trim any extra tissue or tape that hangs over the edges with scissors.
Step 12
Let your craft dry for at least 15 minutes.
Step 13
Share a photo of your finished creation on DIY.org.
Help!?
What can we use instead of tissue paper, a glue stick, or clear tape if we can't find them?
If you don't have tissue paper use coffee filters, crepe paper, or thin paper napkins cut into shapes, and if you lack a glue stick or clear tape try white school glue (thin a little with water) or double-sided tape for the steps that tell you to press or glue pieces in place.
My tissue pieces keep tearing or won't stick—what should I do during the gluing and pressing steps?
If pieces tear or lift when you 'Stick the first tissue piece' or press onto tape, handle small pieces with tweezers, use a tiny dab of white glue under fragile spots, or press a second strip of clear tape over your window art as the instructions suggest to seal and secure layers.
How can I adapt this activity for different ages, like toddlers versus older kids?
For toddlers, pre-cut large tissue shapes and use double-sided tape so they can complete the 'Arrange the cut pieces' and 'Stick the first tissue piece' steps easily with supervision, while older kids can plan detailed designs during the arranging step and build complex mosaics and layered petals as described.
How can we extend or personalize the project after finishing the basic craft?
To enhance your craft, layer sequins or pressed leaves between tissue sheets before you 'Seal window art' with a final strip of clear tape, trim the edges neatly, add LED backlighting to the window art, or photograph the finished creation to share on DIY.org.
Watch videos on how to create colorful tissue paper crafts
7 DIY paper crafts | Paper toys
4 Videos
7 DIY paper crafts | Paper toys
9 DIY paper crafts | Paper toys
Easy Paper Ball - Paper crafts
13 BEST DIY paper crafts Paper toys
Facts about paper crafts for kids
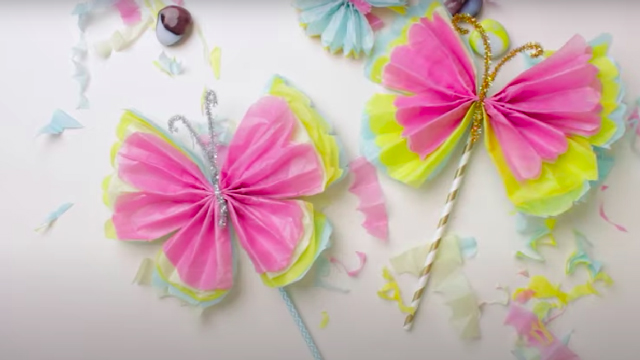
🎨 Tissue paper comes in hundreds of bright colors and is prized for its translucency — overlap sheets to create new colors like magic!
✂️ Kids can make a full tissue-paper flower in about 5 minutes using only a few folds and snips — fast and satisfying!
🪟 Layered tissue-paper mosaics shine like stained glass when taped to windows, turning sunlight into colorful art.
🧠 Cutting, folding, and gluing tissue paper builds fine motor skills and hand–eye coordination — great practice while having fun.
♻️ Uncoated, plain tissue paper can often be composted or recycled, making it an eco-friendly craft material when used carefully.
How do I do The Tissue Paper Craft Challenge with my child?
What materials do I need for The Tissue Paper Craft Challenge?
What ages is The Tissue Paper Craft Challenge suitable for?
What are the benefits of doing The Tissue Paper Craft Challenge?
