Create a Background With Perspective
Draw a background using one-point perspective: establish a horizon, choose a vanishing point, and add buildings, roads, or trees to show depth.


Drawing Apps
Step-by-step guide to create a background with perspective
One Point Perspective Drawing: Easy Art Lesson for Kids
Step 1
Place your paper in landscape orientation on a flat surface.
Step 2
Use your pencil and ruler to draw a straight horizontal horizon line across the middle of the paper.
Step 3
Mark a small dot on the horizon to be your vanishing point.
Step 4
Draw two straight lines from the bottom edge of the paper that meet at the vanishing point to make a road that narrows in the distance.
Step 5
Draw a rectangle near the bottom left or right to be the front face of a close building.
Step 6
Draw straight lines from each corner of that rectangle toward the vanishing point to create the building's sides in perspective.
Step 7
Draw smaller rectangles along the road and connect their corners to the vanishing point to make buildings that look farther away.
Step 8
Draw simple tree trunks and rounded tops along the road that get smaller as they get closer to the vanishing point to show depth.
Step 9
Add windows and doors on the building faces using straight lines that follow your perspective guides.
Step 10
Lightly erase extra construction lines so the main shapes look neat.
Step 11
Trace your final outlines with a black pen to make your drawing stand out.
Step 12
Color and shade your picture using darker colors in the front and lighter colors in the distance to show depth.
Step 13
Share your finished perspective background on DIY.org.
Help!?
What can I use if I don't have a ruler or a sharpened pencil?
Use the straight edge of a hardcover book or the long edge of a cereal box as a ruler and any sharpened pencil or mechanical pencil to draw the horizon and perspective lines.
My building lines don't meet at the vanishing point or look crooked—how can I fix that?
Draw very light guide lines with your pencil, align the ruler so each corner-to-vanishing-point line actually extends to the marked dot, and only erase construction lines after confirming all perspective guides meet the vanishing point.
How can I adapt this project for younger or older kids?
For younger kids pre-draw the horizon and vanishing point and let them color or place simplified rectangles and tree shapes, while older kids can add more buildings along the road, detailed windows and doors, stronger shading, or try adding a second vanishing point for complexity.
What are some ways to extend or personalize the finished background?
Add people, cars, signs, and consistent shadows based on a chosen light source, use watercolor washes or colored pencils so the front is darker and the distance lighter as instructed, and trace with black pen before sharing on DIY.org.
Watch videos on how to create a background with perspective
Draw One Point Perspective // School Hallway // Art Lessons + Projects for Kids
4 Videos
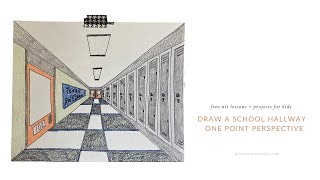
Draw One Point Perspective // School Hallway // Art Lessons + Projects for Kids
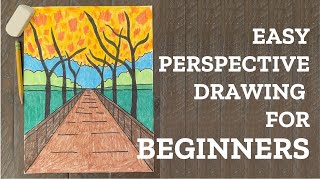
How to Draw Perspective for Beginners
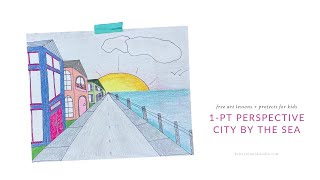
Draw One Point Perspective // A City by the Sea // Art Lesson and Project for Kids
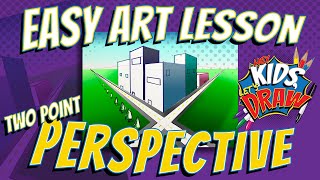
How to Draw Two-Point Perspective - Easy Art Lesson for Kids
Facts about perspective drawing
🎯 A vanishing point is where parallel lines appear to meet on the horizon — a trick artists use to show depth!
🛣️ Look at railroad tracks: they’re a classic real-life example of one-point perspective.
👀 Our eyes use perspective cues (like size and overlap) to judge distance, which artists copy with vanishing points.
🏛️ Filippo Brunelleschi is credited with formalizing linear perspective in the early 1400s during the Renaissance.
🖼️ One-point perspective is perfect for drawing streets, hallways, or rows of buildings that recede straight away.
How do you create a background using one-point perspective?
What materials do I need to draw a one-point perspective background?
What ages is this one-point perspective background activity suitable for?
What are the benefits and variations of doing a one-point perspective background?
