Design a home for an animation's main character
Design and build a miniature home for an animated main character using cardboard, paper, glue, and markers, planning rooms and unique features.


Step-by-step guide to design a home for an animation's main character
Easy Canva Tutorial - Create Your Own Cartoon Characters
Step 1
Pick the animated main character you will build a home for.
Step 2
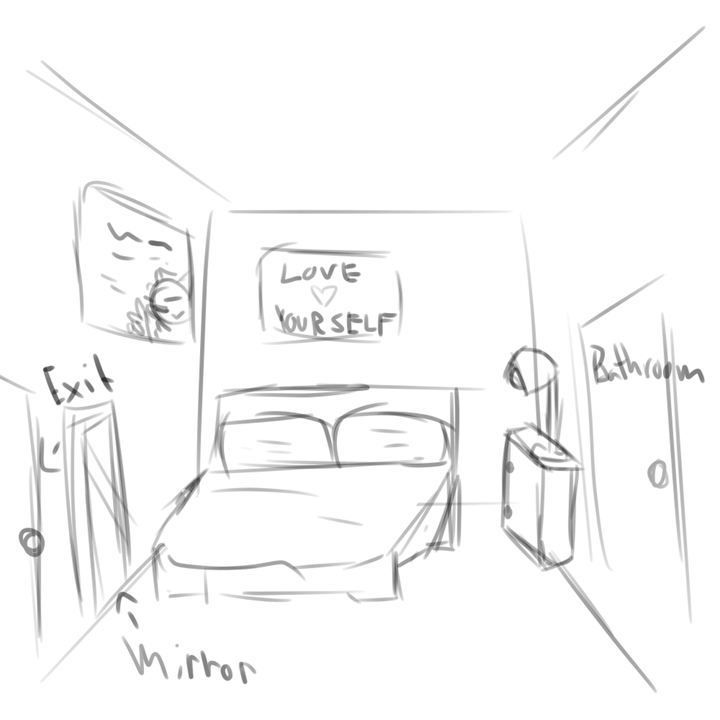
Sketch a simple floor plan on paper showing the rooms and any special features.
Step 3
Choose the overall size of your miniature house.
Step 4
Use a ruler to mark the base and wall outlines on the cardboard.
Step 5
Carefully cut out the base and the walls from the cardboard.
Step 6
Fold and attach the walls to the base using glue or tape to make the house shell.
Step 7
Cut interior walls and floor panels from cardboard to match your floor plan.
Step 8
Glue the interior walls and floors into place inside the house shell.
Step 9
Make simple furniture by cutting and folding cardboard scraps.
Step 10
Decorate each room by drawing wallpaper and rugs with markers and paper.
Step 11
Design one special feature on paper such as a tiny bookshelf or a secret trapdoor.
Step 12
Cut that special feature from cardboard or paper.
Step 13
Glue the special feature into the house where it belongs.
Step 14
Place your animated character inside and arrange the rooms and furniture.
Step 15
Share your finished miniature home on DIY.org.
Help!?
What can I use if I can't find thick cardboard, a ruler, or glue?
If you don’t have thick cardboard for the base and walls, use cereal‑box or shoebox cardboard, and if you lack a ruler or glue use a book edge to mark lines and clear tape to attach folds.
My walls won't stay upright or the seams come apart—what should I do?
If walls fall over or seams come apart after you cut and fold the walls, score fold lines with a blunt knife, reinforce glued joints with extra tape or hot glue, and hold pieces in place with clothespins while drying.
How can I adapt the activity for different ages?
For younger kids, pre‑draw and pre‑cut the base, walls, and simple furniture so they can glue and decorate with markers, while older kids can use a ruler to scale a detailed floor plan, make precise interior walls and a functional secret trapdoor, and use stronger adhesives.
How can we extend or personalize the miniature house project?
To extend the project, add LED tea‑light wiring under the floor panels, fabric scraps for rugs, paint or patterned paper for wallpaper, and make the roof removable so you can animate your character and then share the finished miniature home on DIY.org.
Watch videos on how to design a home for an animation's main character
How to Create Animated Educational Video for Kids - Full Tutorial 🎨📚
4 Videos
How to Create Animated Educational Video for Kids - Full Tutorial 🎨📚

How to Create Animated Videos Using Canva for FREE
How to Create Animated Kids' Story Videos with AI for FREE! | Step-by-Step Tutorial

How to Make Kids 3D - Animated Stories Video | Fast, Easy and Free
Facts about model making and set design for kids
🏠 In animation, a character's home is often designed to show personality — set designers hide clues about backstory in rooms and props.
♻️ Cardboard is lightweight, inexpensive, and fully recyclable — it's a favorite material for quick, eco-friendly prototypes.
📏 Traditional dollhouses often use 1:12 scale, meaning 1 inch in the model equals 1 foot in real life — a handy rule for planning room sizes.
🎬 Stop-motion films like Coraline use handcrafted miniature sets to build rich, tactile worlds for their characters.
🖍️ Washable markers and white school glue are kid-safe, dry quickly, and make decorating tiny rooms fun and easy.
How do I help my child design and build a miniature home for an animated character?
What materials do I need to build a miniature home for a character?
What ages is this miniature home project suitable for?
What are the benefits of designing a miniature home for an animated character?
