Draw a snowy silhouette with mixed media
Create a snowy silhouette scene using mixed media: sketch trees and figures, paint backgrounds, add torn paper, salt, and white paint for texture.


Step-by-step guide to draw a snowy silhouette with mixed media
Step 1
Clear a flat workspace and protect it with scrap paper or a paper towel so your paints and glue won’t make a mess.
Step 2
Use a pencil to lightly sketch a horizon line and the shapes of trees and figures where you want your silhouettes.
Step 3
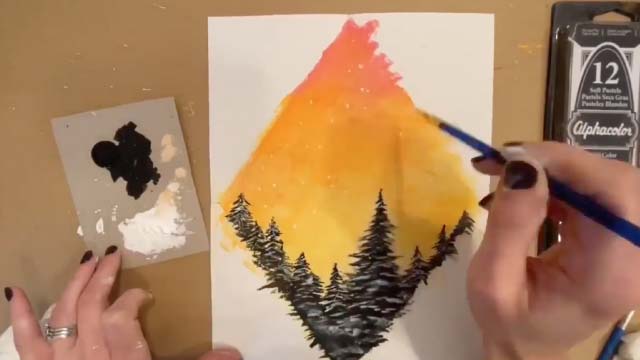
Trace and fill the trees and figures with a black marker or black paint so they become dark silhouettes.
Step 4
Paint a colorful sky background around the silhouettes using watercolors or tempera, blending colors from top to bottom.
Step 5
While the background paint is still wet sprinkle salt lightly over the painted sky to create textured sparkles as it dries.
Step 6
Let the paint dry completely so the salt can set into the texture.
Step 7
Gently brush off the dry salt with your finger or a dry brush to reveal the starry snowy texture.
Step 8
Tear scrap white paper into snowdrift shapes to build up snowy ground and small snow patches.
Step 9
Arrange the torn paper snow where you like on the page to check placement before gluing.
Step 10
Glue each torn paper snowdrift onto the page and press gently so they stick flat.
Step 11
Use white paint to dot or splatter falling snowflakes and to add bright highlights on the torn-paper snow.
Step 12
Add small white paint details on tree branches and figures for snow resting on them.
Step 13
Let the whole artwork dry completely before moving it.
Step 14
Share your finished snowy silhouette on DIY.org
Help!?
What can we use if we don't have salt to sprinkle over the wet sky paint?
If you don't have salt for the step 'While the background paint is still wet sprinkle salt...', substitute coarse sea salt or granulated sugar for a similar textured sparkle or sprinkle fine craft glitter for a shinier effect.
My sky didn't get sparkly because the paint dried too fast—how can I fix it?
If the salt doesn't create texture because the background paint dried, lightly re-wet the painted sky area and reapply salt immediately while the paint is damp, and next time work quickly through the 'paint the sky' and 'sprinkle salt' steps.
How can I adapt the steps for younger kids or make it more challenging for older kids?
For younger children, skip the watercolor blending and offer pre-drawn silhouette templates plus pre-torn snowdrifts to glue, while older kids can freehand complex silhouettes, layer multiple torn-paper drifts, and add fine white paint splatter and branch highlights.
What are some ways to extend or personalize the snowy silhouette artwork?
To extend the project, add cotton batting or torn tissue over glued snowdrifts for 3D texture, use metallic or iridescent paint for highlights on tree branches and snow, or press small sequins into wet white paint splatters for extra sparkle before drying.
Watch videos on how to draw a snowy silhouette with mixed media
6 SIMPLE Mixed Media TECHNIQUES
4 Videos
6 SIMPLE Mixed Media TECHNIQUES
EASY mixed media TECHNIQUES

I Tried 100 Mixed Media Techniques

Mixed Media Art: The Ultimate Tips & Tools Revealed!
Facts about mixed-media art for kids
❄️ Salt sprinkled on wet watercolor pushes pigment away and leaves sparkly starburst textures — artists love it for snowy effects.
🎨 Gouache is an opaque watercolor paint used for bright, flat whites — perfect for snow highlights and crisp silhouettes.
✂️ Tearing paper instead of cutting it makes softer, irregular edges that look more natural for snowy tree lines.
👤 The word “silhouette” comes from Étienne de Silhouette, an 18th-century French finance minister; quick profile cutouts became a popular art form.
🔳 Strong dark silhouettes on pale backgrounds are super readable from far away — great for dramatic snowy scenes.
How do you create a snowy silhouette scene using mixed media?
What materials do I need for a snowy silhouette mixed-media project?
What ages is this snowy silhouette activity suitable for?
What safety tips should I follow for this snowy silhouette craft?
